
1. Before you begin
This codelab teaches you how to use classes and objects in Kotlin.
Classes provide blueprints from which objects can be constructed. An object is an instance of a class that consists of data specific to that object. You can use objects or class instances interchangeably.
As an analogy, imagine that you build a house. A class is similar to an architect's design plan, also known as a blueprint. The blueprint isn't the house; it's the instruction for how to build the house. The house is the actual thing, or object, which is built based on the blueprint.
Just like the house blueprint specifies multiple rooms and each room has its own design and purpose, each class has its own design and purpose. To know how to design your classes, you need to get familiar with object-oriented programming (OOP), a framework that teaches you to enclose data, logic, and behavior in objects.
OOP helps you simplify complex, real-world problems into smaller objects. There are four basic concepts of OOP, each of which you learn more about later in this codelab:
- Encapsulation. Wraps the related properties and methods that perform action on those properties in a class. For example, consider your mobile phone. It encapsulates a camera, display, memory cards, and several other hardware and software components. You don't have to worry about how components are wired internally.
- Abstraction. An extension to encapsulation. The idea is to hide the internal implementation logic as much as possible. For example, to take a photo with your mobile phone, all you need to do is open the camera app, point your phone to the scene that you want to capture, and click a button to capture the photo. You don't need to know how the camera app is built or how the camera hardware on your mobile phone actually works. In short, the internal mechanics of the camera app and how a mobile camera captures the photos are abstracted to let you perform the tasks that matter.
- Inheritance. Enables you to build a class upon the characteristics and behavior of other classes by establishing a parent-child relationship. For example, there are different manufacturers who produce a variety of mobile devices that run Android OS, but the UI for each of the devices is different. In other words, the manufacturers inherit the Android OS feature and build their customizations on top of it.
- Polymorphism. The word is an adaptation of the Greek root poly-, which means many, and -morphism, which means forms. Polymorphism is the ability to use different objects in a single, common way. For example, when you connect a Bluetooth speaker to your mobile phone, the phone only needs to know that there's a device that can play audio over Bluetooth. However, there are a variety of Bluetooth speakers that you can choose from and your phone doesn't need to know how to work with each of them specifically.
Lastly, you learn about property delegates, which provide reusable code to manage property values with a concise syntax. In this codelab, you learn these concepts when you build a class structure for a smart-home app.
Prerequisites
- How to open, edit, and run code in Kotlin Playground.
- Knowledge of Kotlin programming basics, including variables, functions, and the
println()andmain()functions
What you'll learn
- An overview of OOP.
- What classes are.
- How to define a class with constructors, functions, and properties.
- How to instantiate an object.
- What inheritance is.
- The difference between IS-A and HAS-A relationships.
- How to override properties and functions.
- What visibility modifiers are.
- What a delegate is and how to use the
bydelegate.
What you'll build
- A smart-home class structure.
- Classes that represent smart devices, such as a smart TV and a smart light.
What you'll need
- A computer with internet access and a web browser
2. Define a class
When you define a class, you specify the properties and methods that all objects of that class should have.
A class definition starts with the class keyword, followed by a name and a set of curly braces. The part of the syntax before the opening curly brace is also referred to as the class header. In the curly braces, you can specify properties and functions for the class. You learn about properties and functions soon. You can see the syntax of a class definition in this diagram:

These are the recommended naming conventions for a class:
- You can choose any class name that you want, but don't use Kotlin keywords as a class name, such as the
funkeyword. - The class name is written in PascalCase, so each word begins with a capital letter and there are no spaces between the words. For example, in SmartDevice, the first letter of each word is capitalized and there isn't a space between the words.
A class consists of three major parts:
- Properties. Variables that specify the attributes of the class's objects.
- Methods. Functions that contain the class's behaviors and actions.
- Constructors. A special member function that creates instances of the class throughout the program in which it's defined.
This isn't the first time that you've worked with classes. In previous codelabs, you learned about data types, such as the Int, Float, String, and Double data types. These data types are defined as classes in Kotlin. When you define a variable as shown in this code snippet, you create an object of the Int class, which is instantiated with a 1 value:
val number: Int = 1
Define a SmartDevice class:
- In Kotlin Playground, replace the content with an empty
main()function:
fun main() {
}
- On the line before the
main()function, define aSmartDeviceclass with a body that includes an//emptybodycomment:
class SmartDevice {
    // empty body
}

fun main() {
}
3. Create an instance of a class
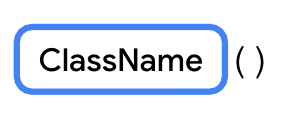
As you learned, a class is a blueprint for an object. The Kotlin runtime uses the class, or blueprint, to create an object of that particular type. With the SmartDevice class, you have a blueprint of what a smart device is. To have an actual smart device in your program, you need to create a SmartDevice object instance. The instantiation syntax starts with the class name followed by a set of parentheses as you can see in this diagram:
To use an object, you create the object and assign it to a variable, similar to how you define a variable. You use the val keyword to create an immutable variable and the var keyword for a mutable variable. The val or var keyword is followed by the name of the variable, then an = assignment operator, then the instantiation of the class object. You can see the syntax in this diagram:

Instantiate the SmartDevice class as an object:
- In the
main()function, use thevalkeyword to create a variable namedsmartTvDeviceand initialize it as an instance of theSmartDeviceclass:
fun main() {
    val smartTvDevice = SmartDevice()
}
4. Define class methods
In Unit 1, you learned that:
- The definition of a function uses the
funkeyword followed by a set of parentheses and a set of curly braces. The curly braces contain code, which are the instructions needed to execute a task. - The calling of a function causes the code contained in that function to execute.
Actions that the class can perform are defined as functions in the class. For example, imagine that you own a smart device, a smart TV, or a smart light, which you can switch on and off with your mobile phone. The smart device is translated to the SmartDevice class in programming, and the action to switch it on and off is represented by the turnOn() and turnOff() functions, which enable the on and off behavior.
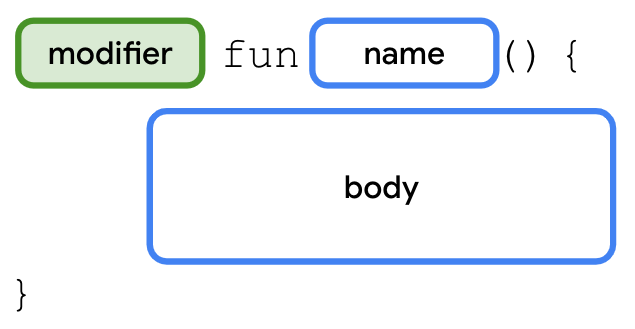
The syntax to define a function in a class is identical to what you learned before. The only difference is that the function is placed in the class body. When you define a function in the class body, it's referred to as a member function or a method, and it represents the behavior of the class. For the rest of this codelab, functions are referred to as methods whenever they appear in the body of a class.
Define a turnOn() and turnOff()method in the SmartDevice class:
- In the body of the
SmartDeviceclass, define aturnOn()method with an empty body:
class SmartDevice {
    fun turnOn() {

    }
}
- In the body of the
turnOn()method, add aprintln()statement and then pass it a"Smartdeviceisturnedon."string:
class SmartDevice {
    fun turnOn() {
        println("Smart device is turned on.")
    }
}
- After the
turnOn()method, add aturnOff()method that prints a"Smartdeviceisturnedoff."string:
class SmartDevice {
    fun turnOn() {
        println("Smart device is turned on.")
    }

    fun turnOff() {
        println("Smart device is turned off.")
    }
}
Call a method on an object
So far, you defined a class that serves as a blueprint for a smart device, created an instance of the class, and assigned the instance to a variable. Now you use the SmartDevice class's methods to turn the device on and off.
The call to a method in a class is similar to how you called other functions from the main() function in the previous codelab. For example, if you need to call the turnOff() method from the turnOn() method, you can write something similar to this code snippet:
class SmartDevice {
    fun turnOn() {
        // A valid use case to call the turnOff() method could be to turn off the TV when available power doesn't meet the requirement.
        turnOff()
        ...
    }

    ...
}
To call a class method outside of the class, start with the class object followed by the . operator, the name of the function, and a set of parentheses. If applicable, the parentheses contain arguments required by the method. You can see the syntax in this diagram:

Call the turnOn() and turnOff() methods on the object:
- In the
main()function on the line after thesmartTvDevicevariable, call theturnOn()method:
fun main() {
    val smartTvDevice = SmartDevice()
    smartTvDevice.turnOn()
}
- On the line after the
turnOn()method, call theturnOff()method:
fun main() {
    val smartTvDevice = SmartDevice()
    smartTvDevice.turnOn()
    smartTvDevice.turnOff()
}
- Run the code.
The output is the following:
Smart device is turned on.
Smart device is turned off.
5. Define class properties
In Unit 1, you learned about variables, which are containers for single pieces of data. You learned how to create a read-only variable with the val keyword and a mutable variable with the var keyword.
While methods define the actions that a class can perform, the properties define the class's characteristics or data attributes. For example, a smart device has these properties:
- Name. Name of the device.
- Category. Type of smart device, such as entertainment, utility, or cooking.
- Device status. Whether the device is on, off, online, or offline. The device is considered online when it's connected to the internet. Otherwise, it's considered offline.
Properties are basically variables that are defined in the class body instead of the function body. This means that the syntax to define properties and variables are identical. You define an immutable property with the val keyword and a mutable property with the var keyword.
Implement the aforementioned characteristics as properties of the SmartDevice class:
- On the line before the
turnOn()method, define thenameproperty and assign it to an"AndroidTV"string:
class SmartDevice {

    val name = "Android TV"

    fun turnOn() {
        println("Smart device is turned on.")
    }

    fun turnOff() {
        println("Smart device is turned off.")
    }
}
- On the line after the
nameproperty, define thecategoryproperty and assign it to an"Entertainment"string, and then define adeviceStatusproperty and assign it to an"online"string:
class SmartDevice {

    val name = "Android TV"
    val category = "Entertainment"
    var deviceStatus = "online"

    fun turnOn() {
        println("Smart device is turned on.")
    }

    fun turnOff() {
        println("Smart device is turned off.")
    }
}
- On the line after the
smartTvDevicevariable, call theprintln()function and then pass it a"Devicenameis:${smartTvDevice.name}"string:
fun main() {
    val smartTvDevice = SmartDevice()
    println("Device name is: ${smartTvDevice.name}")
    smartTvDevice.turnOn()
    smartTvDevice.turnOff()
}
- Run the code.
The output is the following:
Device name is: Android TV
Smart device is turned on.
Smart device is turned off.
Getter and setter functions in properties
Properties can do more than a variable can. For example, imagine that you create a class structure to represent a smart TV. One of the common actions that you perform is increase and decrease the volume. To represent this action in programming, you can create a property named speakerVolume, which holds the current volume level set on the TV speaker, but there's a range in which the value for volume resides. The minimum volume one can set is 0, while the maximum is 100. To ensure that the speakerVolume property never exceeds 100 or falls below 0, you can write a setter function. When you update the value of the property, you need to check whether the value is in the range of 0 to 100. As another example, imagine that there's a requirement to ensure that the name is always in uppercase. You can implement a getter function to convert the name property to uppercase.
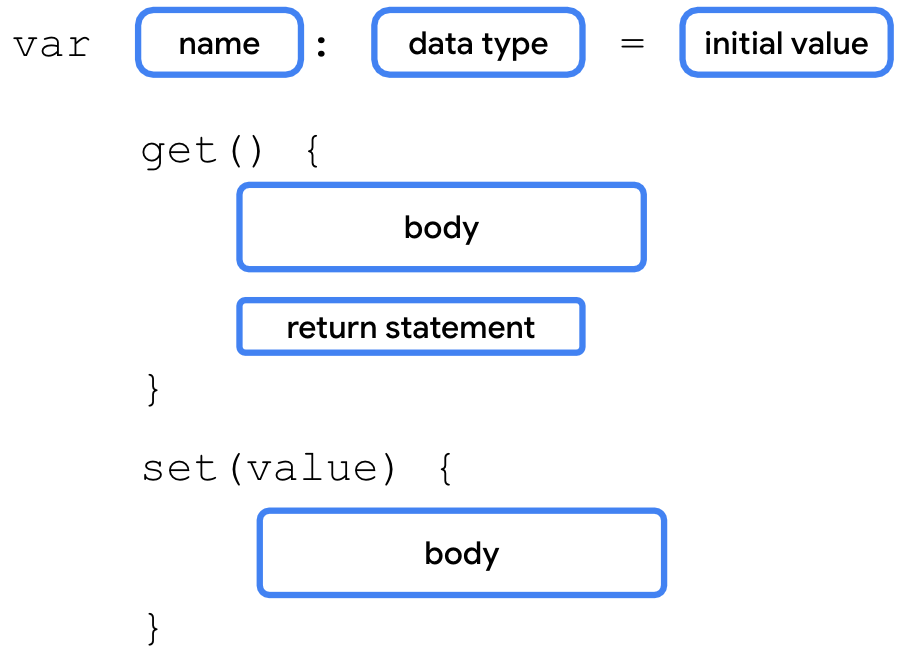
Before going deeper into how to implement these properties, you need to understand the full syntax to declare them. The full syntax to define a mutable property starts with the variable definition followed by the optional get() and set() functions. You can see the syntax in this diagram:
When you don't define the getter and setter function for a property, the Kotlin compiler internally creates the functions. For example, if you use the var keyword to define a speakerVolume property and assign it a 2 value, the compiler autogenerates the getter and setter functions as you can see in this code snippet:
var speakerVolume = 2
    get() = field
    set(value) {
        field = value
    }
You won't see these lines in your code because they're added by the compiler in the background.
The full syntax for an immutable property has two differences:
- It starts with the
valkeyword. - The variables of
valtype are read-only variables, so they don't haveset()functions.
Kotlin properties use a backing field to hold a value in memory. A backing field is basically a class variable defined internally in the properties. A backing field is scoped to a property, which means that you can only access it through the get() or set() property functions.
To read the property value in the get() function or update the value in the set() function, you need to use the property's backing field. It's autogenerated by the Kotlin compiler and referenced with a field identifier.
For example, when you want to update the property's value in the set() function, you use the set() function's parameter, which is referred to as the value parameter, and assign it to the field variable as you can see in this code snippet:
var speakerVolume = 2
    set(value) {
        field = value
    }
For example, to ensure that the value assigned to the speakerVolume property is in the range of 0 to 100, you could implement the setter function as you can see in this code snippet:
var speakerVolume = 2
    set(value) {
        if (value in 0..100) {
            field = value
        }
    }
The set() functions check whether the Int value is in a range of 0 to 100 by using the in keyword followed by the range of value. If the value is in the expected range, the field value is updated. If not, the property's value remains unchanged.
You include this property in a class in the Implement a relationship between classes section of this codelab, so you don't need to add the setter function to the code now.
6. Define a constructor
The primary purpose of the constructor is to specify how the objects of the class are created. In other words, constructors initialize an object and make the object ready for use. You did this when you instantiated the object. The code inside the constructor executes when the object of the class is instantiated. You can define a constructor with or without parameters.
Default constructor
A default constructor is a constructor without parameters. You can define a default constructor as shown in this code snippet:
class SmartDevice constructor() {
    ...
}
Kotlin aims to be concise, so you can remove the constructor keyword if there are no annotations or visibility modifiers, which you learn about soon, on the constructor. You can also remove the parentheses if the constructor has no parameters as shown in this code snippet:
class SmartDevice {
    ...
}
The Kotlin compiler autogenerates the default constructor. You won't see the autogenerated default constructor in your code because it's added by the compiler in the background.
Define a parameterized constructor
In the SmartDevice class, the name and category properties are immutable. You need to ensure that all the instances of the SmartDevice class initialize the name and category properties. With the current implementation, the values for the name and category properties are hardcoded. This means that all the smart devices are named with the "Android TV" string and categorized with the "Entertainment" string.
To maintain immutability but avoid hardcoded values, use a parameterized constructor to initialize them:
- In the
SmartDeviceclass, move thenameandcategoryproperties to the constructor without assigning default values:
class SmartDevice(val name: String, val category: String) {

    var deviceStatus = "online"

    fun turnOn() {
        println("Smart device is turned on.")
    }

    fun turnOff() {
        println("Smart device is turned off.")
    }
}
The constructor now accepts parameters to set up its properties, so the way to instantiate an object for such a class also changes. You can see the full syntax to instantiate an object in this diagram:

This is the code representation:
SmartDevice("Android TV", "Entertainment")
Both arguments to the constructor are strings. It's a bit unclear as to which parameter the value should be assigned. To fix this, similar to how you passed function arguments, you can create a constructor with named arguments as shown in this code snippet:
SmartDevice(name = "Android TV", category = "Entertainment")
There are two main types of constructors in Kotlin:
- Primary constructor. A class can have only one primary constructor, which is defined as part of the class header. A primary constructor can be a default or parameterized constructor. The primary constructor doesn't have a body. That means that it can't contain any code.
- Secondary constructor. A class can have multiple secondary constructors. You can define the secondary constructor with or without parameters. The secondary constructor can initialize the class and has a body, which can contain initialization logic. If the class has a primary constructor, each secondary constructor needs to initialize the primary constructor.
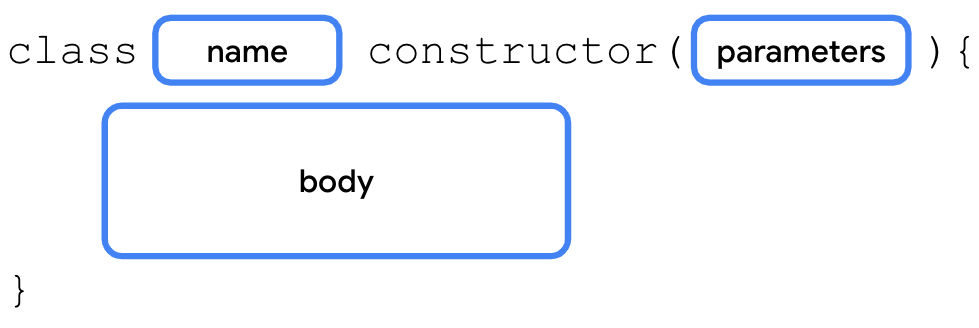
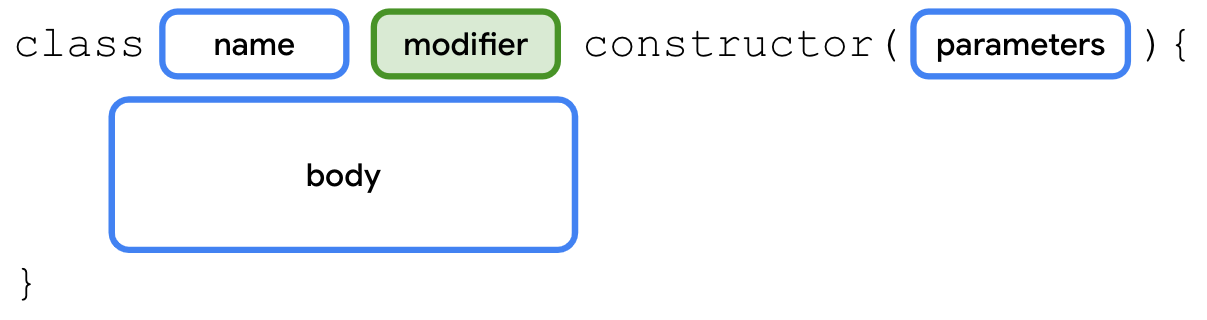
You can use the primary constructor to initialize properties in the class header. The arguments passed to the constructor are assigned to the properties. The syntax to define a primary constructor starts with the class name followed by the constructor keyword and a set of parentheses. The parentheses contain the parameters for the primary constructor. If there's more than one parameter, commas separate the parameter definitions. You can see the full syntax to define a primary constructor in this diagram:
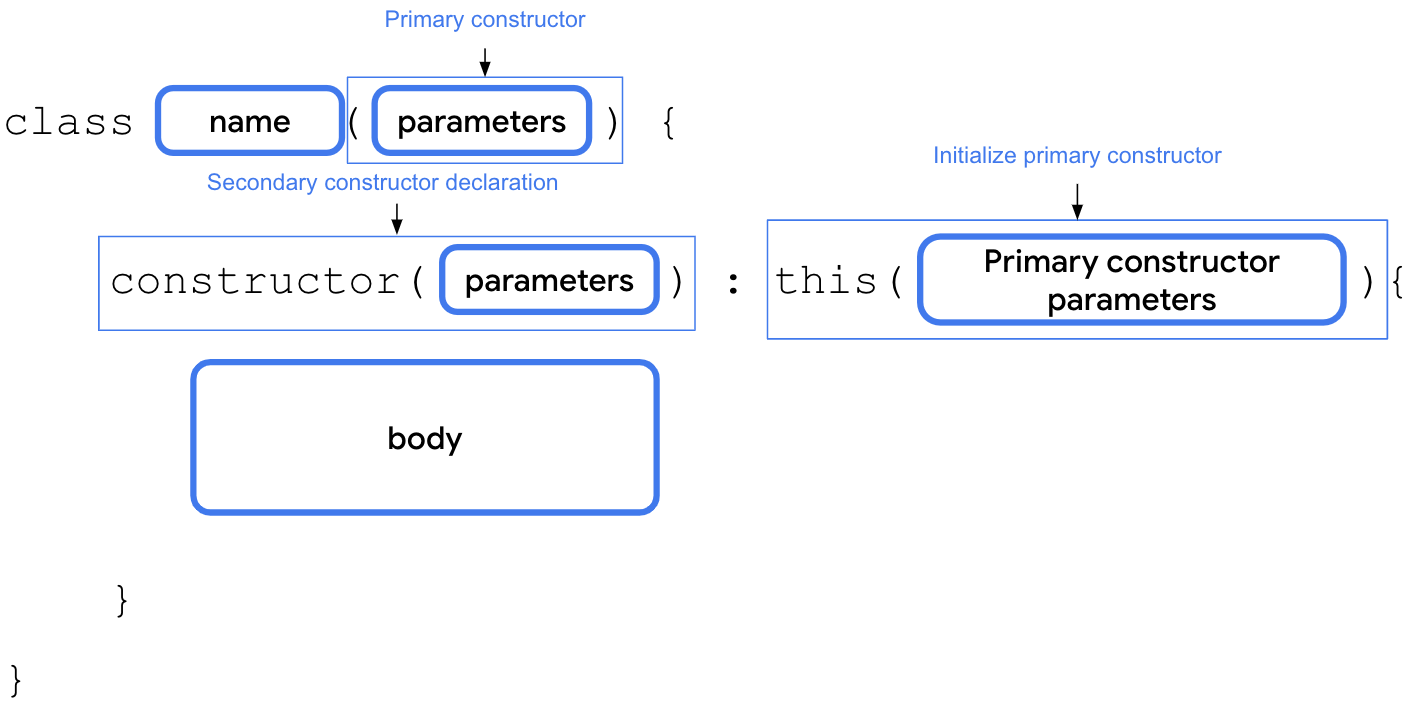
The secondary constructor is enclosed in the body of the class and its syntax includes three parts:
- Secondary constructor declaration. The secondary constructor definition starts with the
constructorkeyword followed by parentheses. If applicable, the parentheses contain the parameters required by the secondary constructor. - Primary constructor initialization. The initialization starts with a colon followed by the
thiskeyword and a set of parentheses. If applicable, the parentheses contain the parameters required by the primary constructor. - Secondary constructor body. Initialization of the primary constructor is followed by a set of curly braces, which contain the secondary constructor's body.
You can see the syntax in this diagram:
For example, imagine that you want to integrate an API developed by a smart-device provider. However, the API returns status code of Int type to indicate initial device status. The API returns a 0 value if the device is offline and a 1 value if the device is online. For any other integer value, the status is considered unknown. You can create a secondary constructor in the SmartDevice class to convert this statusCode parameter to string representation as you can see in this code snippet:
class SmartDevice(val name: String, val category: String) {
    var deviceStatus = "online"

    constructor(name: String, category: String, statusCode: Int) : this(name, category) {
        deviceStatus = when (statusCode) {
            0 -> "offline"
            1 -> "online"
            else -> "unknown"
        }
    }
    ...
}
7. Implement a relationship between classes
Inheritance lets you build a class upon the characteristics and behavior of another class. It's a powerful mechanism that helps you write reusable code and establish relationships between classes.
For example, there are many smart devices in the market, such as smart TVs, smart lights, and smart switches. When you represent smart devices in programming, they share some common properties, such as a name, category, and status. They also have common behaviors, such as the ability to turn them on and off.
However, the way to turn on or turn off each smart device is different. For example, to turn on a TV, you might need to turn on the display, and then set up the last known volume level and channel. On the other hand, to turn on a light, you might only need an increase or decrease to the brightness.
Also, each of the smart devices has more functions and actions that they can perform. For example, with a TV, you can adjust the volume and change the channel. With a light, you can adjust the brightness or color.
In short, all smart devices have different features, yet share some common characteristics. You can either duplicate these common characteristics to each of the smart device classes or make the code reusable with inheritance.
To do so, you need to create a SmartDevice parent class, and define these common properties and behaviors. Then, you can create child classes, such as the SmartTvDevice and SmartLightDevice classes, which inherit the properties of the parent class.
In programming terms, we say that the SmartTvDevice and SmartLightDevice classes extend the SmartDevice parent class. The parent class is also referred to as a superclass and the child class as a subclass. You can see the relationship between them in this diagram:
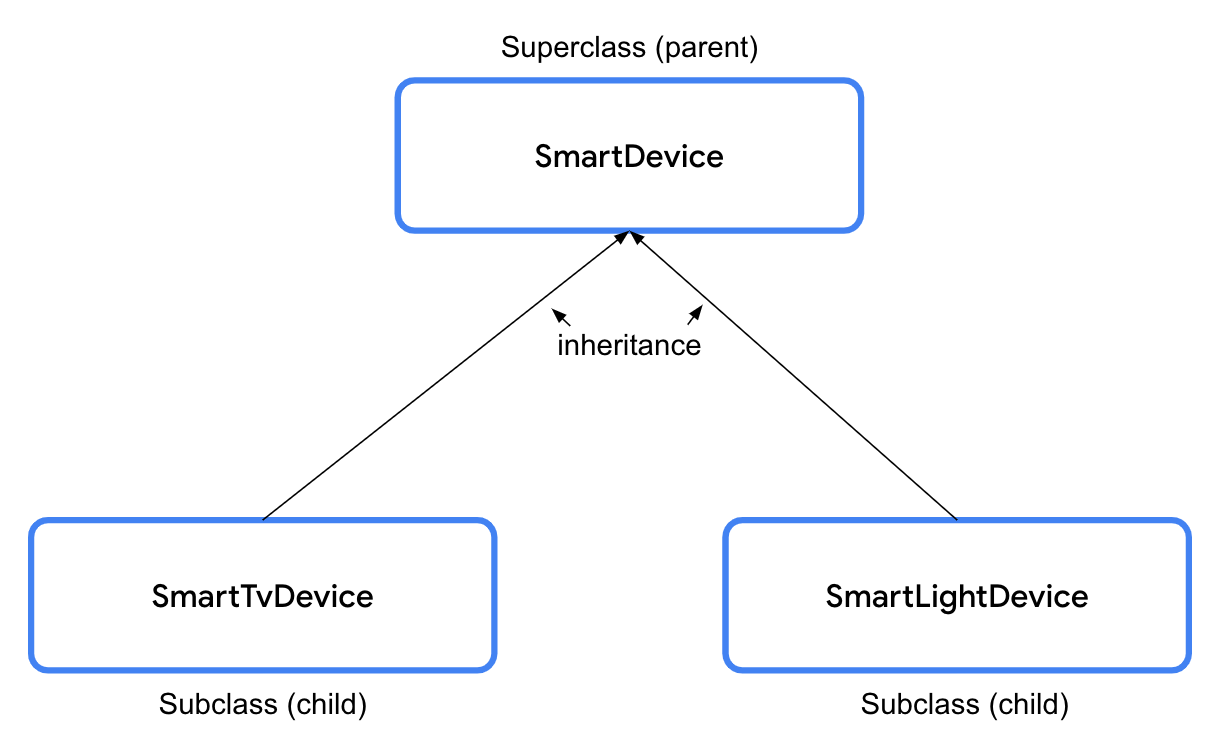
However, in Kotlin, all the classes are final by default, which means that you can't extend them, so you have to define the relationships between them.
Define the relationship between the SmartDevice superclass and its subclasses:
- In the
SmartDevicesuperclass, add anopenkeyword before theclasskeyword to make it extendable:
open class SmartDevice(val name: String, val category: String) {
    ...
}
The open keyword informs the compiler that this class is extendable, so now other classes can extend it.
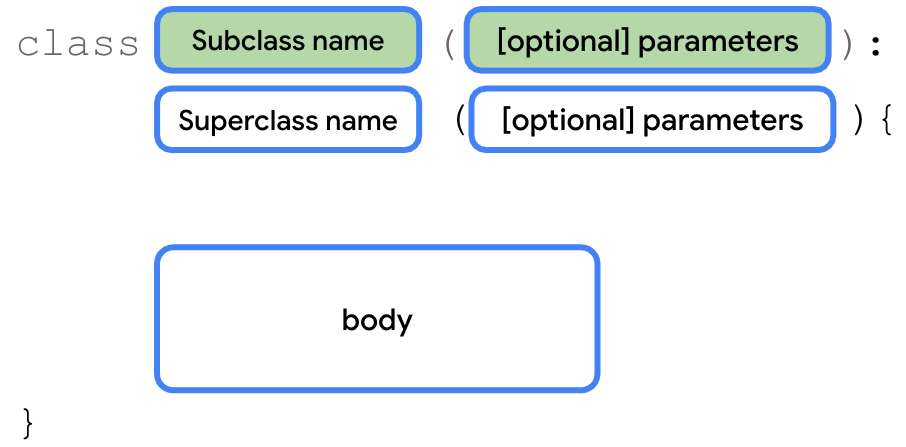
The syntax to create a subclass starts with the creation of the class header as you've done so far. The constructor's closing parenthesis is followed by a space, a colon, another space, the superclass name, and a set of parentheses. If necessary, the parentheses include the parameters required by the superclass constructor. You can see the syntax in this diagram:
- Create a
SmartTvDevicesubclass that extends theSmartDevicesuperclass:
class SmartTvDevice(deviceName: String, deviceCategory: String) :
    SmartDevice(name = deviceName, category = deviceCategory) {
}
The constructor definition for SmartTvDevice doesn't specify whether the properties are mutable or immutable. This means that the deviceName and deviceCategory parameters are merely constructor parameters instead of class properties. You won't be able to use them in the class, but simply pass them to the superclass constructor.
- In the
SmartTvDevicesubclass body, add thespeakerVolumeproperty that you created when you learned about the getter and setter functions:
class SmartTvDevice(deviceName: String, deviceCategory: String) :
    SmartDevice(name = deviceName, category = deviceCategory) {

    var speakerVolume = 2
        set(value) {
            if (value in 0..100) {
                field = value
            }
        }
}
- Define a
channelNumberproperty assigned to a1value with a setter function that specifies a0..200range:
class SmartTvDevice(deviceName: String, deviceCategory: String) :
    SmartDevice(name = deviceName, category = deviceCategory) {

    var speakerVolume = 2
        set(value) {
            if (value in 0..100) {
                field = value
            }
        }

    var channelNumber = 1
        set(value) {
            if (value in 0..200) {
                field = value
            }
        }
}
- Define an
increaseSpeakerVolume()method that increases the volume and prints a"Speakervolumeincreasedto$speakerVolume."string:
class SmartTvDevice(deviceName: String, deviceCategory: String) :
    SmartDevice(name = deviceName, category = deviceCategory) {

    var speakerVolume = 2
        set(value) {
            if (value in 0..100) {
                field = value
            }
        }

     var channelNumber = 1
        set(value) {
            if (value in 0..200) {
                field = value
            }
        }

    fun increaseSpeakerVolume() {
        speakerVolume++
        println("Speaker volume increased to $speakerVolume.")
    }
}
- Add a
nextChannel()method that increases the channel number and prints a"Channelnumberincreasedto$channelNumber."string:
class SmartTvDevice(deviceName: String, deviceCategory: String) :
    SmartDevice(name = deviceName, category = deviceCategory) {

    var speakerVolume = 2
        set(value) {
            if (value in 0..100) {
                field = value
            }
        }

    var channelNumber = 1
        set(value) {
            if (value in 0..200) {
                field = value
            }
        }

    fun increaseSpeakerVolume() {
        speakerVolume++
        println("Speaker volume increased to $speakerVolume.")
    }

    fun nextChannel() {
        channelNumber++
        println("Channel number increased to $channelNumber.")
    }
}
- On the line after the
SmartTvDevicesubclass, define aSmartLightDevicesubclass that extends theSmartDevicesuperclass:
class SmartLightDevice(deviceName: String, deviceCategory: String) :
    SmartDevice(name = deviceName, category = deviceCategory) {
}
- In the
SmartLightDevicesubclass body, define abrightnessLevelproperty assigned to a0value with a setter function that specifies a0..100range:
class SmartLightDevice(deviceName: String, deviceCategory: String) :
    SmartDevice(name = deviceName, category = deviceCategory) {

    var brightnessLevel = 0
        set(value) {
            if (value in 0..100) {
                field = value
            }
        }
}
- Define an
increaseBrightness()method that increases the brightness of the light and prints a"Brightnessincreasedto$brightnessLevel."string:
class SmartLightDevice(deviceName: String, deviceCategory: String) :
    SmartDevice(name = deviceName, category = deviceCategory) {

    var brightnessLevel = 0
        set(value) {
            if (value in 0..100) {
                field = value
            }
        }

    fun increaseBrightness() {
        brightnessLevel++
        println("Brightness increased to $brightnessLevel.")
    }
}
Relationships between classes
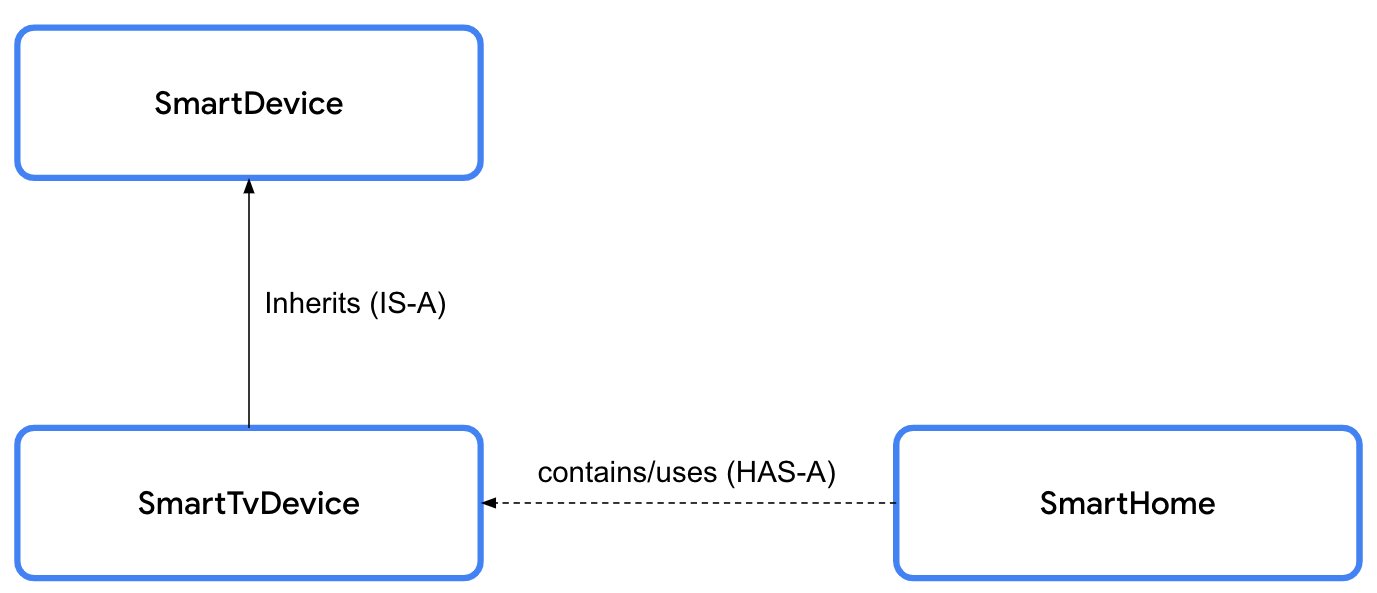
When you use inheritance, you establish a relationship between two classes in something called an IS-A relationship. An object is also an instance of the class from which it inherits. In a HAS-A relationship, an object can own an instance of another class without actually being an instance of that class itself. You can see a high-level representation of these relationships in this diagram:
IS-A relationships
When you specify an IS-A relationship between the SmartDevice superclass and SmartTvDevice subclass, it means that whatever the SmartDevice superclass can do, the SmartTvDevice subclass can do. The relationship is unidirectional, so you can say that every smart TV is a smart device, but you can't say that every smart device is a smart TV. The code representation for an IS-A relationship is shown in this code snippet:
// Smart TV IS-A smart device.
class SmartTvDevice : SmartDevice() {
}
Don't use inheritance only to achieve code reusability. Before you decide, check whether the two classes are related to each other. If they exhibit some relationship, check whether they really qualify for the IS-A relationship. Ask yourself, "Can I say a subclass is a superclass?". For example, Android is an operating system.
HAS-A relationships
A HAS-A relationship is another way to specify the relationship between two classes. For example, you will probably use the smart TV in your home. In this case, there's a relationship between the smart TV and the home. The home contains a smart device or, in other words, the home has a smart device. The HAS-A relationship between two classes is also referred to as composition.
So far, you created a couple of smart devices. Now, you create the SmartHome class, which contains smart devices. The SmartHome class lets you interact with the smart devices.
Use a HAS-A relationship to define a SmartHome class:
- In between the
SmartLightDeviceclass andmain()function, define aSmartHomeclass:
class SmartLightDevice(deviceName: String, deviceCategory: String) :
    SmartDevice(name = deviceName, category = deviceCategory) {

    ...

}

class SmartHome {
}

fun main() {
    ...
}
- In the
SmartHomeclass constructor, use thevalkeyword to create asmartTvDeviceproperty ofSmartTvDevicetype:
// The SmartHome class HAS-A smart TV device.
class SmartHome(val smartTvDevice: SmartTvDevice) {

}
- In the body of the
SmartHomeclass, define aturnOnTv()method that calls theturnOn()method on thesmartTvDeviceproperty:
class SmartHome(val smartTvDevice: SmartTvDevice) {

    fun turnOnTv() {
        smartTvDevice.turnOn()
    }
}
- On the line after the
turnOnTv()method, define aturnOffTv()method that calls theturnOff()method on thesmartTvDeviceproperty:
class SmartHome(val smartTvDevice: SmartTvDevice) {

    fun turnOnTv() {
        smartTvDevice.turnOn()
    }

    fun turnOffTv() {
        smartTvDevice.turnOff()
    }

}
- On the line after the
turnOffTv()method, define anincreaseTvVolume()method that calls theincreaseSpeakerVolume()method on thesmartTvDeviceproperty and then define achangeTvChannelToNext()method that calls thenextChannel()method on thesmartTvDeviceproperty:
class SmartHome(val smartTvDevice: SmartTvDevice) {

    fun turnOnTv() {
        smartTvDevice.turnOn()
    }

    fun turnOffTv() {
        smartTvDevice.turnOff()
    }

    fun increaseTvVolume() {
        smartTvDevice.increaseSpeakerVolume()
    }

    fun changeTvChannelToNext() {
        smartTvDevice.nextChannel()
    }
}
- In the
SmartHomeclass constructor, move thesmartTvDeviceproperty parameter to its own line followed by a comma:
class SmartHome(
    val smartTvDevice: SmartTvDevice,
) {

    ...

}
- On the line after the
smartTvDeviceproperty, use thevalkeyword to define asmartLightDeviceproperty ofSmartLightDevicetype:
// The SmartHome class HAS-A smart TV device and smart light.
class SmartHome(
    val smartTvDevice: SmartTvDevice,
    val smartLightDevice: SmartLightDevice
) {

    ...

}
- In the
SmartHomebody, define aturnOnLight()method that calls theturnOn()method on thesmartLightDeviceobject and aturnOffLight()method that calls theturnOff()method on thesmartLightDeviceobject:
class SmartHome(
    val smartTvDevice: SmartTvDevice,
    val smartLightDevice: SmartLightDevice
) {

    ...

    fun changeTvChannelToNext() {
        smartTvDevice.nextChannel()
    }

    fun turnOnLight() {
        smartLightDevice.turnOn()
    }

    fun turnOffLight() {
        smartLightDevice.turnOff()
    }
}
- On the line after the
turnOffLight()method, define anincreaseLightBrightness()method that calls theincreaseBrightness()method on thesmartLightDeviceproperty:
class SmartHome(
    val smartTvDevice: SmartTvDevice,
    val smartLightDevice: SmartLightDevice
) {

    ...

    fun changeTvChannelToNext() {
        smartTvDevice.nextChannel()
    }

    fun turnOnLight() {
        smartLightDevice.turnOn()
    }

    fun turnOffLight() {
        smartLightDevice.turnOff()
    }

    fun increaseLightBrightness() {
        smartLightDevice.increaseBrightness()
    }
}
- On the line after the
increaseLightBrightness()method, define aturnOffAllDevices()method that calls theturnOffTv()andturnOffLight()methods:.
class SmartHome(
    val smartTvDevice: SmartTvDevice,
    val smartLightDevice: SmartLightDevice
) {

    ...

    fun turnOffAllDevices() {
        turnOffTv()
        turnOffLight()
    }
}
Override superclass methods from subclasses
As discussed earlier, even though the turn-on and turn-off functionality is supported by all the smart devices, the way in which they perform the functionality differs. To provide this device-specific behavior, you need to override the turnOn() and turnOff() methods defined in the superclass. To override means to intercept the action, typically to take manual control. When you override a method, the method in the subclass interrupts the execution of the method defined in the superclass and provides its own execution.
Override the SmartDevice class turnOn() and turnOff() methods:
- In the body of the
SmartDevicesuperclass before thefunkeyword of each method, add anopenkeyword:
open class SmartDevice(val name: String, val category: String) {

    var deviceStatus = "online"

    open fun turnOn() {
        // function body
    }

    open fun turnOff() {
        // function body
    }
}
- In the body of the
SmartLightDeviceclass, define aturnOn()method with an empty body:
class SmartLightDevice(deviceName: String, deviceCategory: String) :
    SmartDevice(name = deviceName, category = deviceCategory) {

    var brightnessLevel = 0
        set(value) {
            if (value in 0..100) {
                field = value
            }
        }

    fun increaseBrightness() {
        brightnessLevel++
        println("Brightness increased to $brightnessLevel.")
    }

    fun turnOn() {
    }
}
- In the body of the
turnOn()method, set thedeviceStatusproperty to the string "on", set thebrightnessLevelproperty to a value of2, and add aprintln()statement and then pass it a"$nameturnedon.Thebrightnesslevelis$brightnessLevel."string:
    fun turnOn() {
        deviceStatus = "on"
        brightnessLevel = 2
        println("$name turned on. The brightness level is $brightnessLevel.")
    }
- In the body of the
SmartLightDeviceclass, define aturnOff()method with an empty body:
class SmartLightDevice(deviceName: String, deviceCategory: String) :
    SmartDevice(name = deviceName, category = deviceCategory) {

    var brightnessLevel = 0
        set(value) {
            if (value in 0..100) {
                field = value
            }
        }

    fun increaseBrightness() {
        brightnessLevel++
        println("Brightness increased to $brightnessLevel.")
    }

    fun turnOn() {
        deviceStatus = "on"
        brightnessLevel = 2
        println("$name turned on. The brightness level is $brightnessLevel.")
    }

    fun turnOff() {
    }
}
- In the body of the
turnOff()method, set thedeviceStatusproperty to the string "off", set thebrightnessLevelproperty to a value of0, and add aprintln()statement and then pass it a"SmartLightturnedoff"string:
class SmartLightDevice(deviceName: String, deviceCategory: String) :
    SmartDevice(name = deviceName, category = deviceCategory) {

    var brightnessLevel = 0
        set(value) {
            if (value in 0..100) {
                field = value
            }
        }

    fun increaseBrightness() {
        brightnessLevel++
        println("Brightness increased to $brightnessLevel.")
    }

    fun turnOn() {
        deviceStatus = "on"
        brightnessLevel = 2
        println("$name turned on. The brightness level is $brightnessLevel.")
    }

    fun turnOff() {
        deviceStatus = "off"
        brightnessLevel = 0
        println("Smart Light turned off")
    }
}
- In the
SmartLightDevicesubclass before thefunkeyword of theturnOn()andturnOff()methods, add theoverridekeyword:
class SmartLightDevice(deviceName: String, deviceCategory: String) :
    SmartDevice(name = deviceName, category = deviceCategory) {

    var brightnessLevel = 0
        set(value) {
            if (value in 0..100) {
                field = value
            }
        }

    fun increaseBrightness() {
        brightnessLevel++
        println("Brightness increased to $brightnessLevel.")
    }

    override fun turnOn() {
        deviceStatus = "on"
        brightnessLevel = 2
        println("$name turned on. The brightness level is $brightnessLevel.")
    }

    override fun turnOff() {
        deviceStatus = "off"
        brightnessLevel = 0
        println("Smart Light turned off")
    }
}
The override keyword informs the Kotlin runtime to execute the code enclosed in the method defined in the subclass.
- In the body of the
SmartTvDeviceclass, define aturnOn()method with an empty body:
class SmartTvDevice(deviceName: String, deviceCategory: String) : SmartDevice(name = deviceName, category = deviceCategory) {

    var speakerVolume = 2
        set(value) {
            if (value in 0..100) {
                field = value
            }
        }

    var channelNumber = 1
        set(value) {
            if (value in 0..200) {
                field = value
            }
        }

    fun increaseSpeakerVolume() {
        speakerVolume++
        println("Speaker volume increased to $speakerVolume.")
    }

    fun nextChannel() {
        channelNumber++
        println("Channel number increased to $channelNumber.")
    }

    fun turnOn() {
    }
}
- In the body of the
turnOn()method, set thedeviceStatusproperty to the string "on" and add aprintln()statement and then pass it a"$name is turned on. Speaker volume is set to $speakerVolume and channel number is " + "set to $channelNumber."string:
class SmartTvDevice(deviceName: String, deviceCategory: String) : SmartDevice(name = deviceName, category = deviceCategory) {

    ...

    fun turnOn() {
        deviceStatus = "on"
        println(
            "$name is turned on. Speaker volume is set to $speakerVolume and channel number is " +
                "set to $channelNumber."
        )
    }
}
- In the body of the
SmartTvDeviceclass after theturnOn()method, define aturnOff()method with an empty body:
class SmartTvDevice(deviceName: String, deviceCategory: String) : SmartDevice(name = deviceName, category = deviceCategory) {

    ...

    fun turnOn() {
        ...
    }

    fun turnOff() {
    }
}
- In the body of the
turnOff()method, set thedeviceStatusproperty to the string "off" and add aprintln()statement and then pass it a"$nameturnedoff"string:
class SmartTvDevice(deviceName: String, deviceCategory: String) : SmartDevice(name = deviceName, category = deviceCategory) {

    ...

    fun turnOn() {
        ...
    }

    fun turnOff() {
        deviceStatus = "off"
        println("$name turned off")
    }
}
- In the
SmartTvDeviceclass before thefunkeyword of theturnOn()andturnOff()methods, add theoverridekeyword:
class SmartTvDevice(deviceName: String, deviceCategory: String) :
    SmartDevice(name = deviceName, category = deviceCategory) {

    var speakerVolume = 2
        set(value) {
            if (value in 0..100) {
                field = value
            }
        }

    var channelNumber = 1
        set(value) {
            if (value in 0..200) {
                field = value
            }
        }

    fun increaseSpeakerVolume() {
        speakerVolume++
        println("Speaker volume increased to $speakerVolume.")
    }

    fun nextChannel() {
        channelNumber++
        println("Channel number increased to $channelNumber.")
    }

    override fun turnOn() {
        deviceStatus = "on"
        println(
            "$name is turned on. Speaker volume is set to $speakerVolume and channel number is " +
                "set to $channelNumber."
        )
    }

    override fun turnOff() {
        deviceStatus = "off"
        println("$name turned off")
    }
}
- In the
main()function, use thevarkeyword to define asmartDevicevariable ofSmartDevicetype that instantiates aSmartTvDeviceobject that takes an"AndroidTV"argument and an"Entertainment"argument:
fun main() {
    var smartDevice: SmartDevice = SmartTvDevice("Android TV", "Entertainment")
}
- On the line after the
smartDevicevariable, call theturnOn()method on thesmartDeviceobject:
fun main() {
    var smartDevice: SmartDevice = SmartTvDevice("Android TV", "Entertainment")
    smartDevice.turnOn()
}
- Run the code.
The output is the following:
Android TV is turned on. Speaker volume is set to 2 and channel number is set to 1.
- On the line after the call to the
turnOn()method, reassign thesmartDevicevariable to instantiate aSmartLightDeviceclass that takes a"GoogleLight"argument and a"Utility"argument, and then call theturnOn()method on thesmartDeviceobject reference:
fun main() {
    var smartDevice: SmartDevice = SmartTvDevice("Android TV", "Entertainment")
    smartDevice.turnOn()

    smartDevice = SmartLightDevice("Google Light", "Utility")
    smartDevice.turnOn()
}
- Run the code.
The output is the following:
Android TV is turned on. Speaker volume is set to 2 and channel number is set to 1.
Google Light turned on. The brightness level is 2.
This is an example of polymorphism. The code calls the turnOn() method on a variable of SmartDevice type and, depending on what the actual value of the variable is, different implementations of the turnOn() method can be executed.
Reuse superclass code in subclasses with the super keyword
When you take a close look at the turnOn()and turnOff() methods, you notice that there's similarity in how the deviceStatus variable is updated whenever the methods are called in the SmartTvDevice and SmartLightDevice subclasses: the code duplicates. You can reuse the code when you update the status in the SmartDevice class.
To call the overridden method in the superclass from the subclass, you need to use the super keyword. Calling a method from the superclass is similar to calling the method from outside the class. Instead of using a . operator between the object and method, you need to use the super keyword, which informs the Kotlin compiler to call the method on the superclass instead of the subclass.
The syntax to call the method from the superclass starts with a super keyword followed by the . operator, function name, and a set of parentheses. If applicable, the parentheses include the arguments. You can see the syntax in this diagram:

Reuse the code from the SmartDevice superclass:
- Remove the
println()statements from theturnOn()andturnOff()methods and move the duplicated code from theSmartTvDeviceandSmartLightDevicesubclasses to theSmartDevicesuperclass:
open class SmartDevice(val name: String, val category: String) {

    var deviceStatus = "online"

    open fun turnOn() {
        deviceStatus = "on"
    }

    open fun turnOff() {
        deviceStatus = "off"
    }
}
- Use the
superkeyword to call the methods from theSmartDeviceclass in theSmartTvDeviceandSmartLightDevicesubclasses:
class SmartTvDevice(deviceName: String, deviceCategory: String) :
    SmartDevice(name = deviceName, category = deviceCategory) {

    var speakerVolume = 2
        set(value) {
            if (value in 0..100) {
                field = value
            }
        }

     var channelNumber = 1
        set(value) {
            if (value in 0..200) {
                field = value
            }
        }

    fun increaseSpeakerVolume() {
        speakerVolume++
        println("Speaker volume increased to $speakerVolume.")
    }

    fun nextChannel() {
        channelNumber++
        println("Channel number increased to $channelNumber.")
    }

    override fun turnOn() {
        super.turnOn()
        println(
            "$name is turned on. Speaker volume is set to $speakerVolume and channel number is " +
                "set to $channelNumber."
        )
    }

    override fun turnOff() {
        super.turnOff()
        println("$name turned off")
    }
}
class SmartLightDevice(deviceName: String, deviceCategory: String) :
    SmartDevice(name = deviceName, category = deviceCategory) {

    var brightnessLevel = 0
        set(value) {
            if (value in 0..100) {
                field = value
            }
        }

    fun increaseBrightness() {
        brightnessLevel++
        println("Brightness increased to $brightnessLevel.")
    }

    override fun turnOn() {
        super.turnOn()
        brightnessLevel = 2
        println("$name turned on. The brightness level is $brightnessLevel.")
    }

    override fun turnOff() {
        super.turnOff()
        brightnessLevel = 0
        println("Smart Light turned off")
    }
}
Override superclass properties from subclasses
Similar to methods, you can also override properties with the same steps.
Override the deviceType property:
- In the
SmartDevicesuperclass on the line after thedeviceStatusproperty, use theopenandvalkeywords to define adeviceTypeproperty set to an"unknown"string:
open class SmartDevice(val name: String, val category: String) {

    var deviceStatus = "online"

    open val deviceType = "unknown"
    ...
}
- In the
SmartTvDeviceclass, use theoverrideandvalkeywords to define adeviceTypeproperty set to a"SmartTV"string:
class SmartTvDevice(deviceName: String, deviceCategory: String) :
    SmartDevice(name = deviceName, category = deviceCategory) {

    override val deviceType = "Smart TV"

    ...
}
- In the
SmartLightDeviceclass, use theoverrideandvalkeywords to define adeviceTypeproperty set to a"SmartLight"string:
class SmartLightDevice(deviceName: String, deviceCategory: String) :
    SmartDevice(name = deviceName, category = deviceCategory) {

    override val deviceType = "Smart Light"

    ...

}
8. Visibility modifiers
Visibility modifiers play an important role to achieve encapsulation:
- In a class, they let you hide your properties and methods from unauthorized access outside the class.
- In a package, they let you hide the classes and interfaces from unauthorized access outside the package.
Kotlin provides four visibility modifiers:
public. Default visibility modifier. Makes the declaration accessible everywhere. The properties and methods that you want used outside the class are marked as public.private. Makes the declaration accessible in the same class or source file.
There are likely some properties and methods that are only used inside the class, and that you don't necessarily want other classes to use. These properties and methods can be marked with the private visibility modifier to ensure that another class can't accidentally access them.
protected. Makes the declaration accessible in subclasses. The properties and methods that you want used in the class that defines them and the subclasses are marked with theprotectedvisibility modifier.internal. Makes the declaration accessible in the same module. The internal modifier is similar to private, but you can access internal properties and methods from outside the class as long as it's being accessed in the same module.
When you define a class, it's publicly visible and can be accessed by any package that imports it, which means that it's public by default unless you specify a visibility modifier. Similarly, when you define or declare properties and methods in the class, by default they can be accessed outside the class through the class object. It's essential to define proper visibility for code, primarily to hide properties and methods that other classes don't need to access.
For example, consider how a car is made accessible to a driver. The specifics of what parts comprise the car and how the car works internally are hidden by default. The car is intended to be as intuitive to operate as possible. You wouldn't want a car to be as complex to operate as a commercial aircraft, similar to how you wouldn't want another developer or your future self to be confused as to what properties and methods of a class are meant to be used.
Visibility modifiers help you surface the relevant parts of the code to other classes in your project and ensure that the implementation can't be unintentionally used, which makes for code that's easy to understand and less prone to bugs.
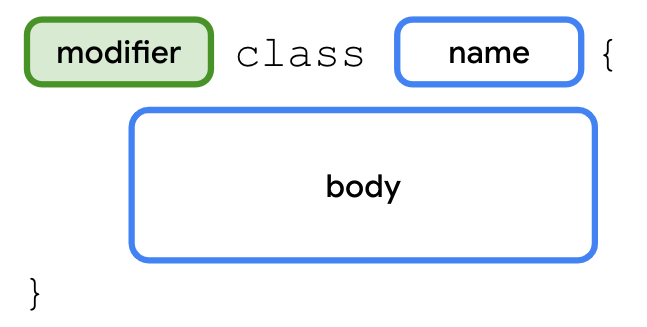
The visibility modifier should be placed before the declaration syntax, while declaring the class, method, or properties as you can see in this diagram:

Specify a visibility modifier for properties
The syntax to specify a visibility modifier for a property starts with the private, protected, or internal modifier followed by the syntax that defines a property. You can see the syntax in this diagram:

For example, you can see how to make the deviceStatus property private in this code snippet:
open class SmartDevice(val name: String, val category: String) {

    ...

    private var deviceStatus = "online"

    ...
}
You can also set the visibility modifiers to setter functions. The modifier is placed before the set keyword. You can see the syntax in this diagram:
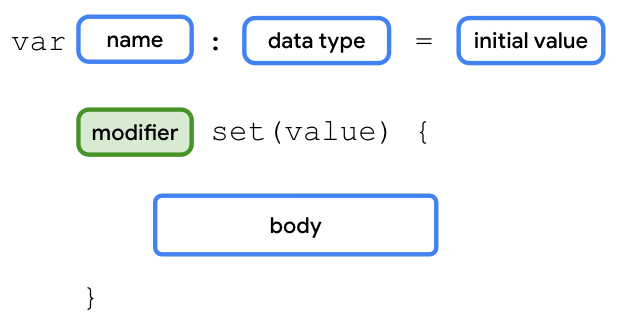
For the SmartDevice class, the value of the deviceStatus property should be readable outside of the class through class objects. However, only the class and its children should be able to update or write the value. To implement this requirement, you need to use the protected modifier on the set() function of the deviceStatus property.
Use the protected modifier on the set() function of the deviceStatus property:
- In the
SmartDevicesuperclass'sdeviceStatusproperty, add theprotectedmodifier to theset()function:
open class SmartDevice(val name: String, val category: String) {

    ...

    var deviceStatus = "online"
        protected set(value) {
           field = value
       }

    ...
}
You aren't performing any actions or checks in the set() function. You are simply assigning the value parameter to the field variable. As you learned before, this is similar to the default implementation for property setters. You can omit the parentheses and body of the set() function in this case:
open class SmartDevice(val name: String, val category: String) {

    ...

    var deviceStatus = "online"
        protected set

    ...
}
- In the
SmartHomeclass, define adeviceTurnOnCountproperty set to a0value with a private setter function:
class SmartHome(
    val smartTvDevice: SmartTvDevice,
    val smartLightDevice: SmartLightDevice
) {

    var deviceTurnOnCount = 0
        private set

    ...
}
- Add the
deviceTurnOnCountproperty followed by the++arithmetic operator to theturnOnTv()andturnOnLight()methods, and then add thedeviceTurnOnCountproperty followed by the--arithmetic operator to theturnOffTv()andturnOffLight()methods:
class SmartHome(
    val smartTvDevice: SmartTvDevice,
    val smartLightDevice: SmartLightDevice
) {

    var deviceTurnOnCount = 0
        private set

    fun turnOnTv() {
        deviceTurnOnCount++
        smartTvDevice.turnOn()
    }

    fun turnOffTv() {
        deviceTurnOnCount--
        smartTvDevice.turnOff()
    }

    ...

    fun turnOnLight() {
        deviceTurnOnCount++
        smartLightDevice.turnOn()
    }

    fun turnOffLight() {
        deviceTurnOnCount--
        smartLightDevice.turnOff()
    }

    ...

}
Visibility modifiers for methods
The syntax to specify a visibility modifier for a method starts with the private, protected, or internal modifiers followed by the syntax that defines a method. You can see the syntax in this diagram:
For example, you can see how to specify a protected modifier for the nextChannel() method in the SmartTvDevice class in this code snippet:
class SmartTvDevice(deviceName: String, deviceCategory: String) :
    SmartDevice(name = deviceName, category = deviceCategory) {

    ...

    protected fun nextChannel() {
        channelNumber++
        println("Channel number increased to $channelNumber.")
    }

    ...
}
Visibility modifiers for constructors
The syntax to specify a visibility modifier for a constructor is similar to defining the primary constructor with a couple of differences:
- The modifier is specified after the class name, but before the
constructorkeyword. - If you need to specify the modifier for the primary constructor, it's necessary to keep the
constructorkeyword and parentheses even when there aren't any parameters.
You can see the syntax in this diagram:
For example, you can see how to add a protected modifier to the SmartDevice constructor in this code snippet:
open class SmartDevice protected constructor (val name: String, val category: String) {

    ...

}
Visibility modifiers for classes
The syntax to specify a visibility modifier for a class starts with the private, protected, or internal modifiers followed by the syntax that defines a class. You can see the syntax in this diagram:
For example, you can see how to specify an internal modifier for the SmartDevice class in this code snippet:
internal open class SmartDevice(val name: String, val category: String) {

    ...

}
Ideally, you should strive for strict visibility of properties and methods, so declare them with the private modifier as often as possible. If you can't keep them private, use the protected modifier. If you can't keep them protected, use the internal modifier. If you can't keep them internal, use the public modifier.
Specify appropriate visibility modifiers
This table helps you determine the appropriate visibility modifiers based on where the property or methods of a class or constructor should be accessible:
Modifier | Accessible in same class | Accessible in subclass | Accessible in same module | Accessible outside module |
| ✔ | 𝗫 | 𝗫 | 𝗫 |
| ✔ | ✔ | 𝗫 | 𝗫 |
| ✔ | ✔ | ✔ | 𝗫 |
| ✔ | ✔ | ✔ | ✔ |
In the SmartTvDevice subclass, you shouldn't allow the speakerVolume and channelNumber properties to be controlled from outside the class. These properties should be controlled only through the increaseSpeakerVolume() and nextChannel() methods.
Similarly, in the SmartLightDevice subclass, the brightnessLevel property should be controlled only through the increaseLightBrightness() method.
Add the appropriate visibility modifiers to the SmartTvDevice and SmartLightDevice subclasses:
- In the
SmartTvDeviceclass, add aprivatevisibility modifier to thespeakerVolumeandchannelNumberproperties:
class SmartTvDevice(deviceName: String, deviceCategory: String) :
    SmartDevice(name = deviceName, category = deviceCategory) {

    private var speakerVolume = 2
        set(value) {
            if (value in 0..100) {
                field = value
            }
        }

    private var channelNumber = 1
        set(value) {
            if (value in 0..200) {
                field = value
            }
        }

    ...
}
- In the
SmartLightDeviceclass, add aprivatemodifier to thebrightnessLevelproperty:
class SmartLightDevice(deviceName: String, deviceCategory: String) :
    SmartDevice(name = deviceName, category = deviceCategory) {

    ...

    private var brightnessLevel = 0
        set(value) {
            if (value in 0..100) {
                field = value
            }
        }

    ...
}
9. Define property delegates
You learned in the previous section that properties in Kotlin use a backing field to hold their values in memory. You use the field identifier to reference it.
When you look at the code so far, you can see the duplicated code to check whether the values are within range for the speakerVolume, channelNumber, and brightnessLevel properties in the SmartTvDevice and SmartLightDevice classes. You can reuse the range-check code in the setter function with delegates. Instead of using a field, and a getter and setter function to manage the value, the delegate manages it.
The syntax to create property delegates starts with the declaration of a variable followed by the by keyword, and the delegate object that handles the getter and setter functions for the property. You can see the syntax in this diagram:

Before you implement the class to which you can delegate the implementation, you need to be familiar with interfaces. An interface is a contract to which classes that implement it need to adhere. It focuses on what to do instead of how to do the action. In short, an interface helps you achieve abstraction.
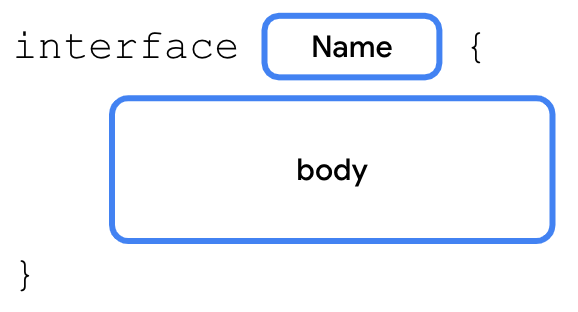
For example, before you build a house, you inform the architect about what you want. You want a bedroom, kid's room, living room, kitchen, and a couple of bathrooms. In short, you specify what you want and the architect specifies how to achieve it. You can see the syntax to create an interface in this diagram:
You already learned how to extend a class and override its functionality. With interfaces, the class implements the interface. The class provides implementation details for the methods and properties declared in the interface. You'll do something similar with the ReadWriteProperty interface to create the delegate. You learn more about interfaces in the next unit.
To create the delegate class for the var type, you need to implement the ReadWriteProperty interface. Similarly, you need to implement the ReadOnlyProperty interface for the val type.
Create the delegate for the var type:
- Before the
main()function, create aRangeRegulatorclass that implements theReadWriteProperty<Any?,Int>interface:
class RangeRegulator() : ReadWriteProperty<Any?, Int> {

}

fun main() {
    ...
}
Don't worry about the angle brackets or the content inside them. They represent generic types and you learn about them in the next unit.
- In the
RangeRegulatorclass's primary constructor, add aninitialValueparameter, a privateminValueproperty, and a privatemaxValueproperty, all ofInttype:
class RangeRegulator(
    initialValue: Int,
    private val minValue: Int,
    private val maxValue: Int
) : ReadWriteProperty<Any?, Int> {

}
- In the
RangeRegulatorclass's body, override thegetValue()andsetValue()methods:
class RangeRegulator(
    initialValue: Int,
    private val minValue: Int,
    private val maxValue: Int
) : ReadWriteProperty<Any?, Int> {

    override fun getValue(thisRef: Any?, property: KProperty<*>): Int {
    }

    override fun setValue(thisRef: Any?, property: KProperty<*>, value: Int) {
    }
}
These methods act as the properties' getter and setter functions.
- On the line before the
SmartDeviceclass, import theReadWritePropertyandKPropertyinterfaces:
import kotlin.properties.ReadWriteProperty
import kotlin.reflect.KProperty

open class SmartDevice(val name: String, val category: String) {
    ...
}

...

class RangeRegulator(
    initialValue: Int,
    private val minValue: Int,
    private val maxValue: Int
) : ReadWriteProperty<Any?, Int> {

    override fun getValue(thisRef: Any?, property: KProperty<*>): Int {
    }

    override fun setValue(thisRef: Any?, property: KProperty<*>, value: Int) {
    }
}

...
- In the
RangeRegulatorclass, on the line before thegetValue()method, define afieldDataproperty and initialize it withinitialValueparameter:
class RangeRegulator(
    initialValue: Int,
    private val minValue: Int,
    private val maxValue: Int
) : ReadWriteProperty<Any?, Int> {

    var fieldData = initialValue

    override fun getValue(thisRef: Any?, property: KProperty<*>): Int {
    }

    override fun setValue(thisRef: Any?, property: KProperty<*>, value: Int) {
    }
}
This property acts as the backing field for the variable.
- In the
getValue()method's body, return thefieldDataproperty:
class RangeRegulator(
    initialValue: Int,
    private val minValue: Int,
    private val maxValue: Int
) : ReadWriteProperty<Any?, Int> {

    var fieldData = initialValue

    override fun getValue(thisRef: Any?, property: KProperty<*>): Int {
        return fieldData
    }

    override fun setValue(thisRef: Any?, property: KProperty<*>, value: Int) {
    }
}
- In the
setValue()method's body, check whether thevalueparameter being assigned is in theminValue..maxValuerange before you assign it to thefieldDataproperty:
class RangeRegulator(
    initialValue: Int,
    private val minValue: Int,
    private val maxValue: Int
) : ReadWriteProperty<Any?, Int> {

    var fieldData = initialValue

    override fun getValue(thisRef: Any?, property: KProperty<*>): Int {
        return fieldData
    }

    override fun setValue(thisRef: Any?, property: KProperty<*>, value: Int) {
        if (value in minValue..maxValue) {
            fieldData = value
        }
    }
}
- In the
SmartTvDeviceclass, use the delegate class to define thespeakerVolumeandchannelNumberproperties:
class SmartTvDevice(deviceName: String, deviceCategory: String) :
    SmartDevice(name = deviceName, category = deviceCategory) {

    override val deviceType = "Smart TV"

    private var speakerVolume by RangeRegulator(initialValue = 2, minValue = 0, maxValue = 100)

    private var channelNumber by RangeRegulator(initialValue = 1, minValue = 0, maxValue = 200)

    ...

}
- In the
SmartLightDeviceclass, use the delegate class to define thebrightnessLevelproperty:
class SmartLightDevice(deviceName: String, deviceCategory: String) :
    SmartDevice(name = deviceName, category = deviceCategory) {

    override val deviceType = "Smart Light"

    private var brightnessLevel by RangeRegulator(initialValue = 0, minValue = 0, maxValue = 100)

    ...

}
10. Test the solution
You can see the solution code in this code snippet:
import kotlin.properties.ReadWriteProperty
import kotlin.reflect.KProperty

open class SmartDevice(val name: String, val category: String) {

    var deviceStatus = "online"
        protected set

    open val deviceType = "unknown"

    open fun turnOn() {
        deviceStatus = "on"
    }

    open fun turnOff() {
        deviceStatus = "off"
    }
}

class SmartTvDevice(deviceName: String, deviceCategory: String) :
    SmartDevice(name = deviceName, category = deviceCategory) {

    override val deviceType = "Smart TV"

    private var speakerVolume by RangeRegulator(initialValue = 2, minValue = 0, maxValue = 100)

    private var channelNumber by RangeRegulator(initialValue = 1, minValue = 0, maxValue = 200)

    fun increaseSpeakerVolume() {
        speakerVolume++
        println("Speaker volume increased to $speakerVolume.")
    }

    fun nextChannel() {
        channelNumber++
        println("Channel number increased to $channelNumber.")
    }

    override fun turnOn() {
        super.turnOn()
        println(
            "$name is turned on. Speaker volume is set to $speakerVolume and channel number is " +
                "set to $channelNumber."
        )
    }

    override fun turnOff() {
        super.turnOff()
        println("$name turned off")
    }
}

class SmartLightDevice(deviceName: String, deviceCategory: String) :
    SmartDevice(name = deviceName, category = deviceCategory) {

    override val deviceType = "Smart Light"

    private var brightnessLevel by RangeRegulator(initialValue = 0, minValue = 0, maxValue = 100)

    fun increaseBrightness() {
        brightnessLevel++
        println("Brightness increased to $brightnessLevel.")
    }

    override fun turnOn() {
        super.turnOn()
        brightnessLevel = 2
        println("$name turned on. The brightness level is $brightnessLevel.")
    }

    override fun turnOff() {
        super.turnOff()
        brightnessLevel = 0
        println("Smart Light turned off")
    }
}

class SmartHome(
    val smartTvDevice: SmartTvDevice,
    val smartLightDevice: SmartLightDevice
) {

    var deviceTurnOnCount = 0
        private set

    fun turnOnTv() {
        deviceTurnOnCount++
        smartTvDevice.turnOn()
    }

    fun turnOffTv() {
        deviceTurnOnCount--
        smartTvDevice.turnOff()
    }

    fun increaseTvVolume() {
        smartTvDevice.increaseSpeakerVolume()
    }

    fun changeTvChannelToNext() {
        smartTvDevice.nextChannel()
    }

    fun turnOnLight() {
        deviceTurnOnCount++
        smartLightDevice.turnOn()
    }

    fun turnOffLight() {
        deviceTurnOnCount--
        smartLightDevice.turnOff()
    }

    fun increaseLightBrightness() {
        smartLightDevice.increaseBrightness()
    }

    fun turnOffAllDevices() {
        turnOffTv()
        turnOffLight()
    }
}

class RangeRegulator(
    initialValue: Int,
    private val minValue: Int,
    private val maxValue: Int
) : ReadWriteProperty<Any?, Int> {

    var fieldData = initialValue

    override fun getValue(thisRef: Any?, property: KProperty<*>): Int {
        return fieldData
    }

    override fun setValue(thisRef: Any?, property: KProperty<*>, value: Int) {
        if (value in minValue..maxValue) {
            fieldData = value
        }
    }
}

fun main() {
    var smartDevice: SmartDevice = SmartTvDevice("Android TV", "Entertainment")
    smartDevice.turnOn()

    smartDevice = SmartLightDevice("Google Light", "Utility")
    smartDevice.turnOn()
}
The output is the following:
Android TV is turned on. Speaker volume is set to 2 and channel number is set to 1.
Google Light turned on. The brightness level is 2.
11. Try this challenge
- In the
SmartDeviceclass, define aprintDeviceInfo()method that prints a"Devicename:$name,category:$category,type:$deviceType"string. - In the
SmartTvDeviceclass, define adecreaseVolume()method that decreases the volume and apreviousChannel()method that navigates to the previous channel. - In the
SmartLightDeviceclass, define adecreaseBrightness()method that decreases the brightness. - In the
SmartHomeclass, ensure that all actions can only be performed when each device'sdeviceStatusproperty is set to an"on"string. Also, ensure that thedeviceTurnOnCountproperty is updated correctly.
After you're done with the implementation:
- In the
SmartHomeclass, define andecreaseTvVolume(),changeTvChannelToPrevious(),printSmartTvInfo(),printSmartLightInfo(), anddecreaseLightBrightness()method. - Call the appropriate methods from the
SmartTvDeviceandSmartLightDeviceclasses in theSmartHomeclass. - In the
main()function, call these added methods to test them.
12. Conclusion
Congratulations! You learned how to define classes and instantiate objects. You also learned how to create relations between classes and create property delegates.
Summary
- There are four main principles of OOP: encapsulation, abstraction, inheritance, and polymorphism.
- Classes are defined with the
classkeyword, and contain properties and methods. - Properties are similar to variables except properties can have custom getters and setters.
- A constructor specifies how to instantiate objects of a class.
- You can omit the
constructorkeyword when you define a primary constructor. - Inheritance makes it easier to reuse code.
- The IS-A relationship refers to inheritance.
- The HAS-A relationship refers to composition.
- Visibility modifiers play an important role in the achievement of encapsulation.
- Kotlin provides four visibility modifiers: the
public,private,protected, andinternalmodifiers. - A property delegate lets you reuse the getter and setter code in multiple classes.