
1. Before you begin
Introduction
So far, you learned all about building Android apps with Compose. That's a good thing! Compose is a very powerful tool that can simplify the development process. However, Android apps were not always built with declarative UIs. Compose is a very recent tool in the history of Android Apps. Android UIs were originally built with Views. As such, it's highly likely that you will encounter Views as you continue your journey as an Android developer. In this codelab, you learn the basics of how Android apps were built before Compose — with XML, Views, View Bindings, and Fragments.
Prerequisites:
- Complete the Android Basics with Compose coursework through Unit 7.
What you'll need
- A computer with internet access and Android Studio
- A device or emulator
- The starter code for the Juice Tracker app
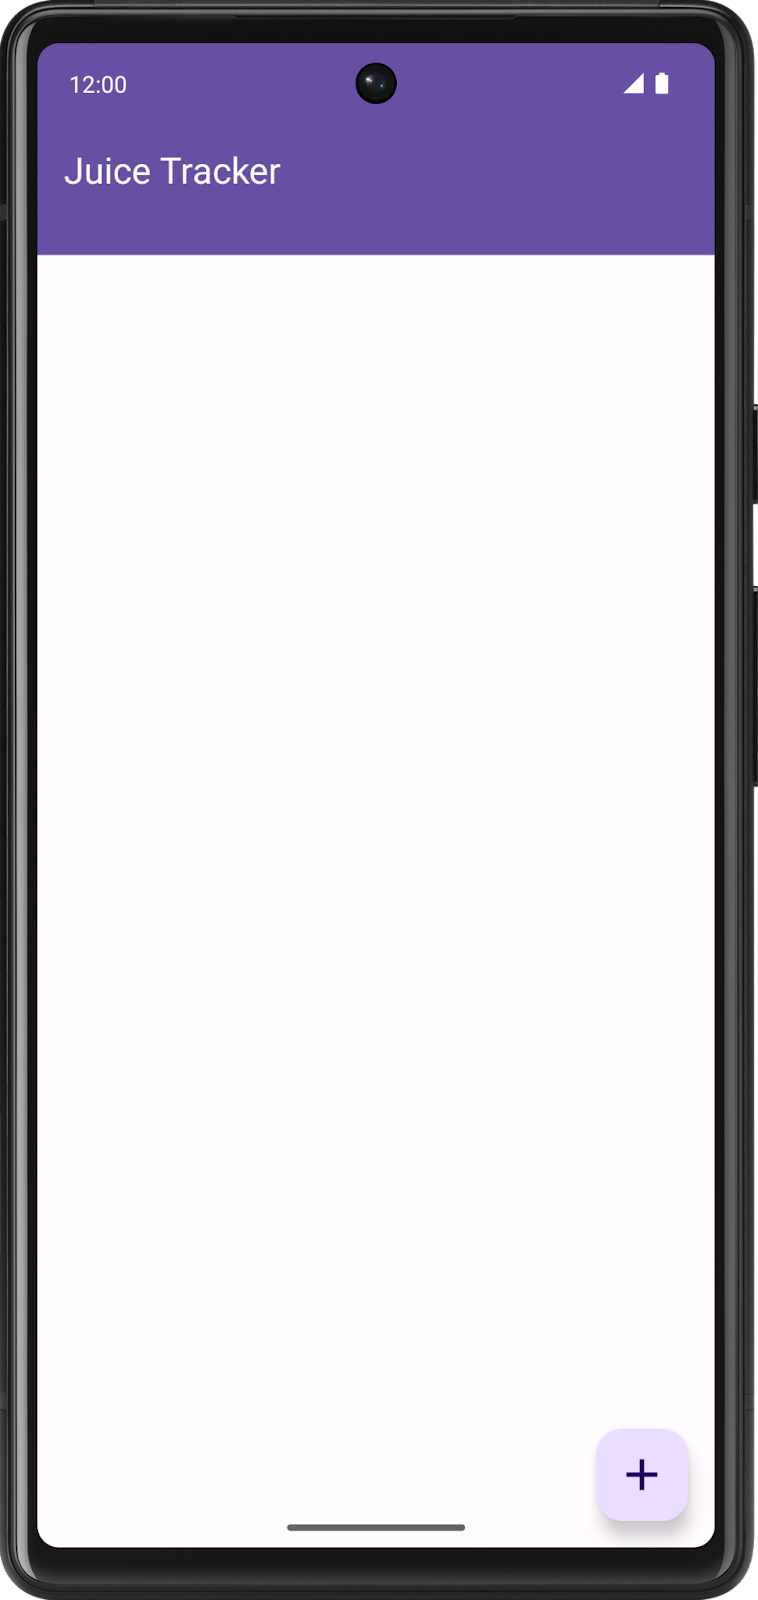
What you'll build
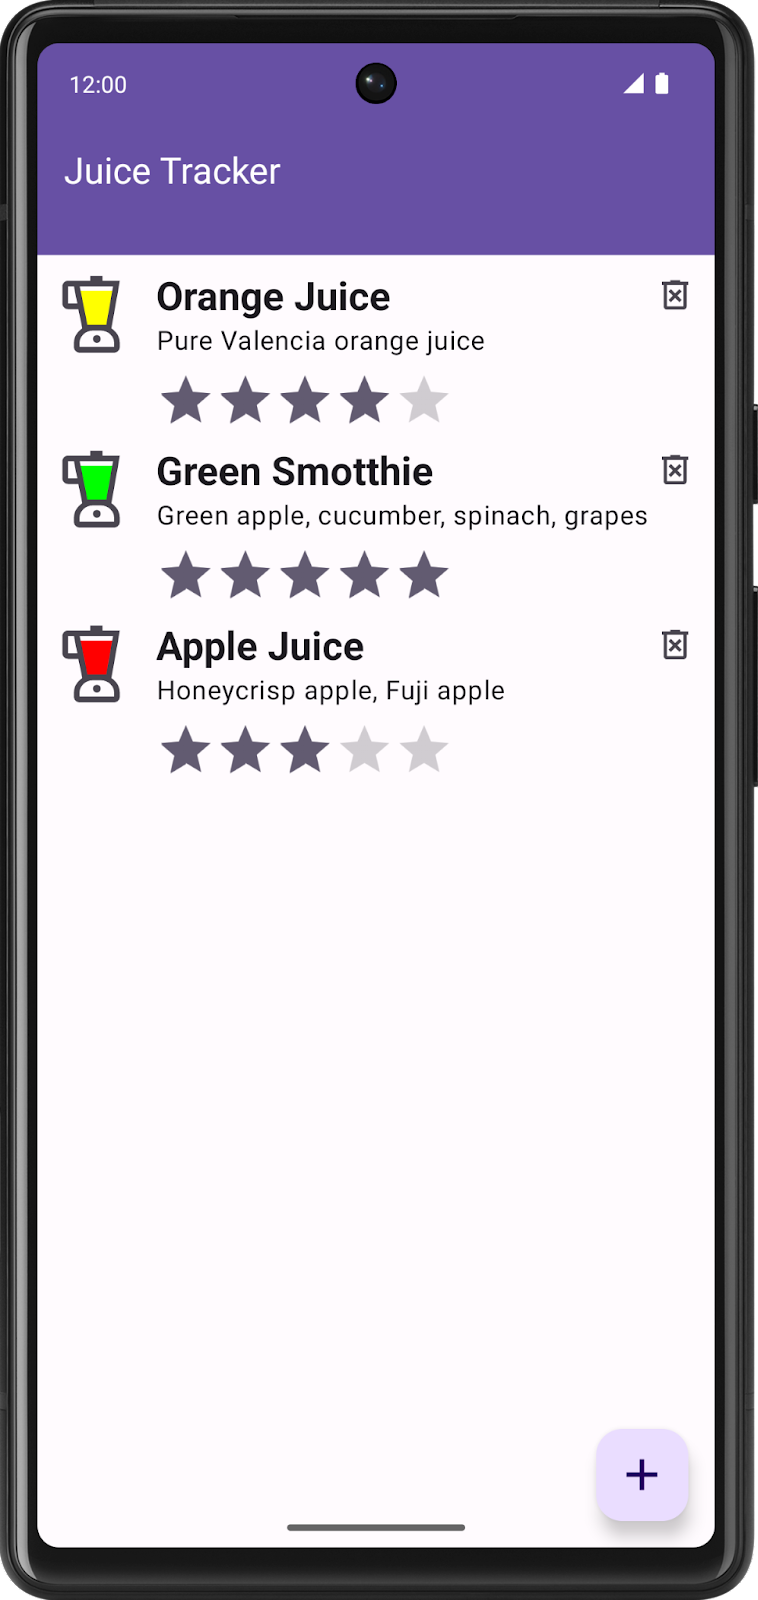
In this codelab, you complete the Juice Tracker app. This app lets you keep track of notable juices by building a list consisting of detailed items. You add and modify Fragments and XML to complete the UI and the starter code. Specifically, you build the entry form for creating a new juice, including the UI and any associated logic or navigation. The result is an app with an empty list to which you can add your own juices.
2. Get the starter code
- In Android Studio, open the
basic-android-kotlin-compose-training-juice-trackerfolder. - Open the Juice Tracker app code in Android Studio.
3. Create a Layout
When building an app with Views, you construct the UI inside of a Layout. Layouts are typically declared using XML. These XML layout files are located in the resources directory under res > layout. Layouts contain the components that make up the UI; these components are known as Views. XML syntax consists of tags, elements, and attributes. For more details on XML syntax, reference the Create XML layouts for Android codelab.
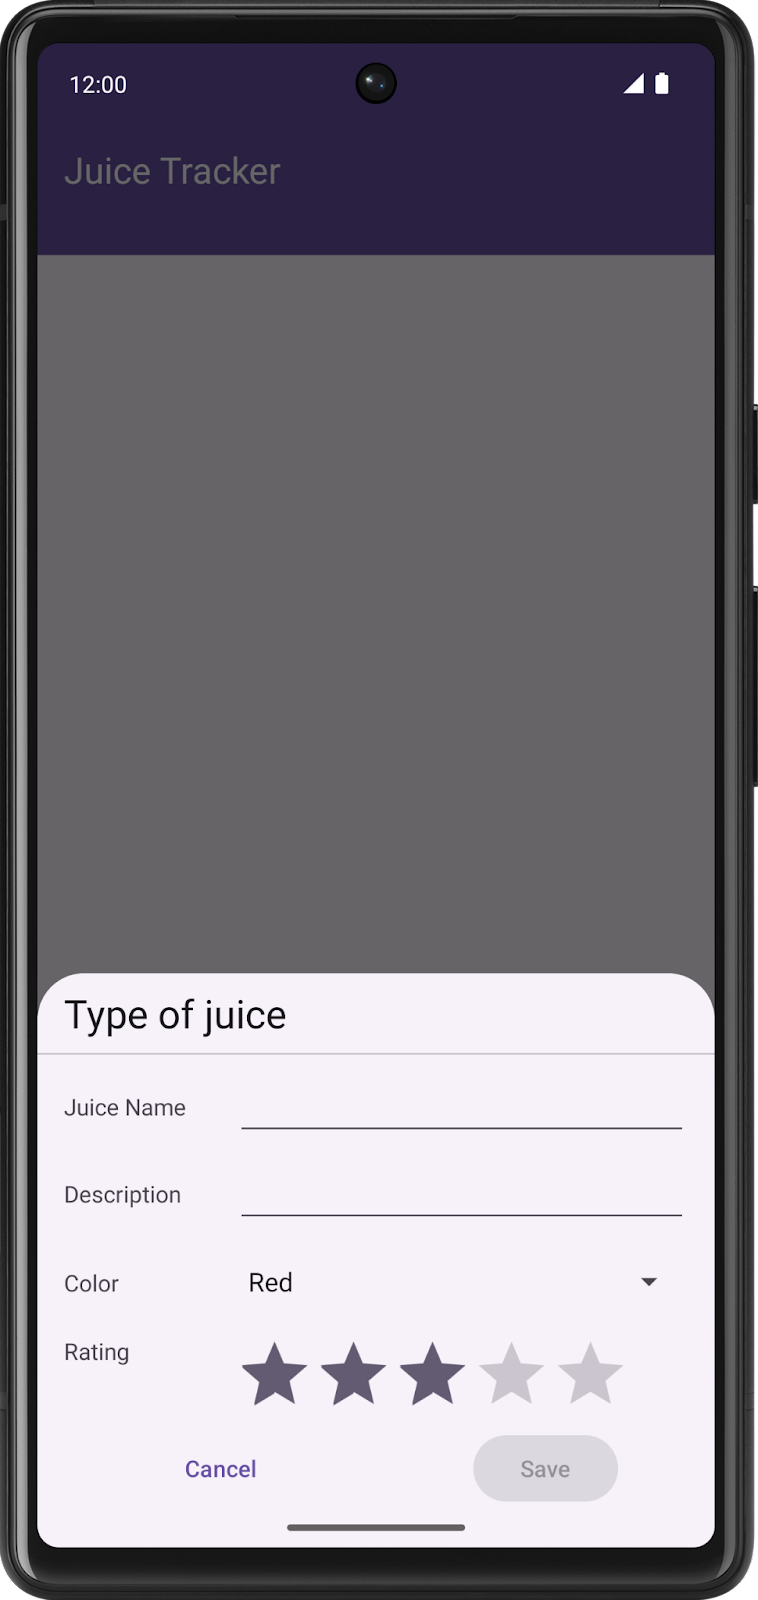
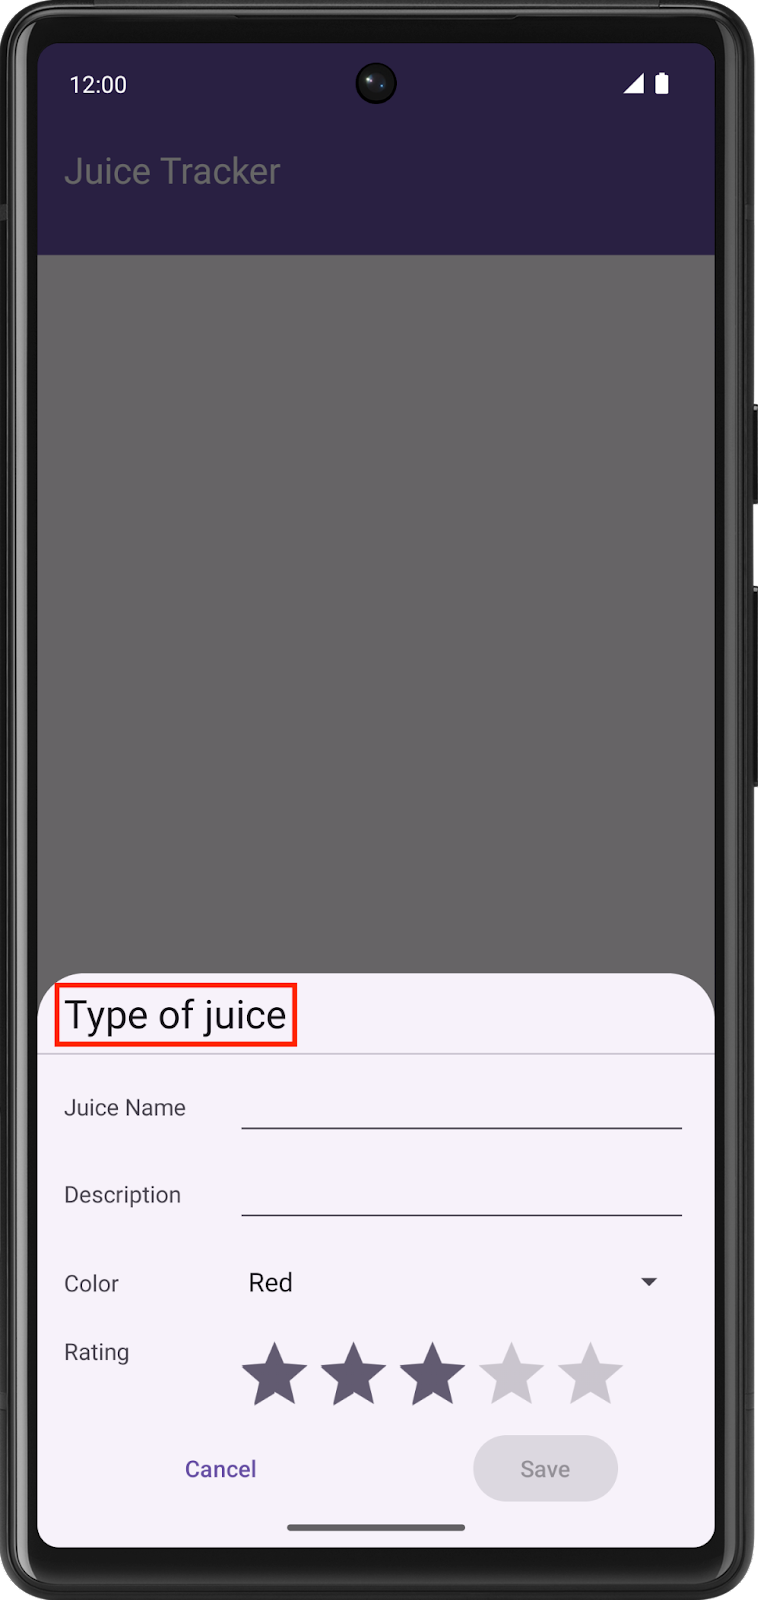
In this section, you build an XML layout for the "Type of juice" entry dialog pictured.
- Create a new Layout Resource File in the main > res > layout directory called
fragment_entry_dialog.
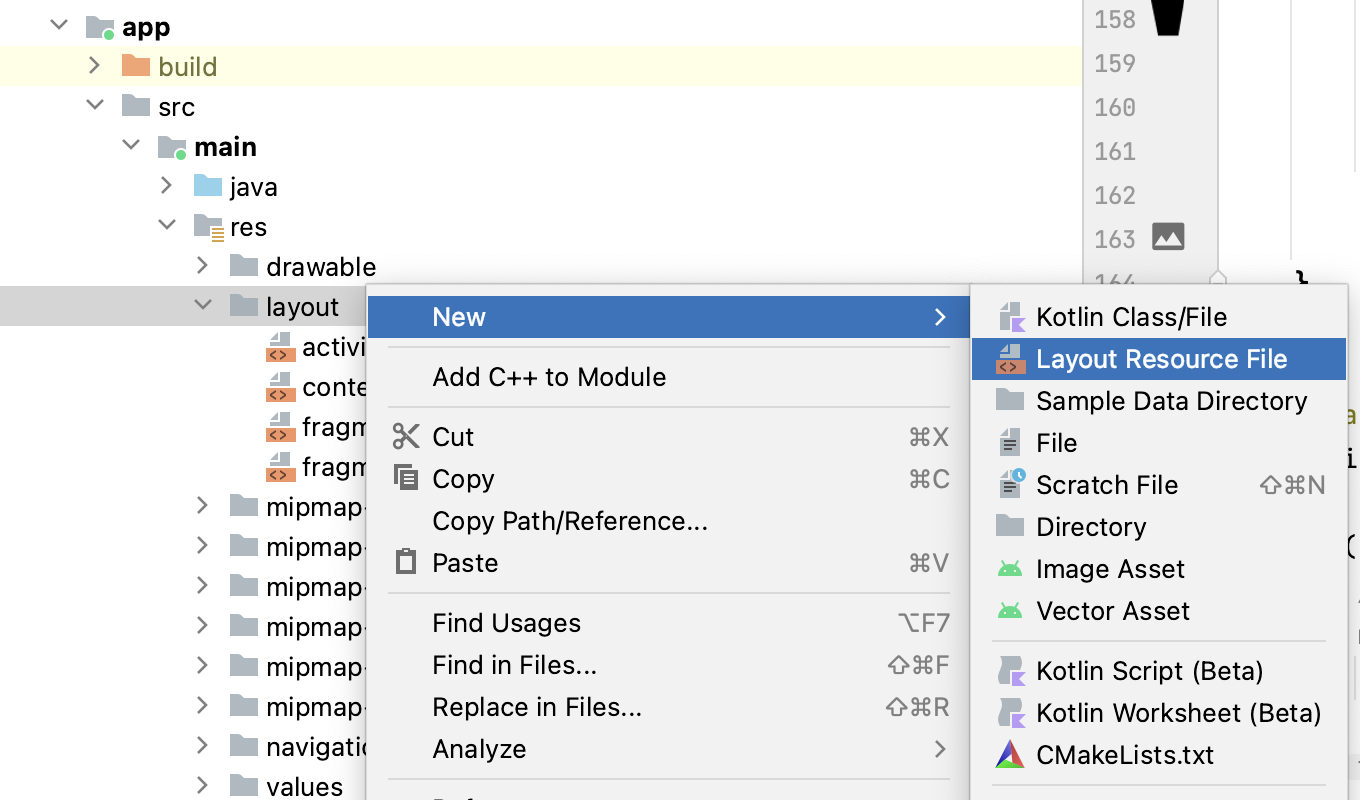
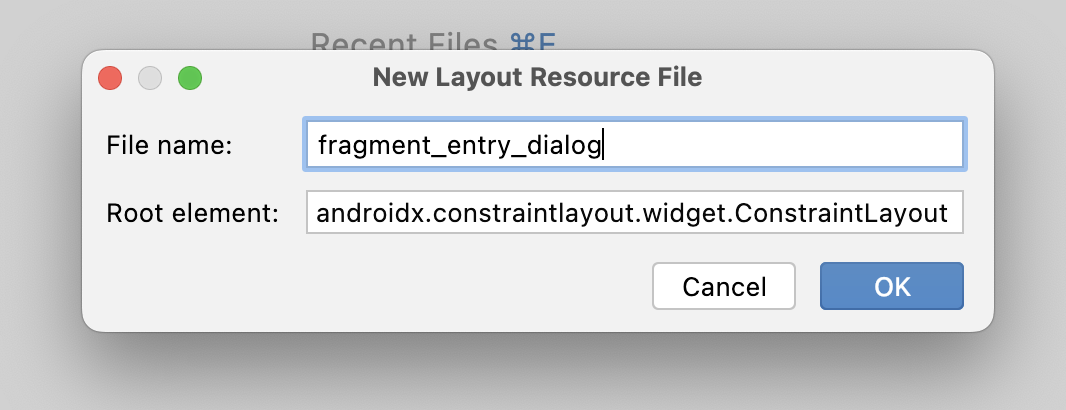
The fragment_entry_dialog.xml layout contains the UI components that the app displays to the user.
Notice that the Root element is a ConstraintLayout. This type of layout is a ViewGroup that lets you position and size Views in a flexible way using the constraints. A ViewGroup is a type of View that contains other Views, called children or child Views. The following steps cover this topic in more detail, but you can learn more about ConstraintLayout in Build a Responsive UI with ConstraintLayout.
- After you create the file, define the app name space in the
ConstraintLayout.
fragment_entry_dialog.xml
<androidx.constraintlayout.widget.ConstraintLayout
   xmlns:android="http://schemas.android.com/apk/res/android"
   xmlns:app="http://schemas.android.com/apk/res-auto"
   android:layout_width="match_parent"
   android:layout_height="match_parent">
</androidx.constraintlayout.widget.ConstraintLayout>
- Add the following guidelines to the
ConstraintLayout.
fragment_entry_dialog.xml
<androidx.constraintlayout.widget.Guideline
   android:id="@+id/guideline_left"
   android:layout_width="wrap_content"
   android:layout_height="wrap_content"
   android:orientation="vertical"
   app:layout_constraintGuide_begin="16dp" />
<androidx.constraintlayout.widget.Guideline
   android:id="@+id/guideline_middle"
   android:layout_width="wrap_content"
   android:layout_height="wrap_content"
   android:orientation="vertical"
   app:layout_constraintGuide_percent="0.5" />
<androidx.constraintlayout.widget.Guideline
   android:id="@+id/guideline_top"
   android:layout_width="wrap_content"
   android:layout_height="wrap_content"
   android:orientation="horizontal"
   app:layout_constraintGuide_begin="16dp" />
These Guidelines serve as padding for other views. The guidelines constrain the "Type of juice" header text.
- Create a
TextViewelement. ThisTextViewrepresents the title of the detail fragment.
- Set the
TextViewanidofheader_title. - Set
layout_widthto0dp. Layout constraints ultimately define thisTextView's width. Therefore, defining a width only adds unnecessary calculations during the drawing of the UI; defining a width of0dpavoids the extra calculations. - Set the
TextView textattribute to@string/juice_type. - Set the
textAppearanceto@style/TextAppearance.MaterialComponents.Headline5.
fragment_entry_dialog.xml
<TextView
   android:id="@+id/header_title"
   android:layout_width="0dp"
   android:layout_height="wrap_content"
   android:text="@string/juice_type"
   android:textAppearance="@style/TextAppearance.MaterialComponents.Headline5" />
Lastly, you need to define the constraints. Unlike the Guidelines, which use dimensions as constraints, the guidelines themselves constrain this TextView. To achieve this outcome, you can reference the id of the Guideline by which you want to constrain the view.
- Constrain the top of the header to the bottom of
guideline_top.
fragment_entry_dialog.xml
<TextView
   android:id="@+id/header_title"
   android:layout_width="0dp"
   android:layout_height="wrap_content"
   android:text="@string/juice_type"
   android:textAppearance="@style/TextAppearance.MaterialComponents.Headline5"
   app:layout_constraintTop_toBottomOf="@+id/guideline_top" />
- Constrain the end to the start of
guideline_middleand the start to the start ofguideline_leftto finish theTextViewplacement. Keep in mind that how you constrain a given view depends entirely on how you want your UI to look.
fragment_entry_dialog.xml
<TextView
   android:id="@+id/header_title"
   android:layout_width="0dp"
   android:layout_height="wrap_content"
   android:text="@string/juice_type"
   android:textAppearance="@style/TextAppearance.MaterialComponents.Headline5"
   app:layout_constraintTop_toBottomOf="@+id/guideline_top"
   app:layout_constraintEnd_toStartOf="@+id/guideline_middle"
   app:layout_constraintStart_toStartOf="@+id/guideline_left" />
Try to build the rest of the UI based on the screenshots. You can find the completed fragment_entry_dialog.xml file in the solution.
4. Create a Fragment with Views
In Compose, you build layouts declaratively using Kotlin or Java. You can access different "screens" by navigating to different Composables, typically within the same activity. When building an app with Views, a Fragment that hosts the XML layout replaces the concept of a Composable "screen."
In this section, you create a Fragment to host the fragment_entry_dialog layout and provide data to the UI.
- In the
juicetrackerpackage, create a new class calledEntryDialogFragment. - Make the
EntryDialogFragmentextend theBottomSheetDialogFragment.
EntryDialogFragment.kt
import com.google.android.material.bottomsheet.BottomSheetDialogFragment


class EntryDialogFragment : BottomSheetDialogFragment() {
}
The DialogFragment is a Fragment that displays a floating dialog. BottomSheetDialogFragment inherits from the DialogFragment class, but displays a sheet the width of the screen pinned to the bottom of the screen. This approach matches the design pictured previously.
- Rebuild the project, which causes View Binding files based on the
fragment_entry_dialoglayout to autogenerate. The View Bindings let you access and interact with XML declaredViews, you can read more about them in the View Binding documentation. - In the
EntryDialogFragmentclass, implement theonCreateView()function. As the name suggests, this function creates theViewfor thisFragment.
EntryDialogFragment.kt
import android.os.Bundle
import android.view.LayoutInflater
import android.view.View
import android.view.ViewGroup

override fun onCreateView(
   inflater: LayoutInflater,
   container: ViewGroup?,
   savedInstanceState: Bundle?
): View? {
   return super.onCreateView(inflater, container, savedInstanceState)
}
The onCreateView() function returns a View, but right now, it does not return a useful View.
- Return the
Viewgenerated by inflating theFragmentEntryDialogViewBindinginstead of returningsuper.onCreateView().
EntryDialogFragment.kt
import com.example.juicetracker.databinding.FragmentEntryDialogBinding


override fun onCreateView(
   inflater: LayoutInflater,
   container: ViewGroup?,
   savedInstanceState: Bundle?
): View? {
   return FragmentEntryDialogBinding.inflate(inflater, container, false).root
}
- Outside of the
onCreateView()function, but inside theEntryDialogFragmentclass, create an instance of theEntryViewModel. - Implement the
onViewCreated()function.
After you inflate the View binding, you can access and modify the Views in the layout. The onViewCreated() method is called after onCreateView() in the lifecycle. The onViewCreated() method is the recommended place to access and modify the Views within the layout.
- Create an instance of the view binding by calling the
bind()method onFragmentEntryDialogBinding.
At this point, your code should look like the following example:
EntryDialogFragment.kt
import androidx.fragment.app.viewModels
import com.example.juicetracker.ui.AppViewModelProvider
import com.example.juicetracker.ui.EntryViewModel

class EntryDialogFragment : BottomSheetDialogFragment() {

   private val entryViewModel by viewModels<EntryViewModel> { AppViewModelProvider.Factory }

   override fun onCreateView(
       inflater: LayoutInflater,
       container: ViewGroup?,
       savedInstanceState: Bundle?
   ): View {
       return FragmentEntryDialogBinding.inflate(inflater, container, false).root
   }

   override fun onViewCreated(view: View, savedInstanceState: Bundle?) {
        val binding = FragmentEntryDialogBinding.bind(view)
    }
}
You can access and set Views through the binding. For example, you can set a TextView through the setText() method.
binding.name.setText("Apple juice")
The entry dialog UI serves as a place for a user to create a new item, but you can also use it to modify an existing item. Therefore, the Fragment needs to retrieve a clicked item. The Navigation Component facilitates navigating to the EntryDialogFragment and retrieving a clicked item.
The EntryDialogFragment is not yet complete, but don't worry! For now, move on to the next section to learn more about using the Navigation Component in an app with Views.
5. Modify the Navigation Component
In this section, you use the navigation component to launch the entry dialog and to retrieve an item, if applicable.
Compose affords the opportunity to render different composables simply by calling them. However, Fragments work differently. The Navigation Component coordinates Fragment "destinations," providing an easy way to move between different Fragments and the Views they contain.
Use the Navigation Component to coordinate navigation to your EntryDialogFragment.
- Open the
nav_graph.xmlfile and make sure the Design tab is selected.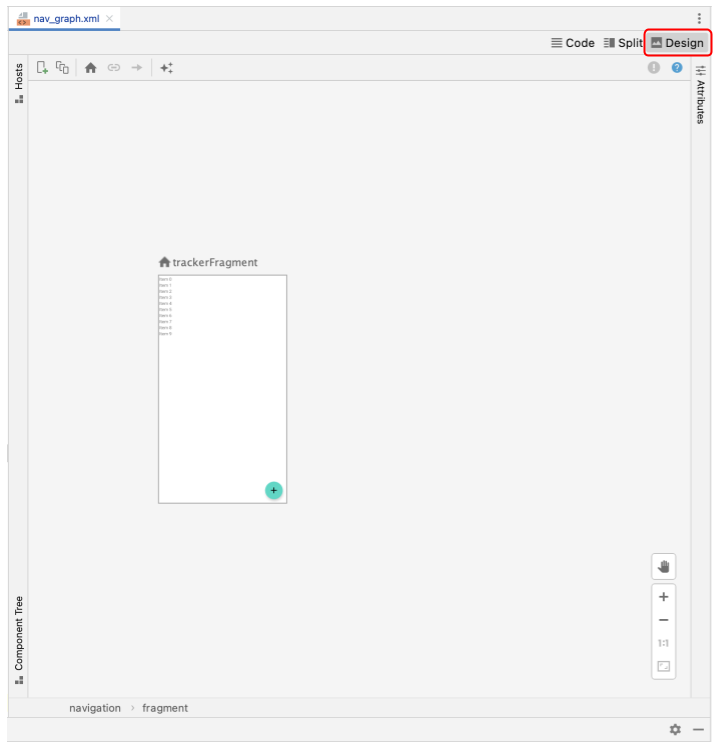
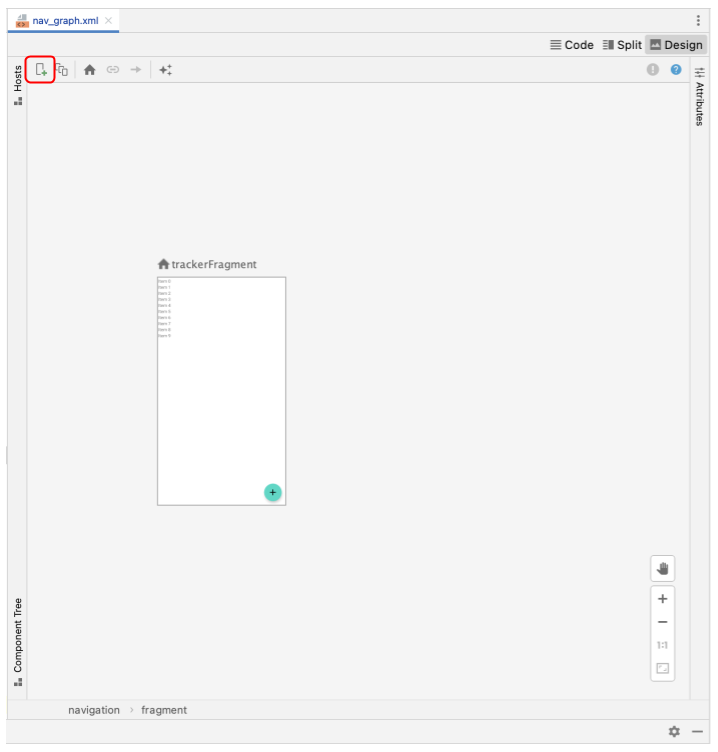
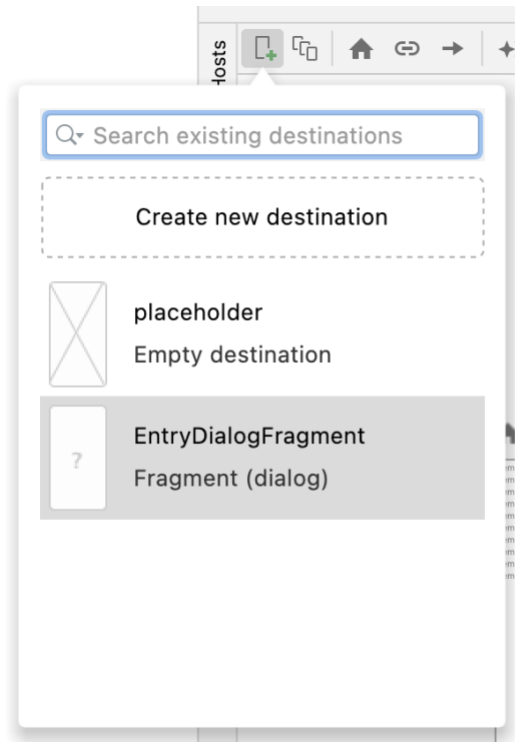
- Click the
 icon to add a new destination.
- Select
EntryDialogFragmentdestination. This action declares theentryDialogFragmentin the nav graph, making it accessible for navigation actions.
You need to launch the EntryDialogFragment from the TrackerFragment. Therefore, a navigation action needs to accomplish this task.
- Drag your cursor over the
trackerFragment. Selecting the gray dot and drag the line to theentryDialogFragment.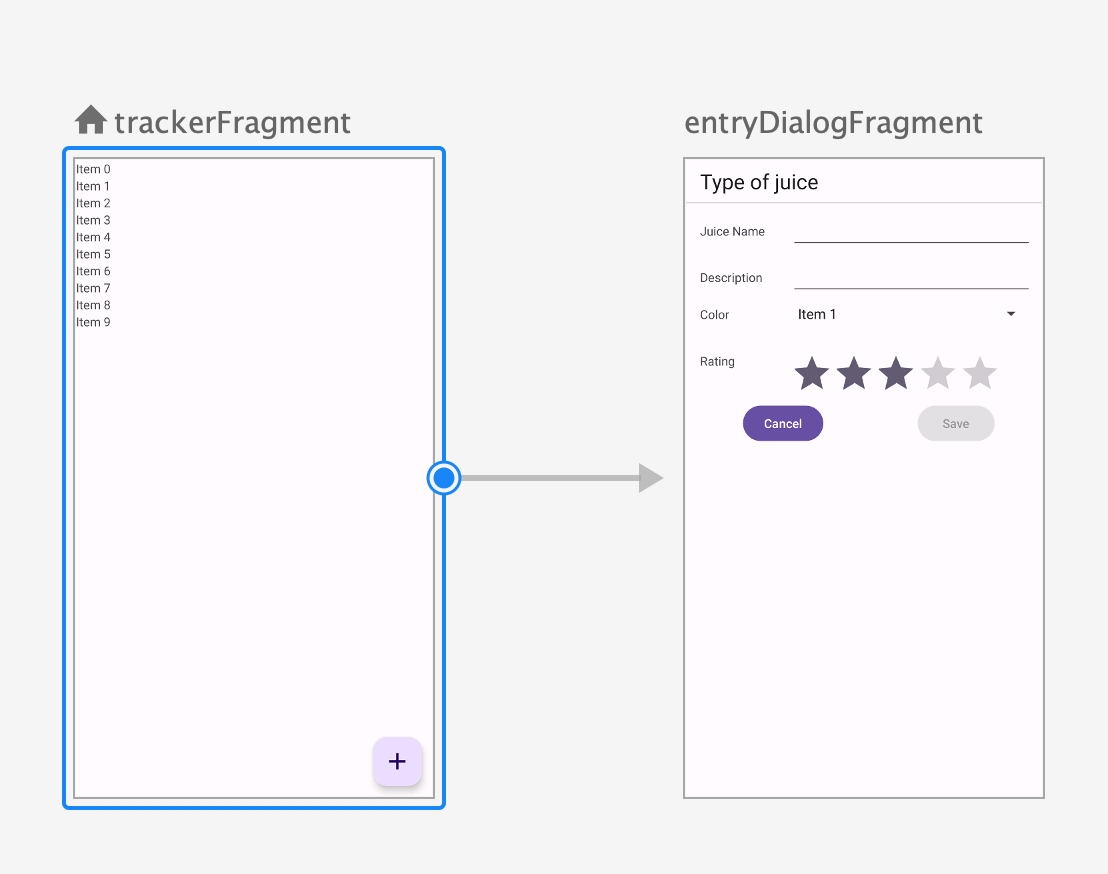
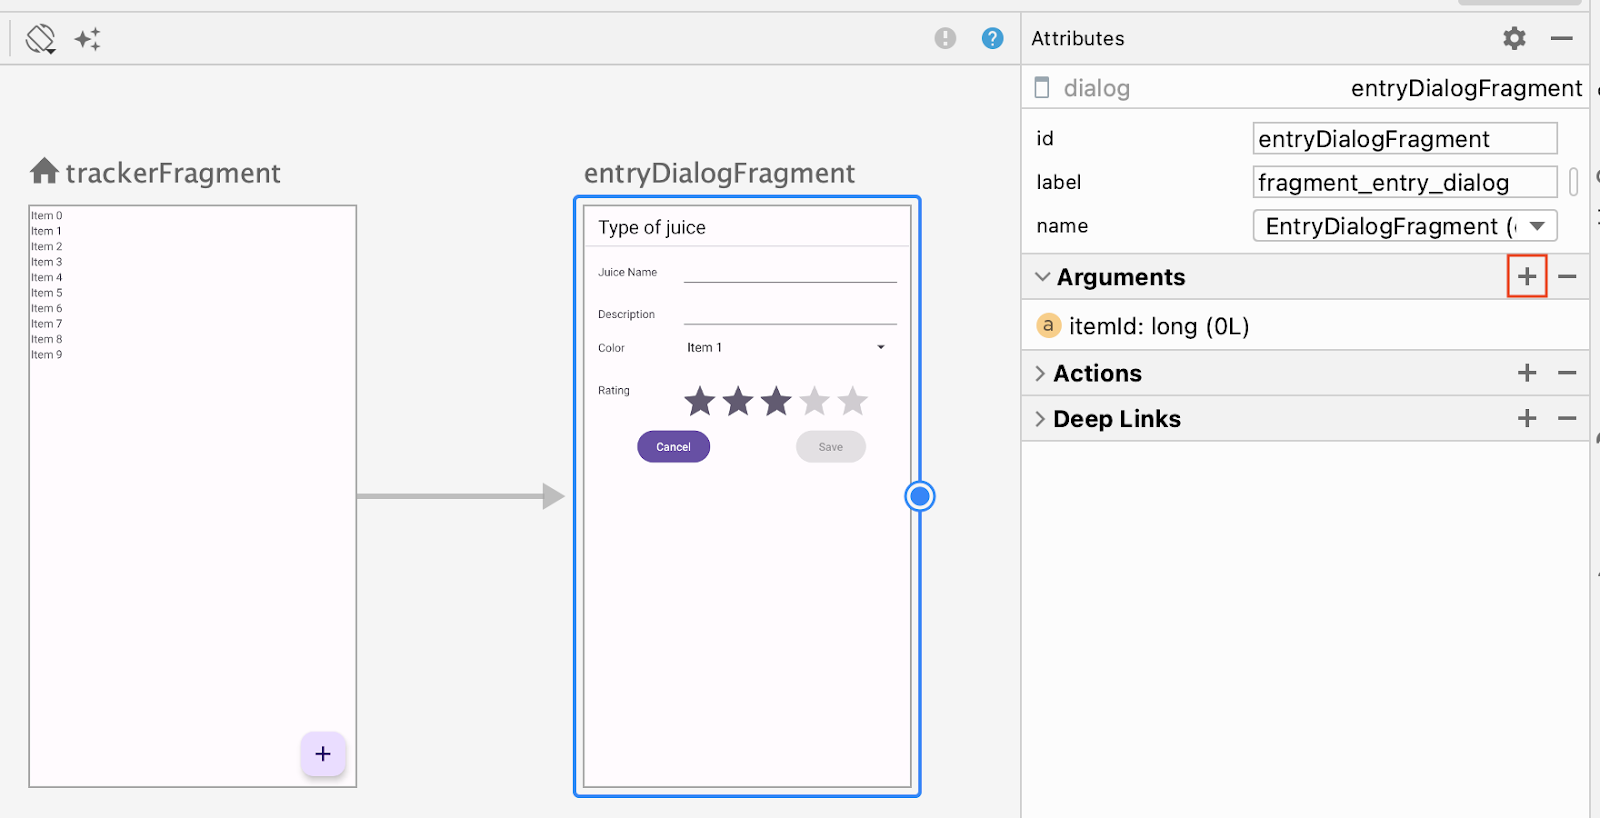
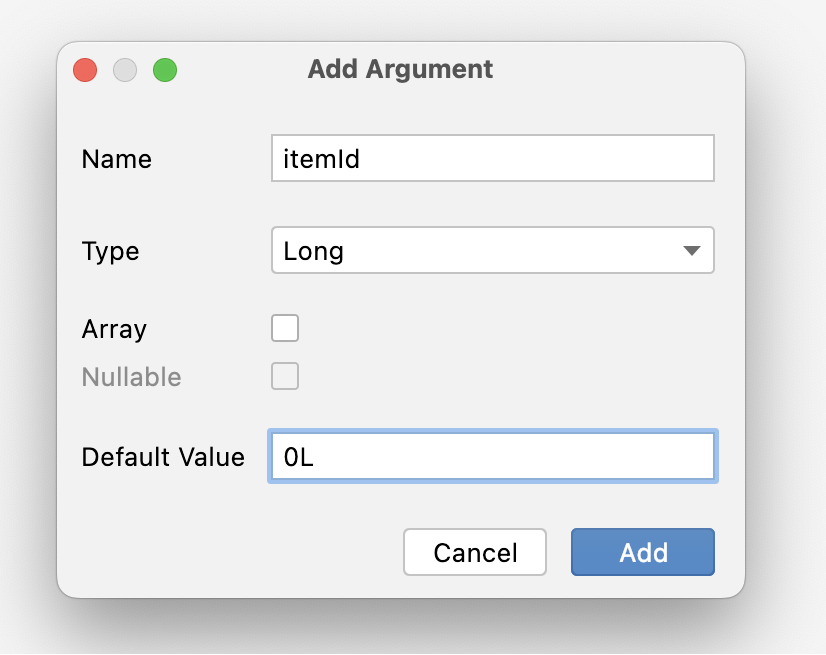
- The nav_graph design view lets you declare arguments for a destination by selecting the destination and clicking the
 icon next to the Arguments dropdown. Use this feature to add an
 itemIdargument of typeLongto theentryDialogFragment; the default value should be0L.
Note that the TrackerFragment holds a list of Juice items — if you click one of these items, the EntryDialogFragment launches.
- Rebuild the project. The
itemIdargument is now accessible in theEntryDialogFragment.
6. Complete the Fragment
With the data from the navigation arguments, complete the entry dialog.
- Retrieve the
navArgs()in theonViewCreated()method of theEntryDialogFragment. - Retrieve the
itemIdfrom thenavArgs(). - Implement the
saveButtonto save the new/modified juice using theViewModel.
Recall from the entry dialog UI that the default color value is red. For now, pass this as a place holder.
Pass the item id from the args when calling saveJuice().
EntryDialogFragment.kt
import androidx.navigation.fragment.navArgs
import com.example.juicetracker.data.JuiceColor


class EntryDialogFragment : BottomSheetDialogFragment() {

   //...
   var selectedColor: JuiceColor = JuiceColor.Red

   override fun onViewCreated(view: View, savedInstanceState: Bundle?) {
        val binding = FragmentEntryDialogBinding.bind(view)
        val args: EntryDialogFragmentArgs by navArgs()
        val juiceId = args.itemId

        binding.saveButton.setOnClickListener {
           entryViewModel.saveJuice(
               juiceId,
               binding.name.text.toString(),
               binding.description.text.toString(),
               selectedColor.name,
               binding.ratingBar.rating.toInt()
           )
        }
    }
}
- After the data is saved, dismiss the dialog with the
dismiss()method.
EntryDialogFragment.kt
class EntryDialogFragment : BottomSheetDialogFragment() {

    //...
    var selectedColor: JuiceColor = JuiceColor.Red
    //...

    override fun onViewCreated(view: View, savedInstanceState: Bundle?) {
        val binding = FragmentEntryDialogBinding.bind(view)
        val args: EntryDialogFragmentArgs by navArgs()
        binding.saveButton.setOnClickListener {
           entryViewModel.saveJuice(
               juiceId,
               binding.name.text.toString(),
               binding.description.text.toString(),
               selectedColor.name,
               binding.ratingBar.rating.toInt()
           )
           dismiss()
        }
    }
}
Keep in mind that the above code does not complete the EntryDialogFragment. You still need to implement a number of things, such as the population of the fields with existing Juice data (if applicable), the selection of a color from the colorSpinner, the implementation of the cancelButton, and more. However, this code is not unique to Fragments, and you are able to implement this code on your own. Try to implement the rest of the functionality. As a last resort, you can refer to the solution code for this codelab.
7. Launch the entry dialog
The last task is to launch the entry dialog using the Navigation Component. The entry dialog needs to launch when the user clicks the floating action button (FAB). It needs to also launch and pass the corresponding id when the user clicks an item.
- In the
onClickListener()for the FAB, callnavigate()on the nav controller.
TrackerFragment.kt
import androidx.navigation.findNavController


//...

binding.fab.setOnClickListener { fabView ->
   fabView.findNavController().navigate(
   )
}

//...
- In the navigate function, pass the action to navigate from the tracker to the entry dialog.
TrackerFragment.kt
//...

binding.fab.setOnClickListener { fabView ->
   fabView.findNavController().navigate(
TrackerFragmentDirections.actionTrackerFragmentToEntryDialogFragment()
   )
}

//...
- Repeat this action in the lambda body for the
onEdit()method in theJuiceListAdapter, but this time, pass theidof theJuice.
TrackerFragment.kt
//...

onEdit = { drink ->
   findNavController().navigate(
       TrackerFragmentDirections.actionTrackerFragmentToEntryDialogFragment(drink.id)
   )
},

//...
8. Get the solution code
To download the code for the finished codelab, you can use these git commands:
$ git clone https://github.com/google-developer-training/basic-android-kotlin-compose-training-juice-tracker.git
$ cd basic-android-kotlin-compose-training-juice-tracker
$ git checkout views
Alternatively, you can download the repository as a zip file, unzip it, and open it in Android Studio.
If you want to see the solution code, view it on GitHub.