
1. Before you begin
Introduction
In the previous codelab, you learned how to get data from a web service by having the ViewModel retrieve the URLs of Mars photos from the network using an API service. While this approach works and is simple to implement, it does not scale well as your app grows and needs to work with more than one data source. To address this issue, Android architecture best practices recommend separating out your UI layer and data layer.
In this codelab, you will refactor the Mars Photos app into separate UI and data layers. You will learn how to implement the repository pattern and use dependency injection. Dependency injection creates a more flexible coding structure that helps with development and testing.
Prerequisites
- Able to retrieve JSON from a REST web service and parse that data into Kotlin objects using the Retrofit and Serialization (kotlinx.serialization) libraries.
- Knowledge of how to use a REST web service.
- Able to implement coroutines in your app.
What you'll learn
- Repository pattern
- Dependency injection
What you'll build
- Modify the Mars Photos app to separate the app into a UI layer and a data layer.
- While separating out the data layer, you will implement the repository pattern.
- Use dependency injection to create a loosely coupled codebase.
What you need
- A computer with a modern web browser, such as the latest version of Chrome
Get the starter code
To get started, download the starter code:
Alternatively, you can clone the GitHub repository for the code:
$ git clone https://github.com/google-developer-training/basic-android-kotlin-compose-training-mars-photos.git
$ cd basic-android-kotlin-compose-training-mars-photos
$ git checkout repo-starter
You can browse the code in the Mars Photos GitHub repository.
2. Separate the UI layer and Data layer
Why different layers?
Separating the code into different layers makes your app more scalable, more robust, and easier to test. Having multiple layers with clearly defined boundaries also makes it easier for multiple developers to work on the same app without negatively impacting each other.
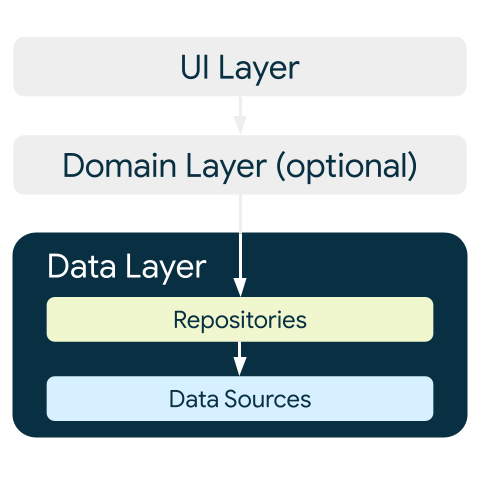
Android's Recommended app architecture states that an app should have at least a UI layer and a data layer.
In this codelab, you concentrate on the data layer and make changes so your app follows the recommended best practices.
What is a data layer?
A data layer is responsible for the business logic of your app and for sourcing and saving data for your app. The data layer exposes data to the UI layer using the Unidirectional Data Flow pattern. Data can come from multiple sources, like a network request, a local database, or from a file on the device.
An app may even have more than one source of data. When the app opens, it retrieves data from a local database on the device, which is the first source. While the app is running, it makes a network request to the second source to retrieve newer data.
By having the data in a separate layer from the UI code, you can make changes in one part of the code without affecting another. This approach is part of a design principle called separation of concerns. A section of code focuses on its own concern and encapsulates its inner workings from other code. Encapsulation is a form of hiding how the code internally works from other sections of code. When one section of code needs to interact with another section of code, it does it through an interface.
The UI layer's concern is displaying the data it is provided. The UI no longer retrieves the data as that is the data layer's concern.
The data layer is made up of one or more repositories. Repositories themselves contain zero or more data sources.
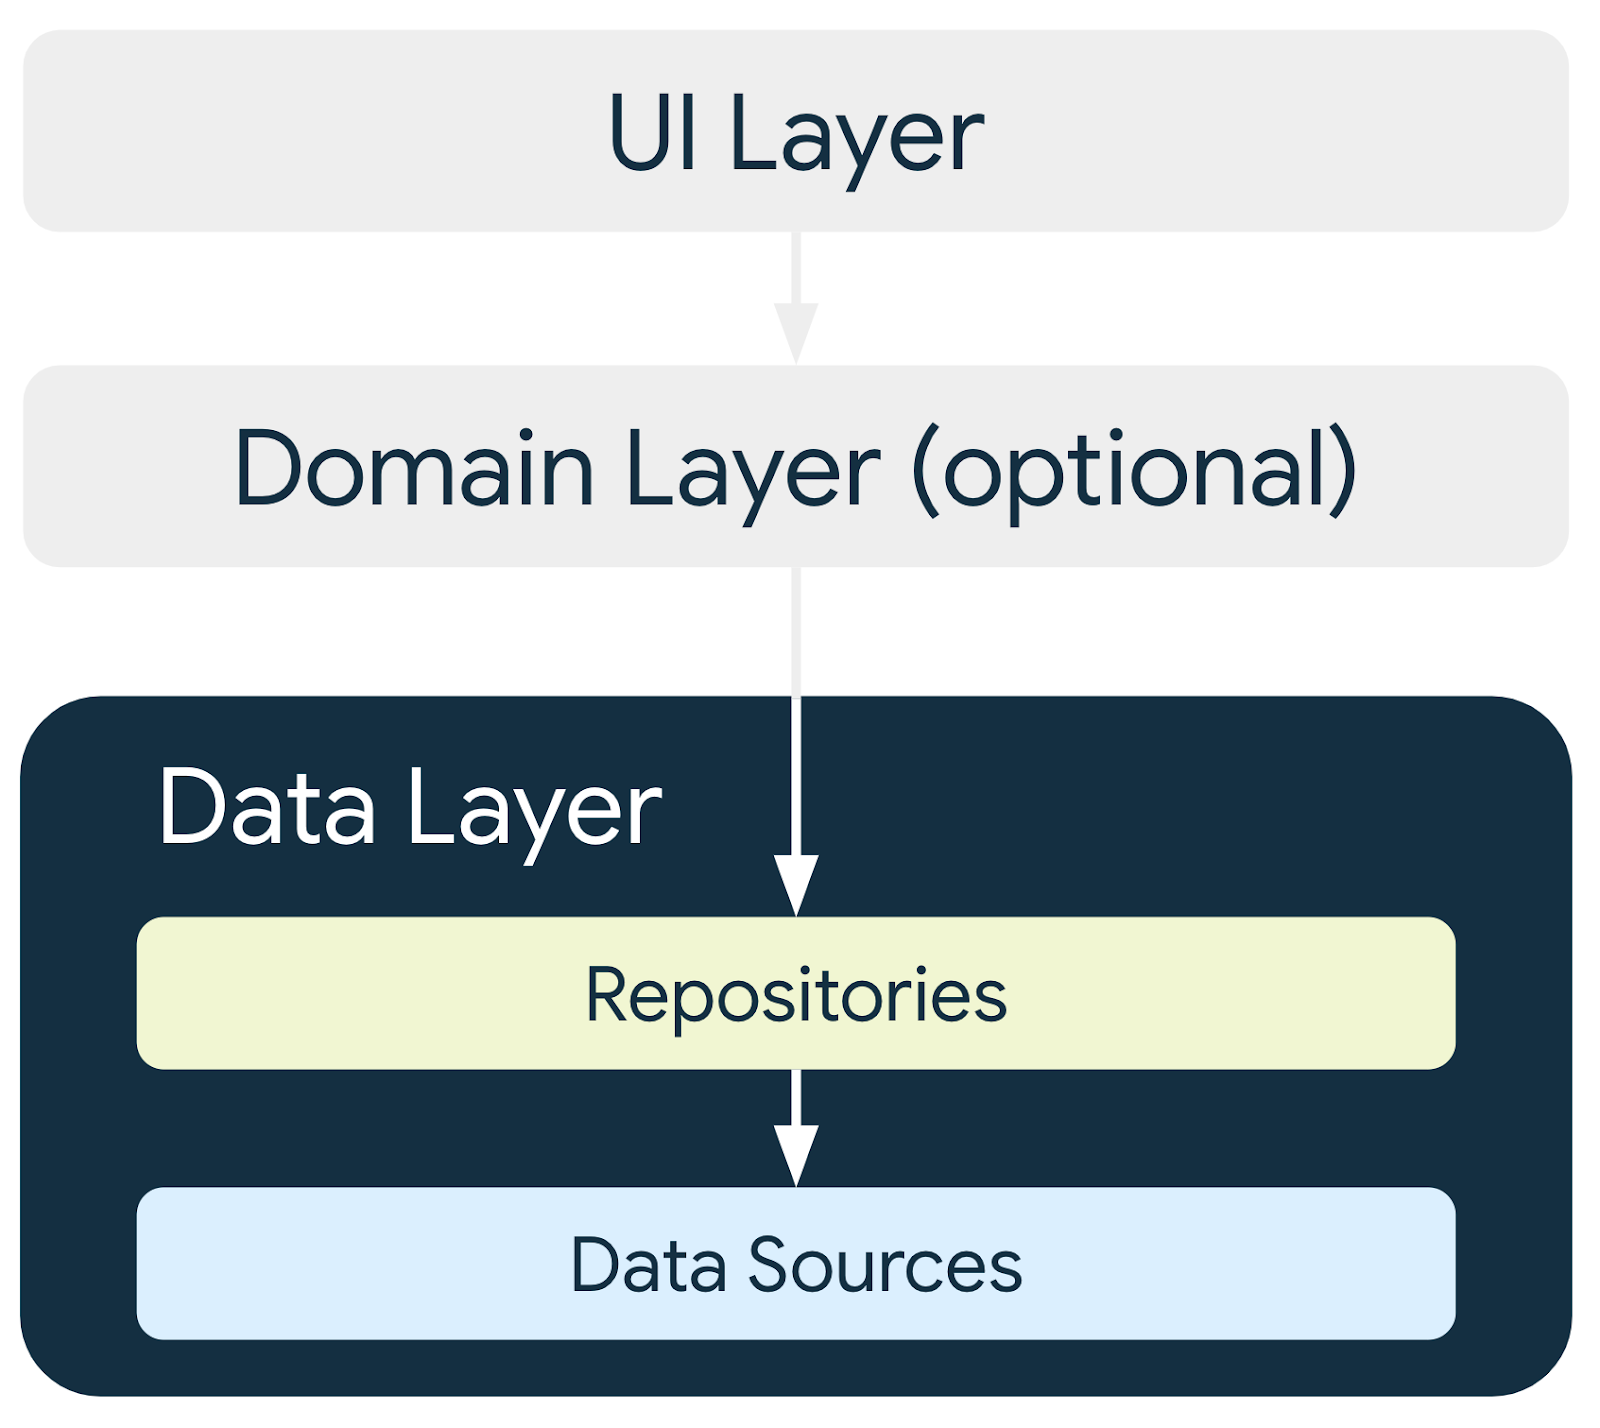
Best practices require the app to have a repository for each type of data source your app uses.
In this codelab, the app has one data source, so it has one repository after you refactor the code. For this app, the repository that retrieves data from the internet completes the data source's responsibilities. It does so by making a network request to an API. If the data source coding is more complex or additional data sources are added, the data source responsibilities are encapsulated in separate data source classes, and the repository is responsible for managing all the data sources.
What is a repository?
In general a repository class:
- Exposes data to the rest of the app.
- Centralizes changes to data.
- Resolves conflicts between multiple data sources.
- Abstracts sources of data from the rest of the app.
- Contains business logic.
The Mars Photos app has a single data source, which is the network API call. It does not have any business logic, as it is just retrieving data. The data is exposed to the app through the repository class, which abstracts away the source of the data.
3. Create Data layer
First, you need to create the repository class. The Android developers guide states that repository classes are named after the data they're responsible for. The repository naming convention is type of data + Repository. In your app, this is MarsPhotosRepository.
Create repository
- Right-click on com.example.marsphotos and select New > Package.
- In the dialog, enter
data. - Right-click on the
datapackage and select New > Kotlin Class/File. - In the dialog, select Interface and enter
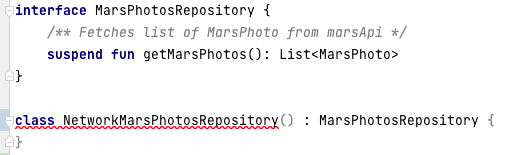
MarsPhotosRepositoryas the name of the interface. - Inside the
MarsPhotosRepositoryinterface, add an abstract function calledgetMarsPhotos(), which returns a list ofMarsPhotoobjects. It is called from a coroutine, so declare it withsuspend.
import com.example.marsphotos.model.MarsPhoto

interface MarsPhotosRepository {
    suspend fun getMarsPhotos(): List<MarsPhoto>
}
- Below the interface declaration, create a class named
NetworkMarsPhotosRepositoryfor implementing theMarsPhotosRepositoryinterface. - Add interface
MarsPhotosRepositoryto the class declaration.
Because you did not override the abstract method of the interface, an error message appears. The next step addresses this error.
- Inside the
NetworkMarsPhotosRepositoryclass, override the abstract functiongetMarsPhotos(). This function returns the data from callingMarsApi.retrofitService.getPhotos().
import com.example.marsphotos.network.MarsApi

class NetworkMarsPhotosRepository() : MarsPhotosRepository {
   override suspend fun getMarsPhotos(): List<MarsPhoto> {
       return MarsApi.retrofitService.getPhotos()
   }
}
Next, you need to update the ViewModel code to use the repository to get the data as Android best practices suggest.
- Open the
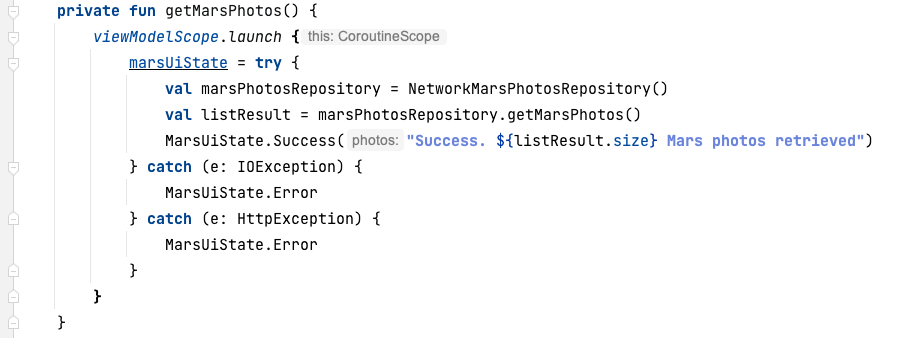
ui/screens/MarsViewModel.ktfile. - Scroll down to the
getMarsPhotos()method. - Replace the line "
val listResult = MarsApi.retrofitService.getPhotos()" with the following code:
import com.example.marsphotos.data.NetworkMarsPhotosRepository

val marsPhotosRepository = NetworkMarsPhotosRepository()
val listResult = marsPhotosRepository.getMarsPhotos()
- Run the app. Notice that the results displayed are the same as the previous results.
Instead of the ViewModel directly making the network request for the data, the repository provides the data. The ViewModel no longer directly references the MarsApi code. 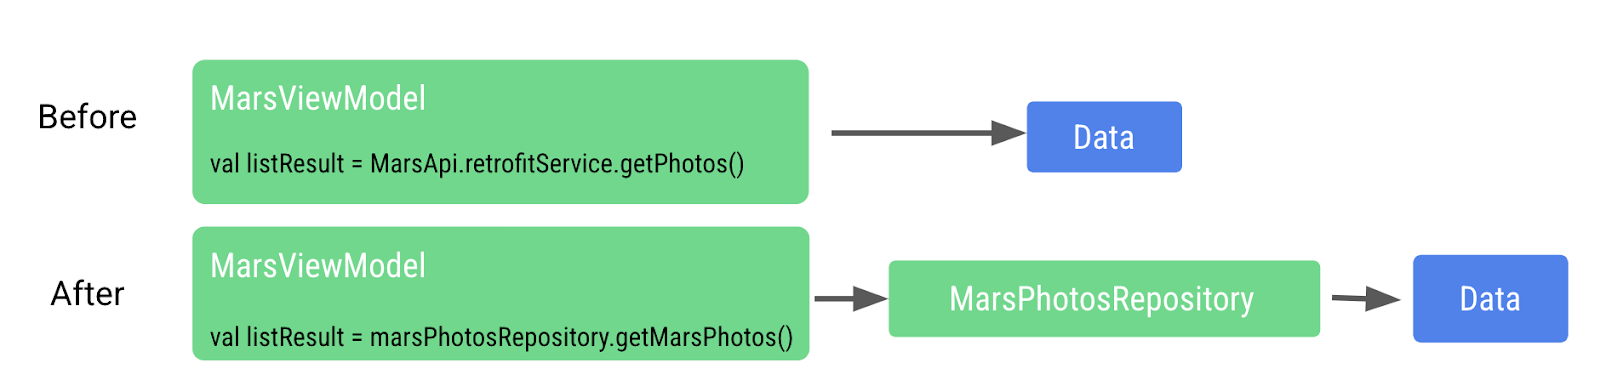
This approach helps make the code retrieving the data loosely coupled from ViewModel. Being loosely coupled allows changes to be made to the ViewModel or the repository without adversely affecting the other, as long as the repository has a function called getMarsPhotos().
We are now able to make changes to the implementation inside the repository without affecting the caller. For larger apps, this change can support multiple callers.
4. Dependency injection
Many times, classes require objects of other classes to function. When a class requires another class, the required class is called a dependency.
In the following examples, the Car object depends on an Engine object.
There are two ways for a class to get these required objects. One way is for the class to instantiate the required object itself.
interface Engine {
    fun start()
}

class GasEngine : Engine {
    override fun start() {
        println("GasEngine started!")
    }
}

class Car {

    private val engine = GasEngine()

    fun start() {
        engine.start()
    }
}

fun main() {
    val car = Car()
    car.start()
}
The other way is by passing the required object in as an argument.
interface Engine {
    fun start()
}

class GasEngine : Engine {
    override fun start() {
        println("GasEngine started!")
    }
}

class Car(private val engine: Engine) {
    fun start() {
        engine.start()
    }
}

fun main() {
    val engine = GasEngine()
    val car = Car(engine)
    car.start()
}
Having a class instantiate the required objects is easy, but this approach makes the code inflexible and more difficult to test as the class and the required object are tightly coupled.
The calling class needs to call the object's constructor, which is an implementation detail. If the constructor changes, the calling code needs to change, too.
To make the code more flexible and adaptable, a class must not instantiate the objects it depends on. The objects it depends on must be instantiated outside the class and then passed in. This approach creates more flexible code, as the class is no longer hardcoded to one particular object. The implementation of the required object can change without needing to modify the calling code.
Continuing with the preceding example, if an ElectricEngine is needed, it can be created and passed into the Car class. The Car class does not need to be modified in any way.
interface Engine {
    fun start()
}

class ElectricEngine : Engine {
    override fun start() {
        println("ElectricEngine started!")
    }
}

class Car(private val engine: Engine) {
    fun start() {
        engine.start()
    }
}

fun main() {
    val engine = ElectricEngine()
    val car = Car(engine)
    car.start()
}
Passing in the required objects is called dependency injection (DI). It is also known as inversion of control.
DI is when a dependency is provided at runtime instead of being hardcoded into the calling class.
Implementing dependency injection:
- Helps with the reusability of code. Code is not dependent on a specific object, which allows for greater flexibility.
- Makes refactoring easier. Code is loosely coupled, so refactoring one section of code does not impact another section of code.
- Helps with testing. Test objects can be passed in during testing.
One example of how DI can help with testing is when testing the network calling code. For this test, you are really trying to test that the network call is made and that data is returned. If you had to pay each time you made a network request during a test, you might decide to skip testing this code, as it can get expensive. Now, imagine if we can fake the network request for testing. How much happier (and wealthier) does that make you? For testing, you can pass a test object to the repository that returns fake data when called without actually performing a real network call. 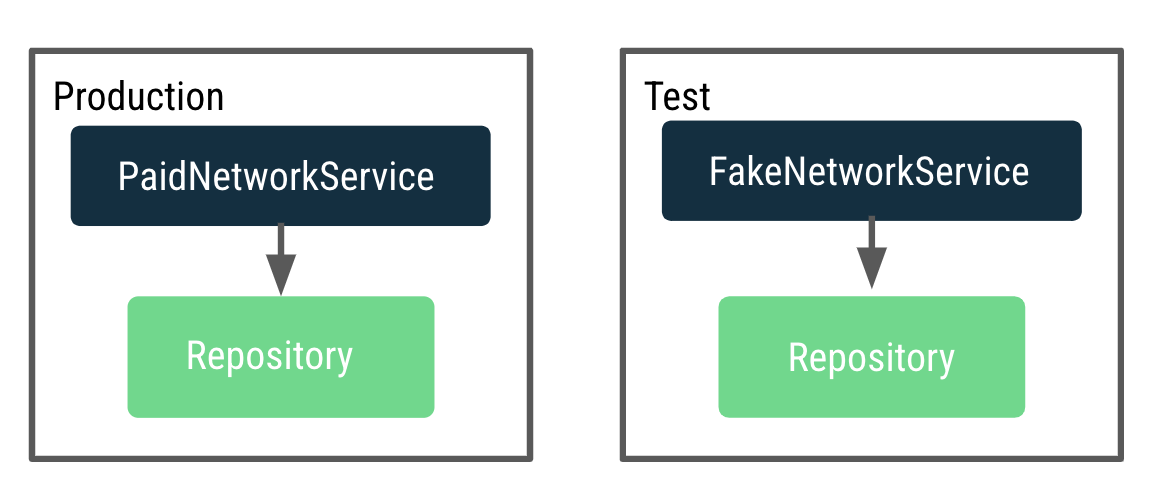
We want to make the ViewModel testable, but it currently depends on a repository that makes actual network calls. When testing with the real production repository, it makes many network calls. To fix this issue, instead of the ViewModel creating the repository, we need a way to decide and pass a repository instance to use for production and test dynamically.
This process is done by implementing an application container that provides the repository to MarsViewModel.
A container is an object that contains the dependencies that the app requires. These dependencies are used across the whole application, so they need to be in a common place that all activities can use. You can create a subclass of the Application class and store a reference to the container.
Create an Application Container
- Right-click on the
datapackage and select New > Kotlin Class/File. - In the dialog, select Interface, and enter
AppContaineras the name of the interface. - Inside the
AppContainerinterface, add an abstract property calledmarsPhotosRepositoryof typeMarsPhotosRepository.
- Below the interface definition, create a class called
DefaultAppContainerthat implements the interfaceAppContainer. - From
network/MarsApiService.kt, move the code for variablesBASE_URL,retrofit, andretrofitServiceinto theDefaultAppContainerclass so that they are all located within the container that maintains the dependencies.
import retrofit2.Retrofit
import com.example.marsphotos.network.MarsApiService
import com.jakewharton.retrofit2.converter.kotlinx.serialization.asConverterFactory
import kotlinx.serialization.json.Json
import okhttp3.MediaType.Companion.toMediaType

class DefaultAppContainer : AppContainer {

    private const val BASE_URL =
        "https://android-kotlin-fun-mars-server.appspot.com"

    private val retrofit: Retrofit = Retrofit.Builder()
        .addConverterFactory(Json.asConverterFactory("application/json".toMediaType()))
        .baseUrl(BASE_URL)
        .build()

    private val retrofitService: MarsApiService by lazy {
        retrofit.create(MarsApiService::class.java)
    }

}
- For variable
BASE_URL, remove theconstkeyword. Removingconstis necessary becauseBASE_URLis no longer a top level variable and is now a property of theDefaultAppContainerclass. Refactor it to camelcasebaseUrl. - For variable
retrofitService, add aprivatevisibility modifier. Theprivatemodifier is added because variableretrofitServiceis only used inside the class by propertymarsPhotosRepository, so it does not need to be accessible outside the class. - The
DefaultAppContainerclass implements the interfaceAppContainer, so we need to override themarsPhotosRepositoryproperty. After the variableretrofitService, add the following code:
override val marsPhotosRepository: MarsPhotosRepository by lazy {
    NetworkMarsPhotosRepository(retrofitService)
}
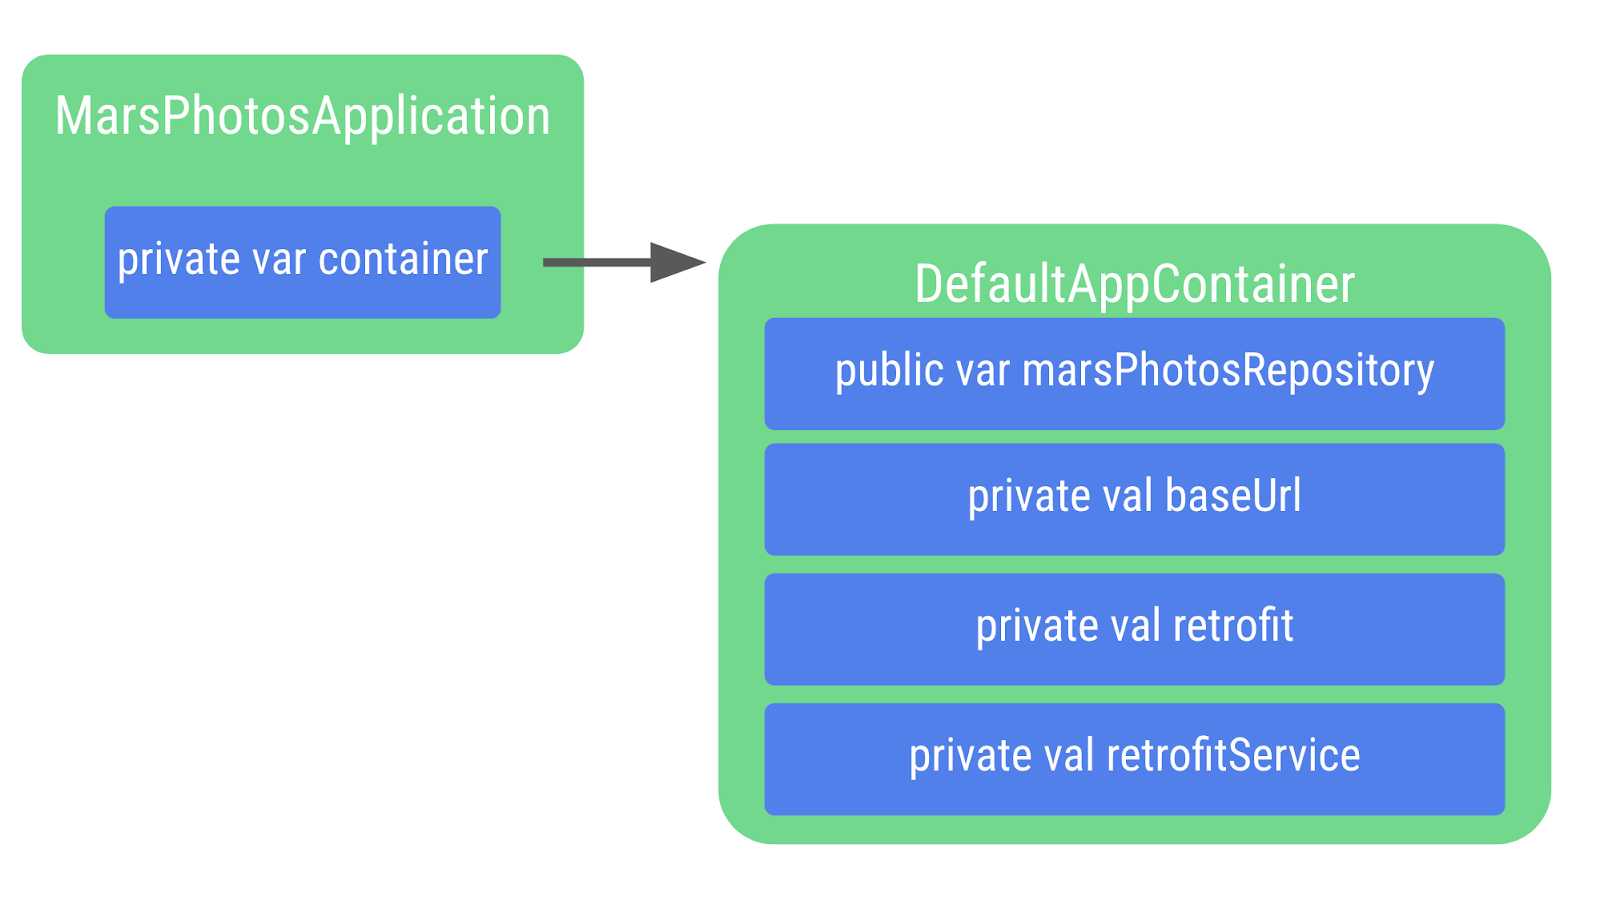
Completed DefaultAppContainer class should look like this:
class DefaultAppContainer : AppContainer {

    private val baseUrl =
        "https://android-kotlin-fun-mars-server.appspot.com"

    /**
     * Use the Retrofit builder to build a retrofit object using a kotlinx.serialization converter
     */
    private val retrofit = Retrofit.Builder()
        .addConverterFactory(Json.asConverterFactory("application/json".toMediaType()))
        .baseUrl(baseUrl)
        .build()

    private val retrofitService: MarsApiService by lazy {
        retrofit.create(MarsApiService::class.java)
    }

    override val marsPhotosRepository: MarsPhotosRepository by lazy {
        NetworkMarsPhotosRepository(retrofitService)
    }
}
- Open the
data/MarsPhotosRepository.ktfile. We are now passingretrofitServicetoNetworkMarsPhotosRepository, and you need to modify theNetworkMarsPhotosRepositoryclass. - In the
NetworkMarsPhotosRepositoryclass declaration, add the constructor parametermarsApiServiceas shown in the following code.
import com.example.marsphotos.network.MarsApiService

class NetworkMarsPhotosRepository(
    private val marsApiService: MarsApiService
) : MarsPhotosRepository {
- In the
NetworkMarsPhotosRepositoryclass, in thegetMarsPhotos()function, change the return statement to retrieve data frommarsApiService.
override suspend fun getMarsPhotos(): List<MarsPhoto> = marsApiService.getPhotos()
}
- Remove the following import from the
MarsPhotosRepository.ktfile.
// Remove
import com.example.marsphotos.network.MarsApi
From the network/MarsApiService.kt file, we moved all the code out of the object. We can now delete the remaining object declaration as it is no longer needed.
- Delete the following code:
object MarsApi {

}
5. Attach application container to the app
The steps in this section connect the application object to the application container as shown in the following figure.
- Right-click on
com.example.marsphotosand select New > Kotlin Class/File. - In the dialog, enter
MarsPhotosApplication. This class inherits from the application object, so you need to add it to the class declaration.
import android.app.Application

class MarsPhotosApplication : Application() {
}
- Inside the
MarsPhotosApplicationclass, declare a variable calledcontainerof the typeAppContainerto store theDefaultAppContainerobject. The variable is initialized during the call toonCreate(), so the variable needs to be marked with thelateinitmodifier.
import com.example.marsphotos.data.AppContainer
import com.example.marsphotos.data.DefaultAppContainer

lateinit var container: AppContainer
override fun onCreate() {
    super.onCreate()
    container = DefaultAppContainer()
}
- The complete
MarsPhotosApplication.ktfile should look like the following code:
package com.example.marsphotos

import android.app.Application
import com.example.marsphotos.data.AppContainer
import com.example.marsphotos.data.DefaultAppContainer

class MarsPhotosApplication : Application() {
    lateinit var container: AppContainer
    override fun onCreate() {
        super.onCreate()
        container = DefaultAppContainer()
    }
}
- You need to update the Android manifest so the app uses the application class you just defined. Open the
manifests/AndroidManifest.xmlfile.

- In the
applicationsection, add theandroid:nameattribute with a value of application class name".MarsPhotosApplication".
<application
   android:name=".MarsPhotosApplication"
   android:allowBackup="true"
...
</application>
6. Add repository to ViewModel
Once you complete these steps, the ViewModel can call the repository object to retrieve Mars data.
- Open the
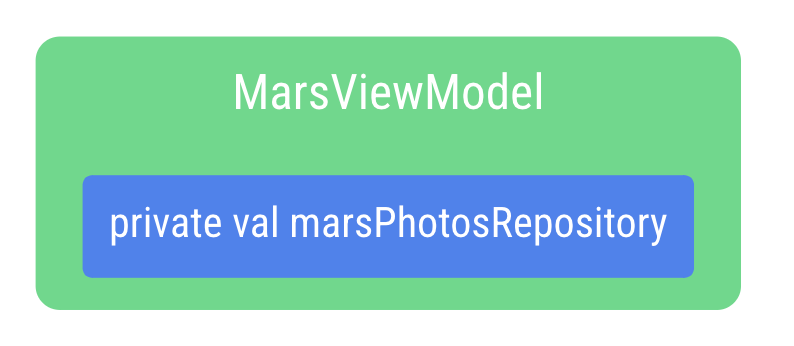
ui/screens/MarsViewModel.ktfile. - In the class declaration for
MarsViewModel, add a private constructor parametermarsPhotosRepositoryof typeMarsPhotosRepository. The value for the constructor parameter comes from the application container because the app is now using dependency injection.
import com.example.marsphotos.data.MarsPhotosRepository


class MarsViewModel(private val marsPhotosRepository: MarsPhotosRepository) : ViewModel(){
- In the
getMarsPhotos()function, remove the following line of code asmarsPhotosRepositoryis now being populated in the constructor call.
val marsPhotosRepository = NetworkMarsPhotosRepository()
- Because the Android framework does not allow a
ViewModelto be passed values in the constructor when created, we implement aViewModelProvider.Factoryobject, which lets us get around this limitation.
The Factory pattern is a creational pattern used to create objects. The MarsViewModel.Factory object uses the application container to retrieve the marsPhotosRepository, and then passes this repository to the ViewModel when the ViewModel object is created.
- Below the function
getMarsPhotos(), type the code for the companion object.
A companion object helps us by having a single instance of an object that is used by everyone without needing to create a new instance of an expensive object. This is an implementation detail, and separating it lets us make changes without impacting other parts of the app's code.
The APPLICATION_KEY is part of the ViewModelProvider.AndroidViewModelFactory.Companion object and is used to find the app's MarsPhotosApplication object, which has the container property used to retrieve the repository used for dependency injection.
import androidx.lifecycle.ViewModelProvider
import androidx.lifecycle.ViewModelProvider.AndroidViewModelFactory.Companion.APPLICATION_KEY
import androidx.lifecycle.viewModelScope
import androidx.lifecycle.viewmodel.initializer
import androidx.lifecycle.viewmodel.viewModelFactory
import com.example.marsphotos.MarsPhotosApplication

companion object {
   val Factory: ViewModelProvider.Factory = viewModelFactory {
       initializer {
           val application = (this[APPLICATION_KEY] as MarsPhotosApplication)
           val marsPhotosRepository = application.container.marsPhotosRepository
           MarsViewModel(marsPhotosRepository = marsPhotosRepository)
       }
   }
}
- Open the
theme/MarsPhotosApp.ktfile, inside theMarsPhotosApp()function, update theviewModel()to use the factory.
Surface(
            // ...
        ) {
            val marsViewModel: MarsViewModel =
   viewModel(factory = MarsViewModel.Factory)
            // ...
        }
This marsViewModel variable is populated by the call to the viewModel() function that is passed the MarsViewModel.Factory from the companion object as an argument to create the ViewModel.
- Run the app to confirm it is still behaving as it was previously.
Congratulations on refactoring the Mars Photos app to use a repository and dependency injection! By implementing a data layer with a repository, the UI and data source code have been separated to follow Android best practices.
By using dependency injection, it is easier to test the ViewModel. Your app is now more flexible, robust, and ready to scale.
After making these improvements, it is now time to learn how to test them. Testing keeps your code behaving as expected and reduces the possibility of introducing bugs as you continue to work on the code.
7. Get setup for local tests
In the previous sections, you have implemented a repository to abstract direct interaction with the REST API service away from the ViewModel. This practice lets you test small pieces of code that have a limited purpose. Tests for small pieces of code with limited functionality are easier to build, implement, and understand than tests written for large pieces of code that have multiple functionalities.
You also have implemented the repository by leveraging interfaces, inheritance, and dependency injection. In the coming sections, you learn why these architectural best practices make testing easier. Additionally, you have used Kotlin coroutines to make the network request. Testing code that uses coroutines requires additional steps to account for the asynchronous execution of code. These steps are covered later in this codelab.
Add the local test dependencies
Add the following dependencies to app/build.gradle.kts.
testImplementation("junit:junit:4.13.2")
testImplementation("org.jetbrains.kotlinx:kotlinx-coroutines-test:1.7.1")
Create the local test directory
- Create a local test directory by right-clicking the src directory in the project view and selecting New > Directory > test/java.
- Create a new package in the test directory named
com.example.marsphotos.
8. Create fake data and dependencies for tests
In this section, you learn how dependency injection can help you write local tests. Earlier in the codelab, you created a repository that depends on an API service. You then modified the ViewModel to depend on the repository.
Each local test needs to only test one thing. For example, when you test the functionality of the view model, you do not want to test the functionality of the repository or the API service. Likewise, when you test the repository, you do not want to test the API service.
By using interfaces and subsequently using dependency injection to include classes that inherit from those interfaces, you can simulate the functionality of those dependencies using fake classes made solely for the purpose of testing. Injecting fake classes and data sources for testing allows code to be tested in isolation, with repeatability and consistency.
This first thing you need is fake data to use in the fake classes that you create later.
- In the test directory, create a package under
com.example.marsphotoscalledfake. - Create a new Kotlin object in the
fakedirectory calledFakeDataSource. - In this object, create a property set to a list of
MarsPhotoobjects. The list does not have to be long, but it should contain at least two objects.
object FakeDataSource {

   const val idOne = "img1"
   const val idTwo = "img2"
   const val imgOne = "url.1"
   const val imgTwo = "url.2"
   val photosList = listOf(
       MarsPhoto(
           id = idOne,
           imgSrc = imgOne
       ),
       MarsPhoto(
           id = idTwo,
           imgSrc = imgTwo
       )
   )
}
It was mentioned earlier in this codelab that the repository depends on the API service. To create a repository test, there must be a fake API service that returns the fake data you just created. When this fake API service is passed into the repository, the repository receives the fake data when the methods in the fake API service are called.
- In the
fakepackage, create a new class calledFakeMarsApiService. - Set up the
FakeMarsApiServiceclass to inherit from theMarsApiServiceinterface.
class FakeMarsApiService : MarsApiService {
}
- Override the
getPhotos()function.
override suspend fun getPhotos(): List<MarsPhoto> {
}
- Return the list of fake photos from the
getPhotos()method.
override suspend fun getPhotos(): List<MarsPhoto> {
   return FakeDataSource.photosList
}
Remember, if you are still unclear on the purpose of this class, that's okay! The uses of this fake class are explained in greater detail in the next section.
9. Write a repository test
In this section, you test the getMarsPhotos() method of the NetworkMarsPhotosRepository class. This section clarifies the usage of fake classes and demonstrates how to test coroutines.
- In the fake directory, create a new class called
NetworkMarsRepositoryTest. - Create a new method in the class you just created called
networkMarsPhotosRepository_getMarsPhotos_verifyPhotoList()and annotate it with@Test.
@Test
fun networkMarsPhotosRepository_getMarsPhotos_verifyPhotoList(){
}
To test the repository, you will need an instance of the NetworkMarsPhotosRepository. Recall that this class depends on the MarsApiService interface. This is where you leverage the fake API service from the previous section.
- Create an instance of the
NetworkMarsPhotosRepositoryand pass theFakeMarsApiServiceas themarsApiServiceparameter.
@Test
fun networkMarsPhotosRepository_getMarsPhotos_verifyPhotoList(){
    val repository = NetworkMarsPhotosRepository(
       marsApiService = FakeMarsApiService()
    )
}
By passing the fake API service, any calls to the marsApiService property in the repository result in a call to the FakeMarsApiService. By passing fake classes for dependencies, you can control exactly what the dependency returns. This approach ensures that the code you are testing doesn't depend on untested code or APIs that could change or have unforeseen problems. Such situations can cause your test to fail, even when nothing is wrong with the code you wrote. Fakes help create a more consistent test environment, reduce test flakiness, and facilitate concise tests that test a single functionality.
- Assert that the data returned by the
getMarsPhotos()method is equal to theFakeDataSource.photosList.
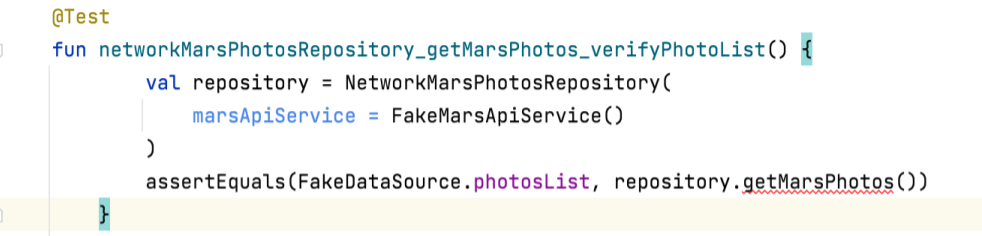
@Test
fun networkMarsPhotosRepository_getMarsPhotos_verifyPhotoList(){
    val repository = NetworkMarsPhotosRepository(
       marsApiService = FakeMarsApiService()
    )assertEquals(FakeDataSource.photosList, repository.getMarsPhotos())
}
Note that in your IDE, the getMarsPhotos() method call is underlined in red.
If you hover your mouse over the method, you can see a tooltip indicating that "Suspend function ‘getMarsPhotos' should be called only from a coroutine or another suspend function:"
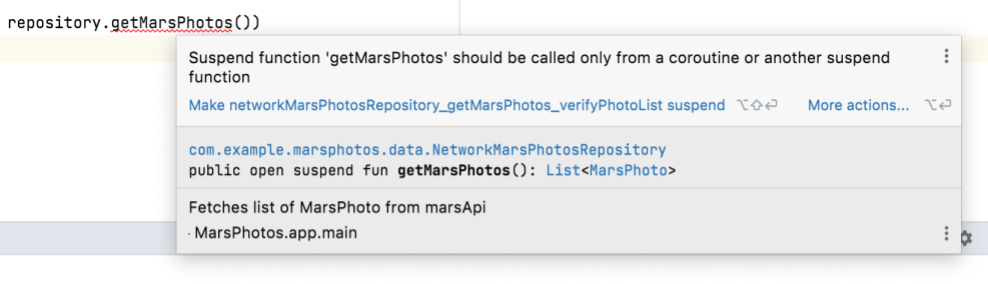
In data/MarsPhotosRepository.kt, looking at the getMarsPhotos() implementation in the NetworkMarsPhotosRepository, you see that the getMarsPhotos() function is a suspend function.
class NetworkMarsPhotosRepository(
   private val marsApiService: MarsApiService
) : MarsPhotosRepository {
   /** Fetches list of MarsPhoto from marsApi*/
   override suspend fun getMarsPhotos(): List<MarsPhoto> = marsApiService.getPhotos()
}
Remember when you called this function from the MarsViewModel, you called this method from a coroutine by calling it from a lambda passed to viewModelScope.launch(). You must also call suspend functions, like getMarsPhotos(), from a coroutine in a test. However, the approach is different. The next section discusses how to solve this problem.
Test coroutines
In this section, you modify the networkMarsPhotosRepository_getMarsPhotos_verifyPhotoList() test so that the body of the test method is run from a coroutine.
- Modify in the
NetworkMarsRepositoryTest.ktthenetworkMarsPhotosRepository_getMarsPhotos_verifyPhotoList()function to be an expression.
@Test
fun networkMarsPhotosRepository_getMarsPhotos_verifyPhotoList() =
- Set the expression equal to the
runTest()function. This method expects a lambda.
...
import kotlinx.coroutines.test.runTest
...

@Test
fun networkMarsPhotosRepository_getMarsPhotos_verifyPhotoList() =
    runTest {}
The coroutine test library provides the runTest() function. The function takes the method that you passed in the lambda and runs it from TestScope, which inherits from CoroutineScope.
- Move the contents of the test function into the lambda function.
@Test
fun networkMarsPhotosRepository_getMarsPhotos_verifyPhotoList() =
   runTest {
       val repository = NetworkMarsPhotosRepository(
           marsApiService = FakeMarsApiService()
       )
       assertEquals(FakeDataSource.photosList, repository.getMarsPhotos())
   }
Notice that the red line under getMarsPhotos() is now gone. If you run this test, it passes!
10. Write a ViewModel test
In this section, you write a test for the getMarsPhotos() function from the MarsViewModel. The MarsViewModel depends on the MarsPhotosRepository. Therefore, to write this test, you need to create a fake MarsPhotosRepository. Additionally, there are some extra steps to take into account for coroutines beyond using the runTest() method.
Create the fake repository
The goal of this step is to create a fake class that inherits from the MarsPhotosRepository interface and overrides the getMarsPhotos() function to return fake data. This approach is similar to the one you took with the fake API service, the difference being that this class extends the MarsPhotosRepository interface instead of the MarsApiService.
- Create a new class in the
fakedirectory calledFakeNetworkMarsPhotosRepository. - Extend this class with the
MarsPhotosRepositoryinterface.
class FakeNetworkMarsPhotosRepository : MarsPhotosRepository{
}
- Override the
getMarsPhotos()function.
class FakeNetworkMarsPhotosRepository : MarsPhotosRepository{
   override suspend fun getMarsPhotos(): List<MarsPhoto> {
   }
}
- Return
FakeDataSource.photosListfrom thegetMarsPhotos()function.
class FakeNetworkMarsPhotosRepository : MarsPhotosRepository{
   override suspend fun getMarsPhotos(): List<MarsPhoto> {
       return FakeDataSource.photosList
   }
}
Write the ViewModel test
- Create a new class called
MarsViewModelTest. - Create a function called
marsViewModel_getMarsPhotos_verifyMarsUiStateSuccess()and annotate it with@Test.
@Test
fun marsViewModel_getMarsPhotos_verifyMarsUiStateSuccess()
- Make this function an expression set to the result of the
runTest()method to ensure that the test is run from a coroutine, just like the repository test in the previous section.
@Test
fun marsViewModel_getMarsPhotos_verifyMarsUiStateSuccess() =
    runTest{
    }
- In the lambda body of
runTest(), create an instance of theMarsViewModeland pass it an instance of the fake repository you created.
@Test
fun marsViewModel_getMarsPhotos_verifyMarsUiStateSuccess() =
    runTest{
        val marsViewModel = MarsViewModel(
            marsPhotosRepository = FakeNetworkMarsPhotosRepository()
         )
    }
- Assert that the
marsUiStateof yourViewModelinstance matches the result of a successful call toMarsPhotosRepository.getMarsPhotos().
@Test
fun marsViewModel_getMarsPhotos_verifyMarsUiStateSuccess() =
   runTest {
       val marsViewModel = MarsViewModel(
           marsPhotosRepository = FakeNetworkMarsPhotosRepository()
       )
       assertEquals(
           MarsUiState.Success("Success: ${FakeDataSource.photosList.size} Mars " +
                   "photos retrieved"),
           marsViewModel.marsUiState
       )
   }
If you try to run this test as is, it will fail. The error looks something like the following example:
Exception in thread "Test worker @coroutine#1" java.lang.IllegalStateException: Module with the Main dispatcher had failed to initialize. For tests Dispatchers.setMain from kotlinx-coroutines-test module can be used
Recall that the MarsViewModel calls the repository using viewModelScope.launch(). This instruction launches a new coroutine under the default coroutine dispatcher, which is called the Main dispatcher. The Main dispatcher wraps the Android UI thread. The reason for the preceding error is the Android UI thread is not available in a unit test. Unit tests are executed on your workstation, not an Android device or Emulator. If code under a local unit test references the Main dispatcher, an exception (like the one above) is thrown when the unit tests are run. To overcome this issue, you must explicitly define the default dispatcher when running unit tests. Head to the next section to learn how to do so.
Create a test dispatcher
Since the Main dispatcher is only available in a UI context, you must replace it with a unit-test-friendly dispatcher. The Kotlin Coroutines library provides a coroutine dispatcher for this purpose called TestDispatcher. The TestDispatcher needs to be used instead of the Main dispatcher for any unit test in which a new coroutine is made, as is the case with the getMarsPhotos() function from the view model.
To replace the Main dispatcher with a TestDispatcher in all cases, use the Dispatchers.setMain() function. You can use the Dispatchers.resetMain() function to reset the thread dispatcher back to the Main dispatcher. To avoid duplicating the code that replaces the Main dispatcher in each test, you can extract it into a JUnit test rule. A TestRule provides a way to control the environment under which a test is run. A TestRule may add additional checks, it may perform necessary setup or cleanup for tests, or it may observe test execution to report it elsewhere. They can be easily shared between test classes.
Create a dedicated class to write the TestRule to replace the Main dispatcher. To implement a custom TestRule, complete the following steps:
- Create a new package in the test directory called
rules. - In the rules directory, create a new class called
TestDispatcherRule. - Extend the
TestDispatcherRulewithTestWatcher. TheTestWatcherclass enables you to take actions on different execution phases of a test.
class TestDispatcherRule(): TestWatcher(){

}
- Create a
TestDispatcherconstructor parameter for theTestDispatcherRule.
This parameter enables the use of different dispatchers, such as StandardTestDispatcher. This constructor parameter needs to have a default value set to an instance of the UnconfinedTestDispatcher object. The UnconfinedTestDispatcher class inherits from the TestDispatcher class and it specifies that tasks must not be executed in any particular order. This pattern of execution is good for simple tests as coroutines are handled automatically. Unlike UnconfinedTestDispatcher, the StandardTestDispatcher class enables full control over coroutine execution. This way is preferable for complicated tests that require a manual approach, but it is not necessary for the tests in this codelab.
class TestDispatcherRule(
    val testDispatcher: TestDispatcher = UnconfinedTestDispatcher(),
) : TestWatcher() {

}
- The primary goal of this test rule is to replace the
Maindispatcher with a test dispatcher before a test begins to execute. Thestarting()function of theTestWatcherclass executes before a given test executes. Override thestarting()function.
class TestDispatcherRule(
    val testDispatcher: TestDispatcher = UnconfinedTestDispatcher(),
) : TestWatcher() {
    override fun starting(description: Description) {

    }
}
- Add a call to
Dispatchers.setMain(), passing intestDispatcheras an argument.
class TestDispatcherRule(
    val testDispatcher: TestDispatcher = UnconfinedTestDispatcher(),
) : TestWatcher() {
    override fun starting(description: Description) {
        Dispatchers.setMain(testDispatcher)
    }
}
- After test execution is finished, reset the
Maindispatcher by overriding thefinished()method. Call theDispatchers.resetMain()function.
class TestDispatcherRule(
    val testDispatcher: TestDispatcher = UnconfinedTestDispatcher(),
) : TestWatcher() {
    override fun starting(description: Description) {
        Dispatchers.setMain(testDispatcher)
    }

    override fun finished(description: Description) {
        Dispatchers.resetMain()
    }
}
The TestDispatcherRule rule is ready for reuse.
- Open the
MarsViewModelTest.ktfile. - In the
MarsViewModelTestclass, instantiate theTestDispatcherRuleclass and assign it to atestDispatcherread-only property.
class MarsViewModelTest {

    val testDispatcher = TestDispatcherRule()
    ...
}
- To apply this rule to your tests, add the
@get:Ruleannotation to thetestDispatcherproperty.
class MarsViewModelTest {
    @get:Rule
    val testDispatcher = TestDispatcherRule()
    ...
}
- Re-run the test. Confirm that it passes this time.
11. Get the solution code
To download the code for the finished codelab, you can use these commands:
$ git clone https://github.com/google-developer-training/basic-android-kotlin-compose-training-mars-photos.git
$ cd basic-android-kotlin-compose-training-mars-photos
$ git checkout coil-starter
Alternatively, you can download the repository as a zip file, unzip it, and open it in Android Studio.
If you want to see the solution code for this codelab, view it on GitHub.
12. Conclusion
Congratulations on completing this codelab and refactoring the Mars Photos app to implement the repository pattern and dependency injection!
The app's code is now following Android best practices for the data layer, which means it is more flexible, robust, and easily scalable.
These changes also helped make the app more easily testable. This benefit is very important, as the code can continue to evolve while making sure it still behaves as expected.
Don't forget to share your work on social media with #AndroidBasics!
13. Learn more
Android developer documentation:
Other: