
1. 소개
이전 Codelab에서는 창 크기 클래스를 사용하고 동적 탐색을 구현하여 Reply 앱을 적응형 앱으로 변환하기 시작했습니다. 이러한 기능은 모든 화면 크기에 맞는 앱을 빌드하기 위한 첫 번째 단계이자 중요한 기반입니다. 동적 탐색으로 적응형 앱 빌드 Codelab을 진행하지 않았다면 다시 돌아가 그 Codelab부터 시작하는 것이 좋습니다.
이 Codelab에서는 배운 개념을 바탕으로 앱에서 적응형 레이아웃을 추가로 구현합니다. 구현할 적응형 레이아웃은 대형 화면 디스플레이에 흔히 사용되는 패턴 세트인 표준 레이아웃의 일부입니다. 강력한 앱을 빠르게 빌드하는 데 도움이 되는 도구 및 테스트 기법에 관해서도 더 자세히 알아봅니다.
기본 요건
- 동적 탐색으로 적응형 앱 빌드 Codelab 완료
- 클래스, 함수, 조건문 등 Kotlin 프로그래밍에 관한 지식
ViewModel클래스에 관한 지식Composable함수에 관한 지식- Jetpack Compose로 레이아웃을 빌드해 본 경험
- 기기 또는 에뮬레이터에서 앱을 실행해 본 경험
WindowSizeClassAPI 사용 경험
학습할 내용
- Jetpack Compose를 사용하여 목록 보기 패턴 적응형 레이아웃을 만드는 방법
- 다양한 화면 크기에 맞게 미리보기를 만드는 방법
- 여러 화면 크기용 코드를 테스트하는 방법
빌드할 항목
- 모든 화면 크기에 적응하도록 Reply 앱을 계속 업데이트합니다.
최종 앱은 다음과 같이 표시됩니다.
필요한 항목
- 인터넷 액세스가 가능하고 웹브라우저, Android 스튜디오가 있는 컴퓨터
- GitHub 액세스
시작 코드 다운로드하기
시작하려면 시작 코드를 다운로드하세요.
GitHub 저장소를 클론하여 코드를 가져와도 됩니다.
$ git clone
https://github.com/google-developer-training/basic-android-kotlin-compose-training-reply-app.git
$ cd basic-android-kotlin-compose-training-reply-app
$ git checkout nav-update
Reply GitHub 저장소에서 시작 코드를 찾아볼 수 있습니다.
2. 다양한 화면 크기 미리보기
다양한 화면 크기의 미리보기 만들기
동적 탐색으로 적응형 앱 빌드 Codelab에서는 개발 프로세스에 도움이 되도록 미리보기 컴포저블을 사용하는 방법을 알아봤습니다. 적응형 앱의 경우 여러 미리보기를 만들어 다양한 화면 크기에 앱을 표시하는 것이 좋습니다. 여러 미리보기를 사용하면 모든 화면 크기에서 변경사항을 한 번에 확인할 수 있습니다. 또한 미리보기는 코드를 검토하여 앱이 다양한 화면 크기와 호환되는지 확인하는 다른 개발자를 위한 문서 역할도 합니다.
이전에는 소형 화면을 지원하는 미리보기가 하나만 있었습니다. 이제 더 많은 미리보기를 추가합니다.
중형 및 확장형 화면의 미리보기를 추가하려면 다음 단계를 완료하세요.
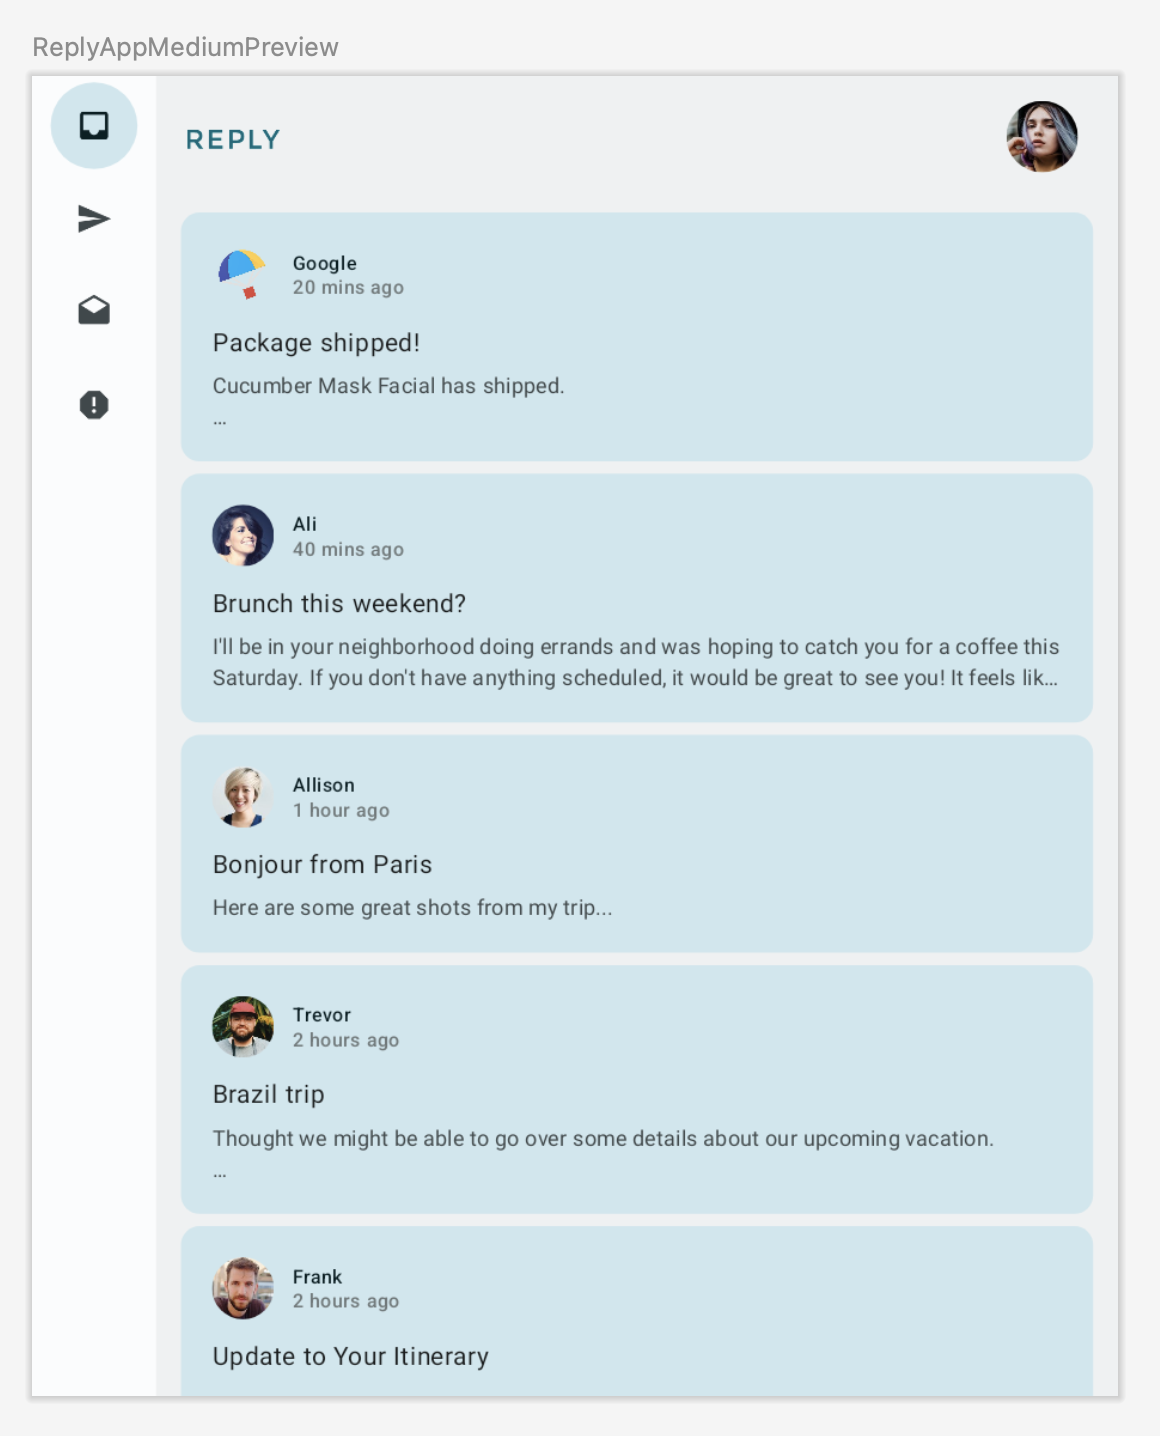
Preview주석 매개변수에 중형widthDp값을 설정하고WindowWidthSizeClass.Medium값을ReplyApp컴포저블의 매개변수로 지정하여 중형 화면의 미리보기를 추가합니다.
MainActivity.kt
...
@Preview(showBackground = true, widthDp = 700)
@Composable
fun ReplyAppMediumPreview() {
    ReplyTheme {
        Surface {
            ReplyApp(windowSize = WindowWidthSizeClass.Medium)
        }
    }
}
...
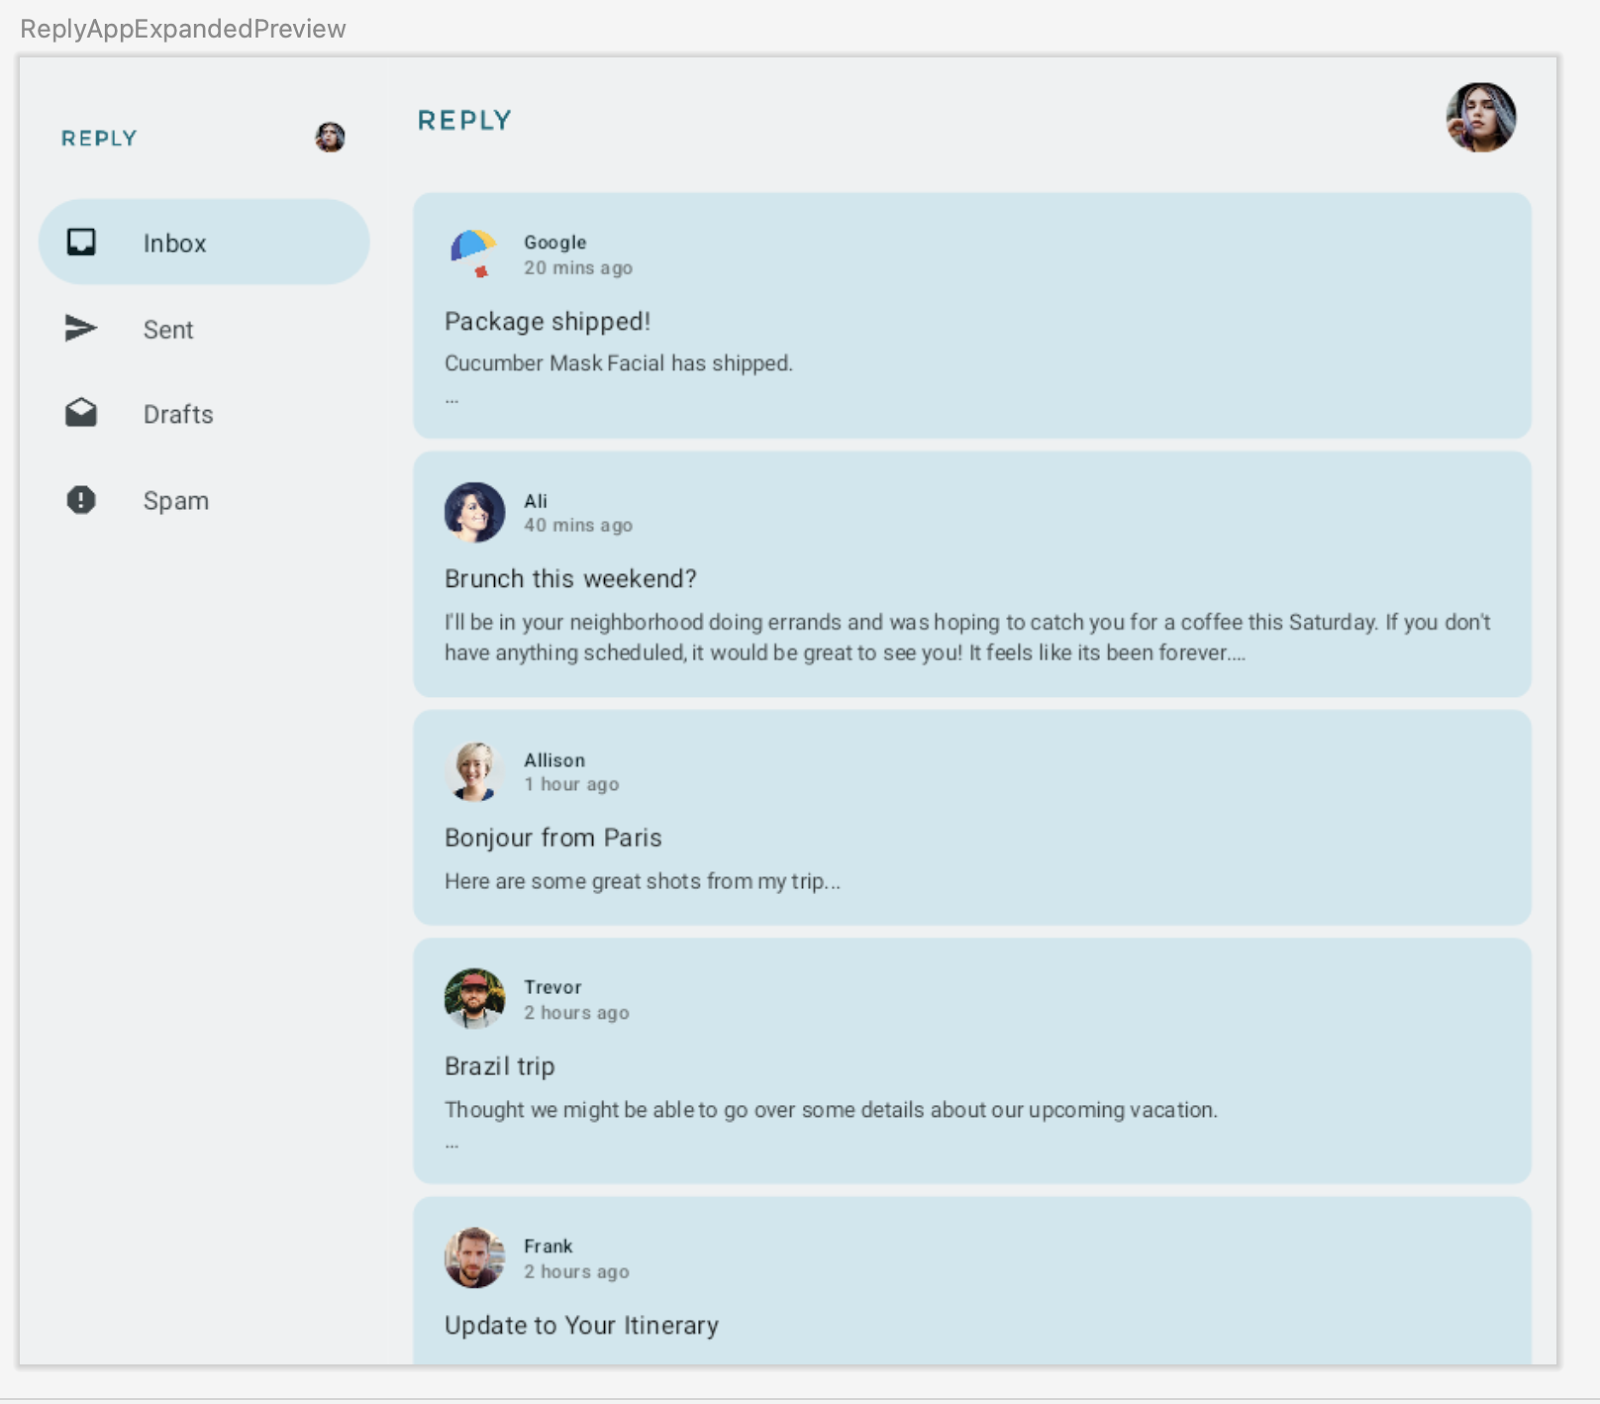
Preview주석 매개변수에 대형widthDp값을 설정하고WindowWidthSizeClass.Expanded값을ReplyApp컴포저블의 매개변수로 지정하여 확장형 화면의 또 다른 미리보기를 추가합니다.
MainActivity.kt
...
@Preview(showBackground = true, widthDp = 1000)
@Composable
fun ReplyAppExpandedPreview() {
    ReplyTheme {
        Surface {
            ReplyApp(windowSize = WindowWidthSizeClass.Expanded)
        }
    }
}
...
- 미리보기를 빌드하여 다음을 확인합니다.
3. 적응형 콘텐츠 레이아웃 구현
목록 세부정보 뷰 소개
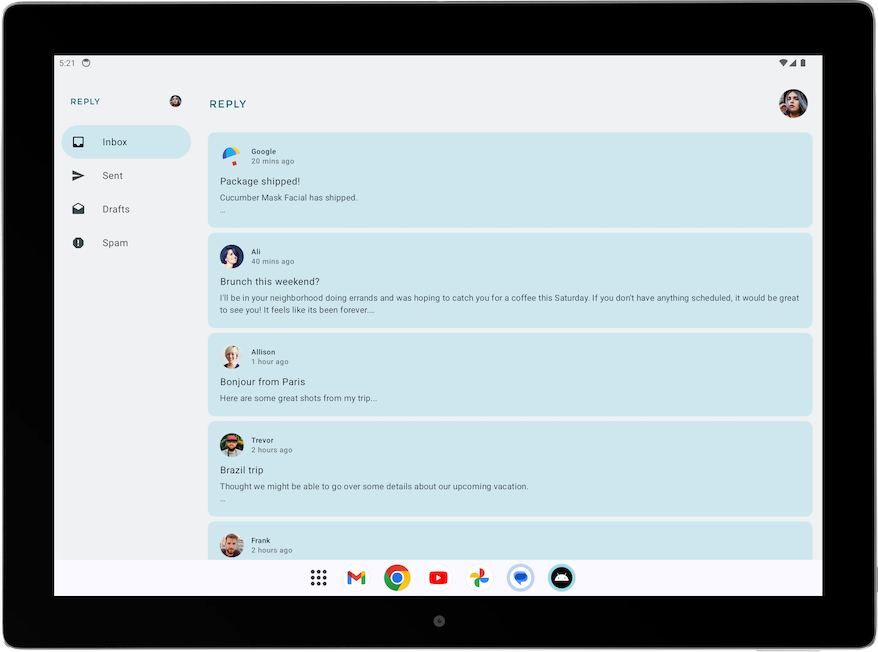
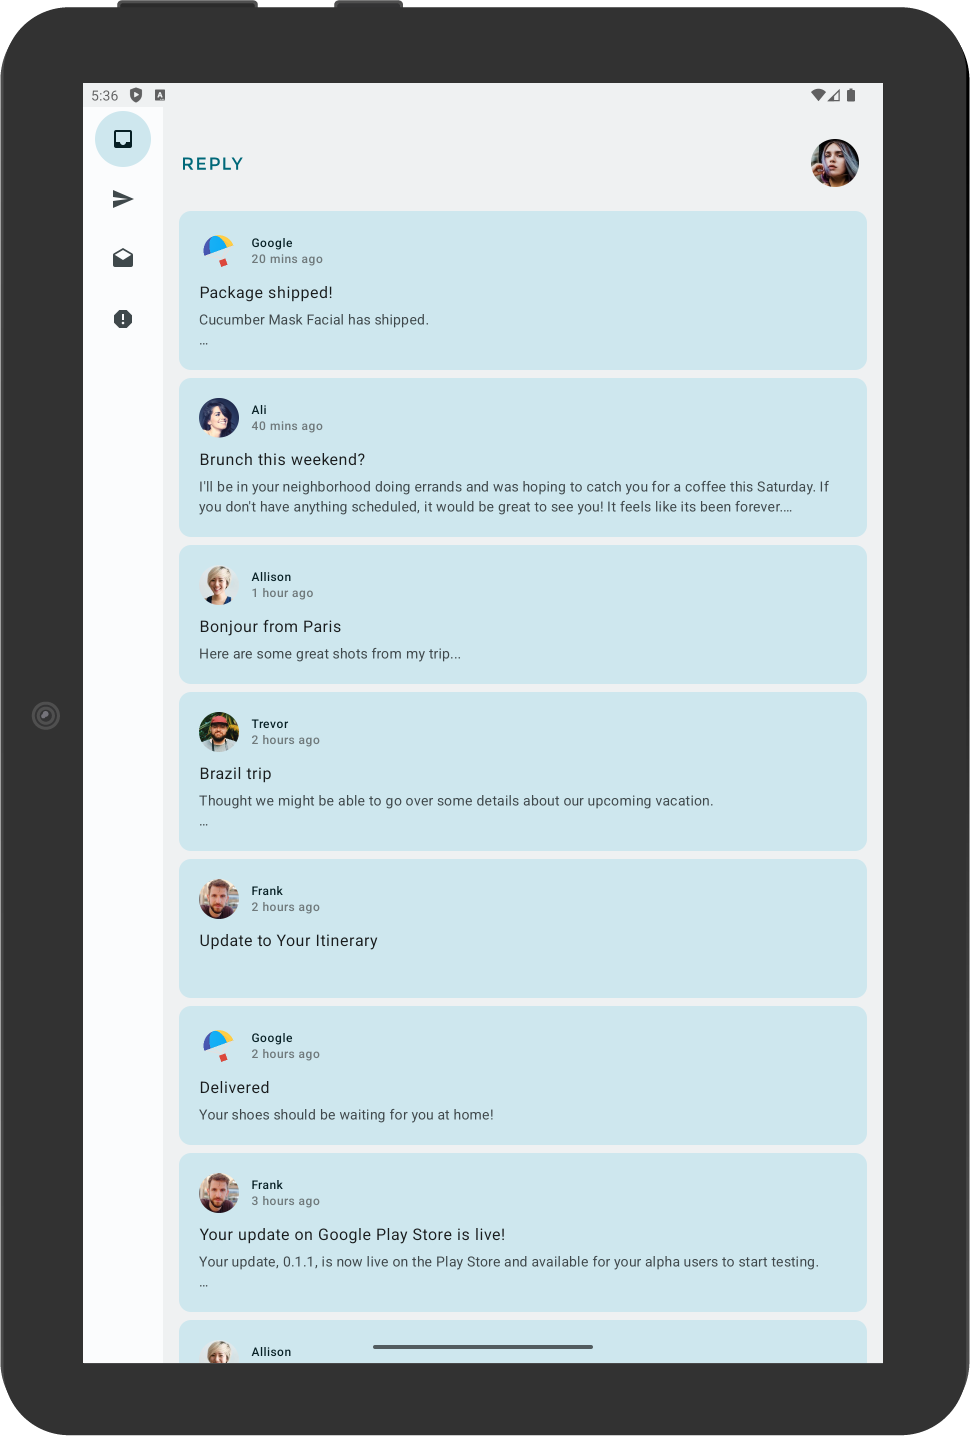
확장형 화면에서는 콘텐츠가 늘어나 보이고 사용할 수 있는 화면 공간을 잘 활용하지 못하는 것을 확인할 수 있습니다.
이 레이아웃은 표준 레이아웃 중 하나를 적용하여 개선할 수 있습니다. 표준 레이아웃은 디자인 및 구현을 위한 시작점 역할을 하는 대형 화면 컴포지션입니다. 제공되는 세 가지 레이아웃을 사용하여 앱, 목록 보기, 지원 패널, 피드에서 일반적인 요소를 정리하는 방법을 안내할 수 있습니다. 각 레이아웃은 일반적인 사용 사례와 구성요소를 고려하여 앱이 여러 화면 크기와 중단점에서 어떻게 조정되는지에 관한 기대치와 사용자의 요구를 해결합니다.
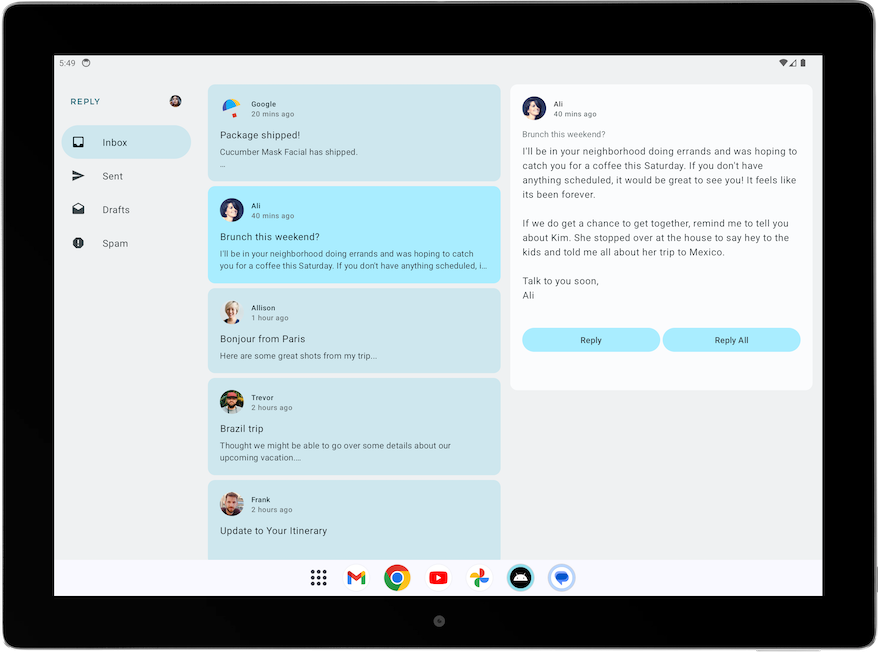
Reply 앱에서는 콘텐츠를 탐색하고 세부정보를 빠르게 확인하는 데 최적인 목록 세부정보 뷰를 구현해 보겠습니다. 목록 세부정보 뷰 레이아웃을 사용하면 이메일 목록 화면 옆에 이메일 세부정보를 표시할 다른 창을 만들 수 있습니다. 이 레이아웃을 사용하면 제공되는 화면을 사용하여 사용자에게 더 많은 정보를 표시하고 앱의 생산성을 높일 수 있습니다.
목록 세부정보 뷰 구현
확장형 화면의 목록 세부정보 뷰를 구현하려면 다음 단계를 완료하세요.
- 다양한 유형의 콘텐츠 레이아웃을 표현하려면
WindowStateUtils.kt에서 다양한 콘텐츠 유형에 관한 새Enum클래스를 만듭니다. 확장형 화면을 사용 중인 경우LIST_AND_DETAIL값을 사용하고, 사용하지 않는 경우LIST_ONLY값을 사용합니다.
WindowStateUtils.kt
...
enum class ReplyContentType {
    LIST_ONLY, LIST_AND_DETAIL
}
...
ReplyApp.kt에서contentType변수를 선언하고 다양한 창 크기에 맞는 적절한contentType을 할당하여 화면 크기에 따라 적절한 콘텐츠 유형 선택을 결정할 수 있습니다.
ReplyApp.kt
...
import com.example.reply.ui.utils.ReplyContentType
...

    val navigationType: ReplyNavigationType
    val contentType: ReplyContentType

    when (windowSize) {
        WindowWidthSizeClass.Compact -> {
            ...
            contentType = ReplyContentType.LIST_ONLY
        }
        WindowWidthSizeClass.Medium -> {
            ...
            contentType = ReplyContentType.LIST_ONLY
        }
        WindowWidthSizeClass.Expanded -> {
            ...
            contentType = ReplyContentType.LIST_AND_DETAIL
        }
        else -> {
            ...
            contentType = ReplyContentType.LIST_ONLY
        }
    }
...
이제 contentType 값을 사용하여 ReplyAppContent 컴포저블에서 레이아웃의 다른 브랜치를 만들 수 있습니다.
ReplyHomeScreen.kt에서contentType을 매개변수로ReplyHomeScreen컴포저블에 추가합니다.
ReplyHomeScreen.kt
...
@OptIn(ExperimentalMaterial3Api::class)
@Composable
fun ReplyHomeScreen(
    navigationType: ReplyNavigationType,
    contentType: ReplyContentType,
    replyUiState: ReplyUiState,
    onTabPressed: (MailboxType) -> Unit,
    onEmailCardPressed: (Email) -> Unit,
    onDetailScreenBackPressed: () -> Unit,
    modifier: Modifier = Modifier
) {
...
contentType값을ReplyHomeScreen컴포저블에 전달합니다.
ReplyApp.kt
...
    ReplyHomeScreen(
        navigationType = navigationType,
        contentType = contentType,
        replyUiState = replyUiState,
        onTabPressed = { mailboxType: MailboxType ->
            viewModel.updateCurrentMailbox(mailboxType = mailboxType)
            viewModel.resetHomeScreenStates()
        },
        onEmailCardPressed = { email: Email ->
            viewModel.updateDetailsScreenStates(
                email = email
            )
        },
        onDetailScreenBackPressed = {
            viewModel.resetHomeScreenStates()
        },
        modifier = modifier
    )

...
contentType을ReplyAppContent컴포저블의 매개변수로 추가합니다.
ReplyHomeScreen.kt
...
@Composable
private fun ReplyAppContent(
    navigationType: ReplyNavigationType,
    contentType: ReplyContentType,
    replyUiState: ReplyUiState,
    onTabPressed: ((MailboxType) -> Unit),
    onEmailCardPressed: (Email) -> Unit,
    navigationItemContentList: List<NavigationItemContent>,
    modifier: Modifier = Modifier
) {
...
contentType값을ReplyAppContent컴포저블 두 개에 전달합니다.
ReplyHomeScreen.kt
...
            ReplyAppContent(
                navigationType = navigationType,
                contentType = contentType,
                replyUiState = replyUiState,
                onTabPressed = onTabPressed,
                onEmailCardPressed = onEmailCardPressed,
                navigationItemContentList = navigationItemContentList,
                modifier = modifier
            )
        }
    } else {
        if (replyUiState.isShowingHomepage) {
            ReplyAppContent(
                navigationType = navigationType,
                contentType = contentType,
                replyUiState = replyUiState,
                onTabPressed = onTabPressed,
                onEmailCardPressed = onEmailCardPressed,
                navigationItemContentList = navigationItemContentList,
                modifier = modifier
            )
        } else {
            ReplyDetailsScreen(
                replyUiState = replyUiState,
                isFullScreen = true,
                onBackButtonClicked = onDetailScreenBackPressed,
                modifier = modifier
            )
        }
    }
...
contentType이 LIST_AND_DETAIL일 때는 전체 목록과 세부정보 화면을 표시하고 contentType이 LIST_ONLY일 때는 목록 전용 이메일 콘텐츠를 표시해 보겠습니다.
ReplyHomeScreen.kt에서ReplyAppContent컴포저블에if/else문을 추가하여contentType값이LIST_AND_DETAIL일 때ReplyListAndDetailContent컴포저블을 표시하고else브랜치에ReplyListOnlyContent컴포저블을 표시합니다.
ReplyHomeScreen.kt
...
        Column(
            modifier = modifier
                .fillMaxSize()
                .background(MaterialTheme.colorScheme.inverseOnSurface)
        ) {
            if (contentType == ReplyContentType.LIST_AND_DETAIL) {
                ReplyListAndDetailContent(
                    replyUiState = replyUiState,
                    onEmailCardPressed = onEmailCardPressed,
                    modifier = Modifier.weight(1f)
                )
            } else {
                ReplyListOnlyContent(
                    replyUiState = replyUiState,
                    onEmailCardPressed = onEmailCardPressed,
                    modifier = Modifier.weight(1f)
                        .padding(
                            horizontal = dimensionResource(R.dimen.email_list_only_horizontal_padding)
                        )
                )
            }
            AnimatedVisibility(visible = navigationType == ReplyNavigationType.BOTTOM_NAVIGATION) {
                ReplyBottomNavigationBar(
                    currentTab = replyUiState.currentMailbox,
                    onTabPressed = onTabPressed,
                    navigationItemContentList = navigationItemContentList
                )
            }
        }
...
- 사용자가 확장형 뷰를 사용하는 경우 세부정보 뷰로 이동할 필요가 없으므로
replyUiState.isShowingHomepage조건을 삭제하여 영구 탐색 창을 표시합니다.
ReplyHomeScreen.kt
...
    if (navigationType == ReplyNavigationType.PERMANENT_NAVIGATION_DRAWER) {
        PermanentNavigationDrawer(
            drawerContent = {
                PermanentDrawerSheet(Modifier.width(dimensionResource(R.dimen.drawer_width))) {
                    NavigationDrawerContent(
                        selectedDestination = replyUiState.currentMailbox,
                        onTabPressed = onTabPressed,
                        navigationItemContentList = navigationItemContentList,
                        modifier = Modifier
                            .wrapContentWidth()
                            .fillMaxHeight()
                            .background(MaterialTheme.colorScheme.inverseOnSurface)
                            .padding(dimensionResource(R.dimen.drawer_padding_content))
                    )
                }
            }
        ) {

...
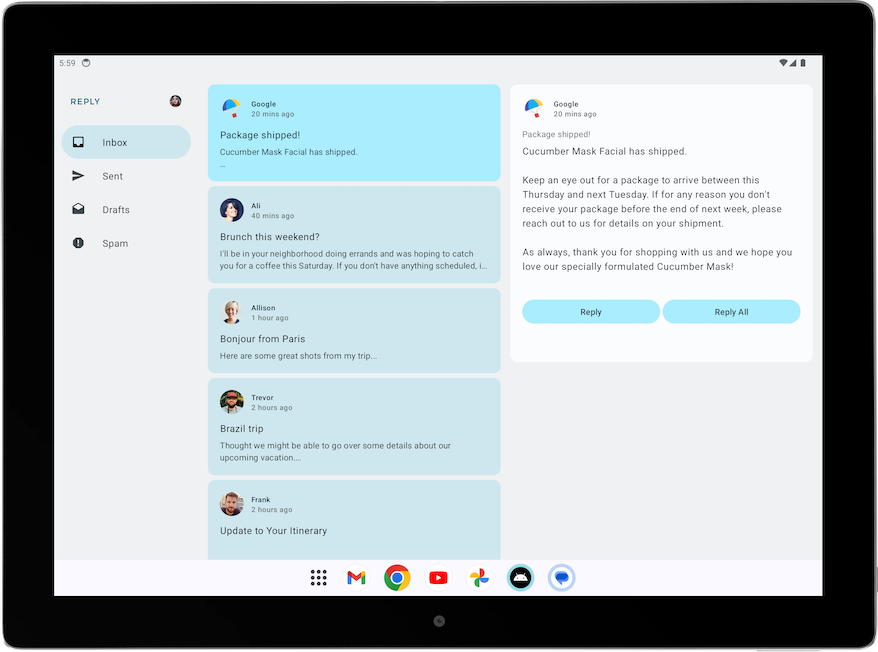
- 앱을 태블릿 모드로 실행하면 아래 화면과 같이 표시됩니다.
목록-세부정보 뷰의 UI 요소 개선
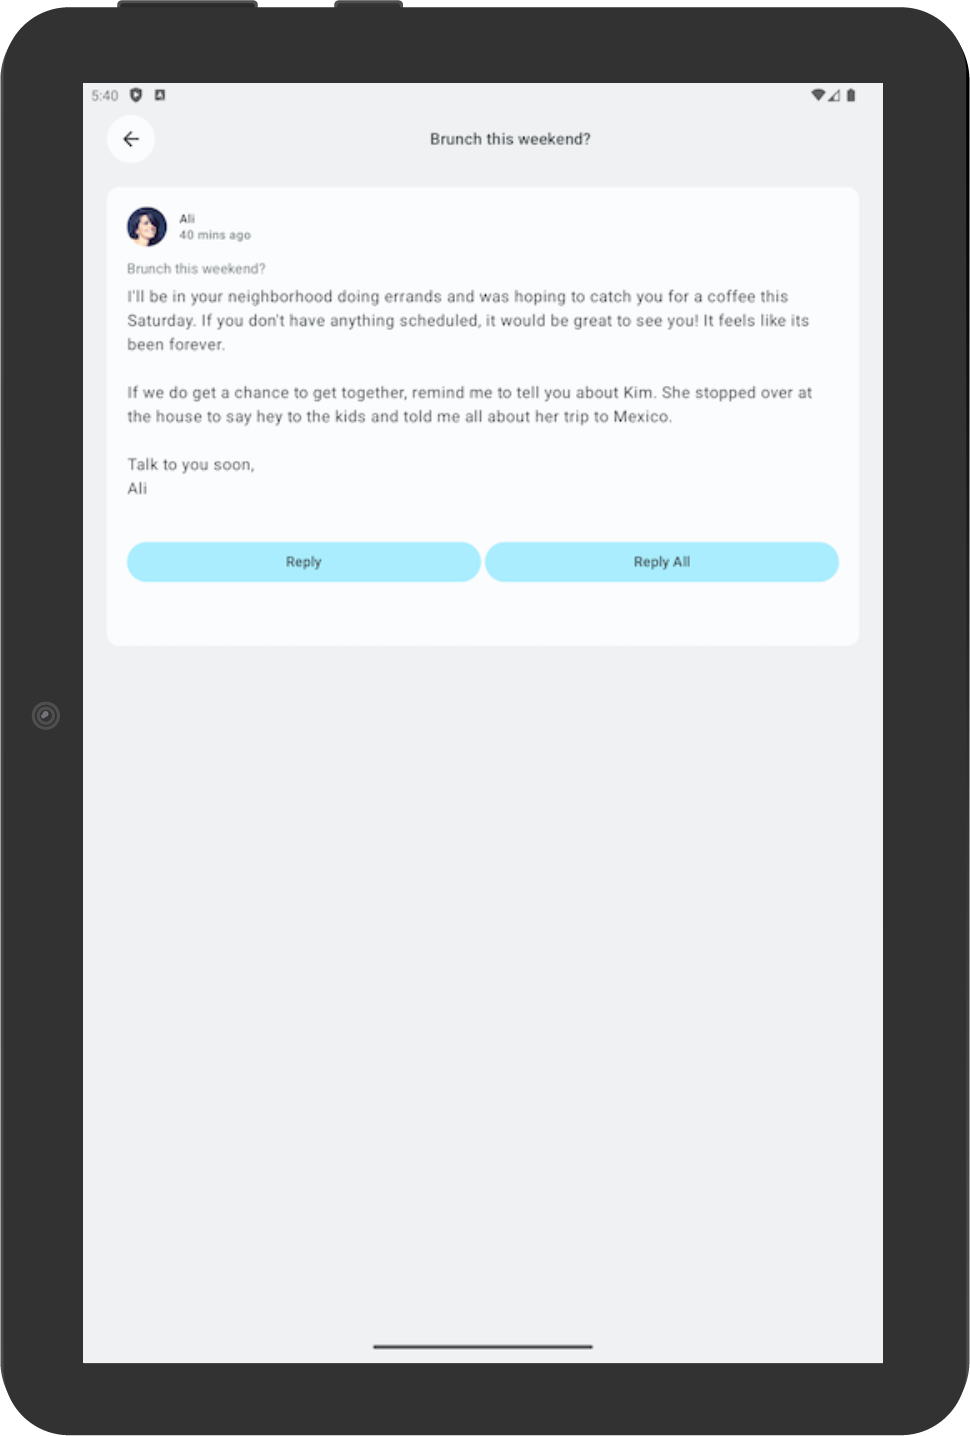
현재 앱에서는 홈 화면에 확장형 화면의 세부정보 창을 표시합니다.
하지만 뒤로 버튼과 제목 헤더, 추가 패딩과 같은 관련 없는 요소가 화면에 포함되어 있습니다. 독립형 세부정보 화면용으로 설계되었기 때문입니다. 간단한 조정으로 이 부분을 개선할 수 있습니다.
확장형 뷰의 세부정보 화면을 개선하려면 다음 단계를 완료하세요.
ReplyDetailsScreen.kt에서isFullScreen변수를Boolean매개변수로ReplyDetailsScreen컴포저블에 추가합니다.
이렇게 하면 독립형으로 사용할 때와 홈 화면 내에서 사용할 때 컴포저블을 구별할 수 있습니다.
ReplyDetailsScreen.kt
...
@Composable
fun ReplyDetailsScreen(
    replyUiState: ReplyUiState,
    onBackPressed: () -> Unit,
    modifier: Modifier = Modifier,
    isFullScreen: Boolean = false
) {
...
ReplyDetailsScreen컴포저블 내에서 앱이 전체 화면일 때만 표시되도록if문으로ReplyDetailsScreenTopBar컴포저블을 래핑합니다.
ReplyDetailsScreen.kt
...
    LazyColumn(
        modifier = modifier
            .fillMaxSize()
            .background(color = MaterialTheme.colorScheme.inverseOnSurface)
            .padding(top = dimensionResource(R.dimen.detail_card_list_padding_top))
    ) {
        item {
            if (isFullScreen) {
                ReplyDetailsScreenTopBar(
                    onBackPressed,
                    replyUiState,
                    Modifier
                        .fillMaxWidth()
                        .padding(bottom = dimensionResource(R.dimen.detail_topbar_padding_bottom))
                    )
                )
            }

...
이제 패딩을 추가할 수 있습니다. ReplyEmailDetailsCard 컴포저블에 필요한 패딩은 전체 화면으로 사용하는지에 따라 달라집니다. 확장형 화면에서 다른 컴포저블과 함께 ReplyEmailDetailsCard를 사용하면 다른 컴포저블의 추가 패딩이 있습니다.
isFullScreen값을ReplyEmailDetailsCard컴포저블에 전달합니다. 화면이 전체 화면인 경우 가로 패딩이R.dimen.detail_card_outer_padding_horizontal인 수정자를 전달하고 전체 화면이 아닌 경우 끝 패딩이R.dimen.detail_card_outer_padding_horizontal인 수정자를 전달합니다.
ReplyDetailsScreen.kt
...
        item {
            if (isFullScreen) {
                ReplyDetailsScreenTopBar(
                    onBackPressed,
                    replyUiState,
                    Modifier
                        .fillMaxWidth()
                        .padding(bottom = dimensionResource(R.dimen.detail_topbar_padding_bottom))
                    )
                )
            }
            ReplyEmailDetailsCard(
                email = replyUiState.currentSelectedEmail,
                mailboxType = replyUiState.currentMailbox,
                isFullScreen = isFullScreen,
                modifier = if (isFullScreen) {
                    Modifier.padding(horizontal = dimensionResource(R.dimen.detail_card_outer_padding_horizontal))
                } else {
                    Modifier.padding(end = dimensionResource(R.dimen.detail_card_outer_padding_horizontal))
                }
            )
        }
...
isFullScreen값을 매개변수로ReplyEmailDetailsCard컴포저블에 추가합니다.
ReplyDetailsScreen.kt
...
@OptIn(ExperimentalMaterial3Api::class)
@Composable
private fun ReplyEmailDetailsCard(
    email: Email,
    mailboxType: MailboxType,
    modifier: Modifier = Modifier,
    isFullScreen: Boolean = false
) {
...
ReplyEmailDetailsCard컴포저블 내에서 앱이 전체 화면이 아닐 때만 이메일 제목 텍스트를 표시합니다. 전체 화면 레이아웃에는 이미 이메일 제목이 헤더로 표시되어 있기 때문입니다. 전체 화면인 경우 높이가R.dimen.detail_content_padding_top인 스페이서를 추가합니다.
ReplyDetailsScreen.kt
...
Column(
    modifier = Modifier
        .fillMaxWidth()
        .padding(dimensionResource(R.dimen.detail_card_inner_padding))
) {
    DetailsScreenHeader(
        email,
        Modifier.fillMaxWidth()
    )
    if (isFullScreen) {
        Spacer(modifier = Modifier.height(dimensionResource(R.dimen.detail_content_padding_top)))
    } else {
        Text(
            text = stringResource(email.subject),
            style = MaterialTheme.typography.bodyMedium,
            color = MaterialTheme.colorScheme.outline,
            modifier = Modifier.padding(
                top = dimensionResource(R.dimen.detail_content_padding_top),
                bottom = dimensionResource(R.dimen.detail_expanded_subject_body_spacing)
            ),
        )
    }
    Text(
        text = stringResource(email.body),
        style = MaterialTheme.typography.bodyLarge,
        color = MaterialTheme.colorScheme.onSurfaceVariant,
    )
    DetailsScreenButtonBar(mailboxType, displayToast)
}

...
ReplyHomeScreen.kt의ReplyHomeScreen컴포저블 내에서ReplyDetailsScreen컴포저블을 독립형으로 만들 때isFullScreen매개변수에true값을 전달합니다.
ReplyHomeScreen.kt
...
        } else {
            ReplyDetailsScreen(
                replyUiState = replyUiState,
                isFullScreen = true,
                onBackPressed = onDetailScreenBackPressed,
                modifier = modifier
            )
        }
...
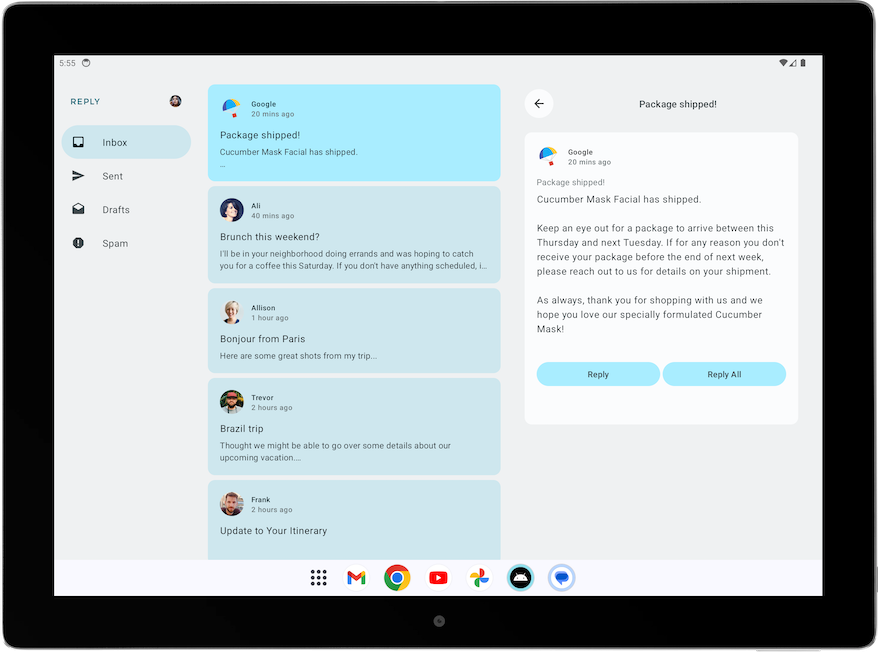
- 태블릿 모드에서 앱을 실행하면 레이아웃이 다음과 같이 표시됩니다.
목록-세부정보 뷰의 뒤로 처리 조정
확장형 화면을 사용하면 ReplyDetailsScreen으로 이동할 필요가 전혀 없습니다. 대신 사용자가 뒤로 버튼을 선택할 때 앱이 닫히도록 하는 것이 좋습니다. 따라서 뒤로 핸들러를 조정해야 합니다.
ReplyListAndDetailContent 컴포저블 내에서 ReplyDetailsScreen 컴포저블의 onBackPressed 매개변수로 activity.finish() 함수를 전달하여 뒤로 핸들러를 수정합니다.
ReplyHomeContent.kt
...
import android.app.Activity
import androidx.compose.ui.platform.LocalContext
...
        val activity = LocalContext.current as Activity
        ReplyDetailsScreen(
            replyUiState = replyUiState,
            modifier = Modifier.weight(1f),
            onBackPressed = { activity.finish() }
        )
...
4. 다양한 화면 크기 확인
대형 화면 앱 품질 가이드라인
Android 사용자에게 훌륭하고 일관된 환경을 제공하려면 품질을 염두에 두고 앱을 빌드하고 테스트해야 합니다. 핵심 앱 품질 가이드라인을 참조하여 앱 품질을 개선하는 방법을 알아보세요.
모든 폼 팩터를 위한 우수한 품질의 앱을 빌드하려면 대형 화면 앱 품질 가이드라인을 참고하세요. 앱은 Tier 3: 대형 화면 지원 요구사항도 충족해야 합니다.
대형 화면 준비를 위해 수동으로 앱 테스트
앱 품질 가이드라인에서는 앱 품질을 확인하기 위한 테스트 기기 권장사항과 절차를 제공합니다. Reply 앱과 관련된 테스트 예를 살펴보겠습니다.
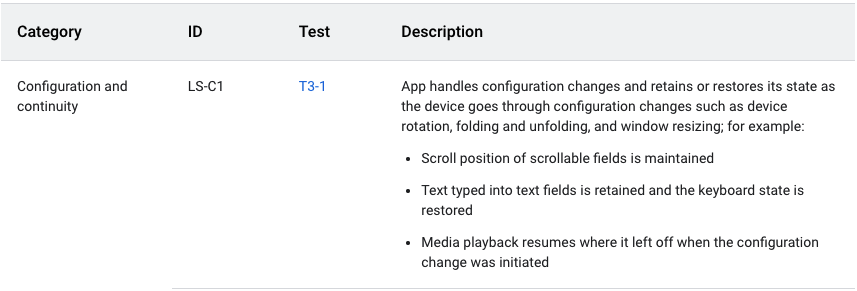
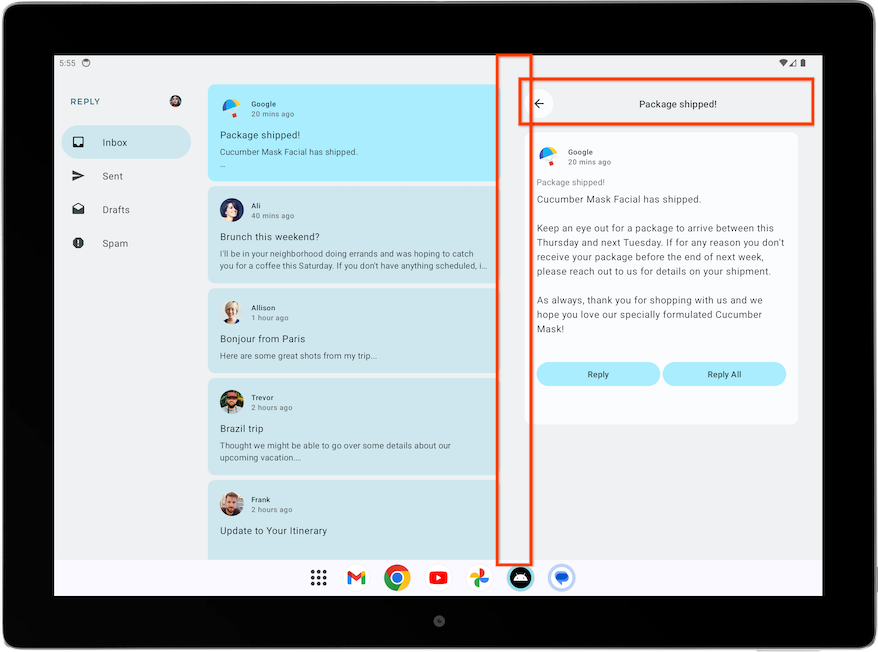
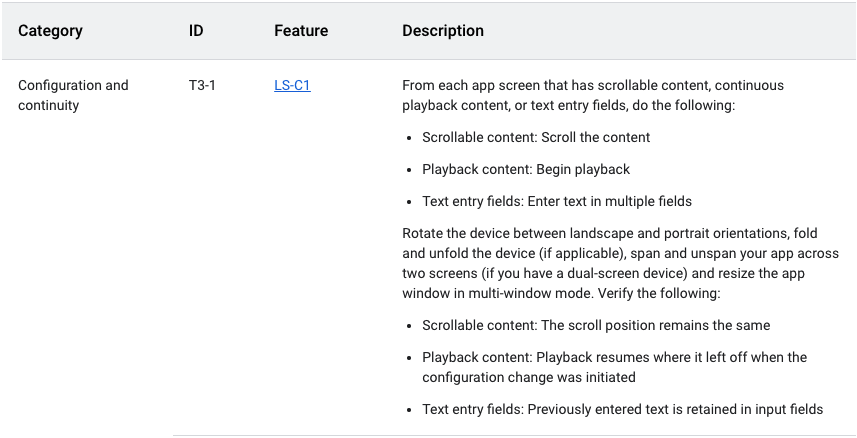
위의 앱 품질 가이드라인에서는 구성 변경 후 앱에서 상태를 유지하거나 복원해야 합니다. 또한 이 가이드라인에는 다음 그림과 같이 앱을 테스트하는 방법에 관한 안내도 나와 있습니다.
Reply 앱의 구성 및 연속성을 수동으로 테스트하려면 다음 단계를 완료하세요.
- 중형 기기에서 Reply 앱을 실행하거나 크기 조절 가능한 에뮬레이터를 사용 중인 경우 펼친 상태의 폴더블 모드에서 Reply 앱을 실행합니다.
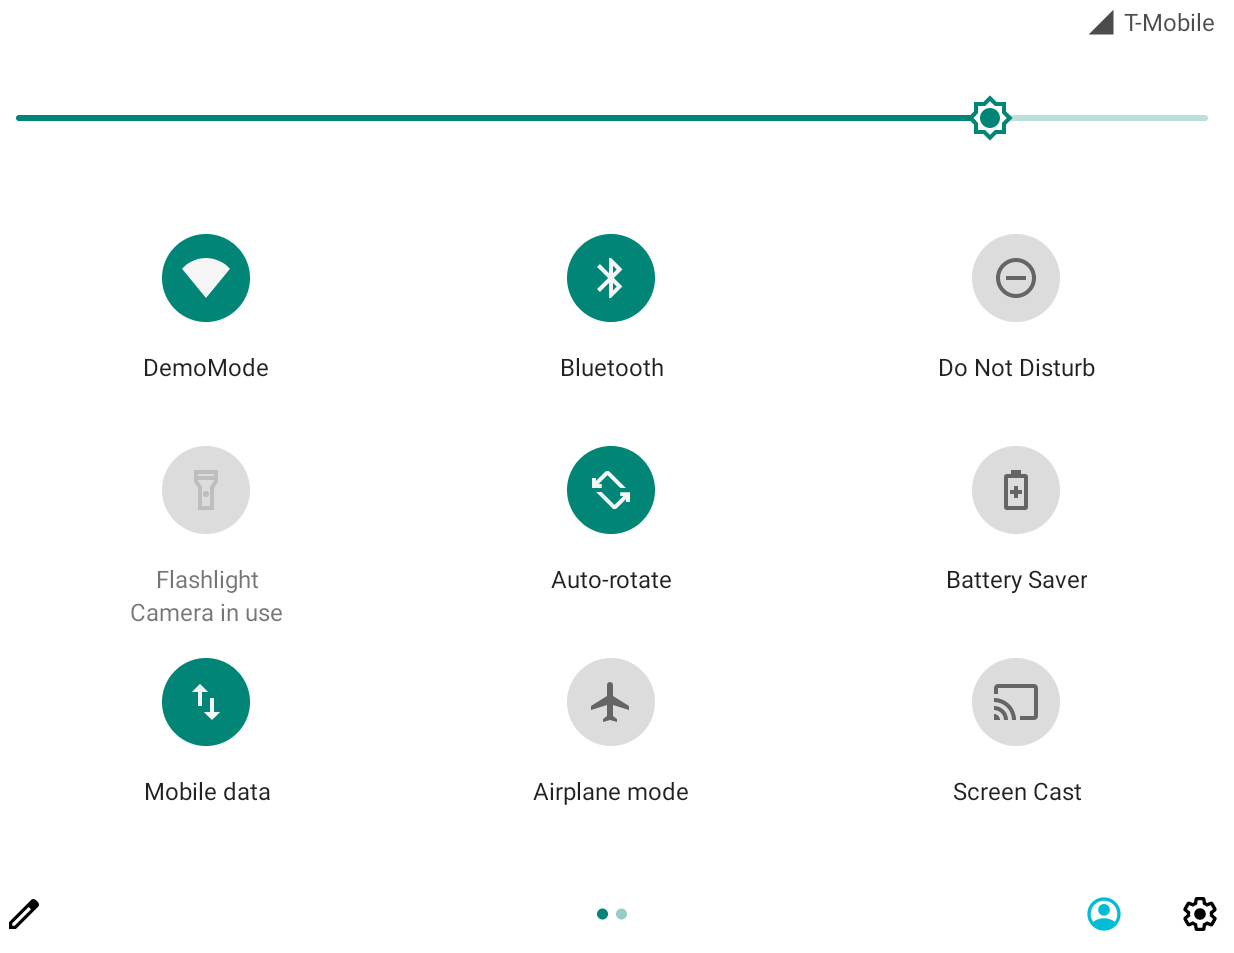
- 에뮬레이터의 Auto rotate가 On으로 설정되어 있는지 확인합니다.
- 이메일 목록을 아래로 스크롤합니다.
- 이메일 카드를 클릭합니다. 예를 들어 Ali의 이메일을 엽니다.
- 기기를 회전하여 선택된 이메일이 세로 모드 방향에서 선택한 이메일과 여전히 일치하는지 확인합니다. 이 예에서는 Ali의 이메일이 계속 표시됩니다.
- 다시 세로 모드 방향으로 회전하여 앱에 동일한 이메일이 표시되고 있는지 확인합니다.
5. 적응형 앱의 자동 테스트 추가
소형 화면 크기 테스트 구성
Cupcake 앱 테스트 Codelab에서는 UI 테스트를 만드는 방법을 알아봤습니다. 이제 다양한 화면 크기용으로 특정 테스트를 만드는 방법을 살펴보겠습니다.
Reply 앱에서는 화면 크기에 따라 다른 탐색 요소를 사용합니다. 예를 들어 사용자에게 확장형 화면이 표시될 때 개발자는 영구 탐색 창이 표시될 것으로 예상합니다. 다양한 화면 크기에 관해 하단 탐색, 탐색 레일, 탐색 창 등 여러 탐색 요소의 존재를 확인하는 테스트를 만드는 것이 유용합니다.
소형 화면에 하단 탐색 요소가 있는지 확인하는 테스트를 만들려면 다음 단계를 완료하세요.
- 테스트 디렉터리에서 새 Kotlin 클래스
ReplyAppTest.kt를 만듭니다. ReplyAppTest클래스에서createAndroidComposeRule을 사용하고ComponentActivity를 유형 매개변수로 전달하여 테스트 규칙을 만듭니다.ComponentActivity는MainActivity대신 빈 활동에 액세스하는 데 사용됩니다.
ReplyAppTest.kt
...
class ReplyAppTest {

    @get:Rule
    val composeTestRule = createAndroidComposeRule<ComponentActivity>()
...
화면에서 탐색 요소를 구별하려면 ReplyBottomNavigationBar 컴포저블에 testTag를 추가합니다.
- Navigation Bottom 문자열 리소스를 정의합니다.
strings.xml
...
<resources>
...
    <string name="navigation_bottom">Navigation Bottom</string>
...
</resources>
ReplyBottomNavigationBar컴포저블에서 문자열 이름을Modifier의testTag메서드에 관한testTag인수로 추가합니다.
ReplyHomeScreen.kt
...
val bottomNavigationContentDescription = stringResource(R.string.navigation_bottom)
ReplyBottomNavigationBar(
    ...
    modifier = Modifier
        .fillMaxWidth()
        .testTag(bottomNavigationContentDescription)
)
...
ReplyAppTest클래스에서 소형 크기 화면을 테스트할 테스트 함수를 만듭니다.ReplyApp컴포저블을 사용하여composeTestRule의 콘텐츠를 설정하고WindowWidthSizeClass.Compact를windowSize인수로 전달합니다.
ReplyAppTest.kt
...
    @Test
    fun compactDevice_verifyUsingBottomNavigation() {
        // Set up compact window
        composeTestRule.setContent {
            ReplyApp(
                windowSize = WindowWidthSizeClass.Compact
            )
        }
    }
- 하단 탐색 요소가 테스트 태그와 함께 있는지 어설션합니다.
composeTestRule에서 확장 함수onNodeWithTagForStringId를 호출하고 탐색 하단 문자열을 전달하고assertExists()메서드를 호출합니다.
ReplyAppTest.kt
...
    @Test
    fun compactDevice_verifyUsingBottomNavigation() {
        // Set up compact window
        composeTestRule.setContent {
            ReplyApp(
                windowSize = WindowWidthSizeClass.Compact
            )
        }
        // Bottom navigation is displayed
        composeTestRule.onNodeWithTagForStringId(
            R.string.navigation_bottom
        ).assertExists()
    }
- 테스트를 실행하고 통과했는지 확인합니다.
중형 및 확장형 화면 크기 테스트 구성
소형 화면 테스트를 성공적으로 만들었으므로 이제 상응하는 중형 및 확장형 화면 테스트를 만들어 보겠습니다.
중형 및 확장형 화면에 탐색 레일과 영구 탐색 창이 있는지 확인하는 테스트를 만들려면 다음 단계를 완료하세요.
- 나중에 테스트 태그로 사용할 Navigation Rail 문자열 리소스를 정의합니다.
strings.xml
...
<resources>
...
    <string name="navigation_rail">Navigation Rail</string>
...
</resources>
PermanentNavigationDrawer컴포저블의Modifier를 통해 문자열을 테스트 태그로 전달합니다.
ReplyHomeScreen.kt
...
    val navigationDrawerContentDescription = stringResource(R.string.navigation_drawer)
        PermanentNavigationDrawer(
...
modifier = Modifier.testTag(navigationDrawerContentDescription)
)
...
ReplyNavigationRail컴포저블의Modifier를 통해 문자열을 테스트 태그로 전달합니다.
ReplyHomeScreen.kt
...
val navigationRailContentDescription = stringResource(R.string.navigation_rail)
ReplyNavigationRail(
    ...
    modifier = Modifier
        .testTag(navigationRailContentDescription)
)
...
- 중형 화면에 탐색 레일 요소가 있는지 확인하는 테스트를 추가합니다.
ReplyAppTest.kt
...
@Test
fun mediumDevice_verifyUsingNavigationRail() {
    // Set up medium window
    composeTestRule.setContent {
        ReplyApp(
            windowSize = WindowWidthSizeClass.Medium
        )
    }
    // Navigation rail is displayed
    composeTestRule.onNodeWithTagForStringId(
        R.string.navigation_rail
    ).assertExists()
}
- 확장형 화면에 탐색 창 요소가 있는지 확인하는 테스트를 추가합니다.
ReplyAppTest.kt
...
@Test
fun expandedDevice_verifyUsingNavigationDrawer() {
    // Set up expanded window
    composeTestRule.setContent {
        ReplyApp(
            windowSize = WindowWidthSizeClass.Expanded
        )
    }
    // Navigation drawer is displayed
    composeTestRule.onNodeWithTagForStringId(
        R.string.navigation_drawer
    ).assertExists()
}
- 태블릿 모드에서 태블릿 에뮬레이터 또는 크기 조절 가능한 에뮬레이터를 사용하여 테스트를 실행합니다.
- 모든 테스트를 실행하고 통과하는지 확인합니다.
소형 화면에서 구성 변경 테스트
구성 변경은 앱 수명 주기에서 흔히 발생하는 일입니다. 예를 들어 방향을 세로 모드에서 가로 모드로 변경하면 구성이 변경됩니다. 구성 변경이 발생하면 앱의 상태가 유지되는지 테스트하는 것이 중요합니다. 구성 변경을 시뮬레이션하는 테스트를 만들어 앱이 소형 화면에서 상태를 유지하는지 테스트합니다.
소형 화면에서 구성 변경을 테스트하려면 다음 단계를 따르세요.
- 테스트 디렉터리에서 새 Kotlin 클래스
ReplyAppStateRestorationTest.kt를 만듭니다. ReplyAppStateRestorationTest클래스에서createAndroidComposeRule을 사용하고ComponentActivity를 유형 매개변수로 전달하는 테스트 규칙을 만듭니다.
ReplyAppStateRestorationTest.kt
...
class ReplyAppStateRestorationTest {

    /**
     * Note: To access to an empty activity, the code uses ComponentActivity instead of
     * MainActivity.
     */
    @get:Rule
    val composeTestRule = createAndroidComposeRule<ComponentActivity>()
}
...
- 구성 변경 후에도 소형 화면에서 이메일이 여전히 선택되어 있는지 확인하는 테스트 함수를 만듭니다.
ReplyAppStateRestorationTest.kt
...
@Test
fun compactDevice_selectedEmailEmailRetained_afterConfigChange() {

}
...
구성 변경을 테스트하려면 StateRestorationTester를 사용해야 합니다.
composeTestRule을StateRestorationTester에 인수로 전달하여stateRestorationTester를 설정합니다.ReplyApp컴포저블과 함께setContent()를 사용하고WindowWidthSizeClass.Compact를windowSize인수로 전달합니다.
ReplyAppStateRestorationTest.kt
...
@Test
fun compactDevice_selectedEmailEmailRetained_afterConfigChange() {
    // Setup compact window
    val stateRestorationTester = StateRestorationTester(composeTestRule)
    stateRestorationTester.setContent { ReplyApp(windowSize = WindowWidthSizeClass.Compact) }

}
...
- 세 번째 이메일이 앱에 표시되는지 확인합니다. 세 번째 이메일의 텍스트를 찾는
composeTestRule에서assertIsDisplayed()메서드를 사용합니다.
ReplyAppStateRestorationTest.kt
...
@Test
fun compactDevice_selectedEmailEmailRetained_afterConfigChange() {
    // Setup compact window
    val stateRestorationTester = StateRestorationTester(composeTestRule)
    stateRestorationTester.setContent { ReplyApp(windowSize = WindowWidthSizeClass.Compact) }

    // Given third email is displayed
    composeTestRule.onNodeWithText(
        composeTestRule.activity.getString(LocalEmailsDataProvider.allEmails[2].body)
    ).assertIsDisplayed()
}
...
- 이메일 제목을 클릭하여 이메일의 세부정보 화면으로 이동합니다.
performClick()메서드를 사용하여 이동합니다.
ReplyAppStateRestorationTest.kt
...
@Test
fun compactDevice_selectedEmailEmailRetained_afterConfigChange() {
    // Setup compact window
    val stateRestorationTester = StateRestorationTester(composeTestRule)
    stateRestorationTester.setContent { ReplyApp(windowSize = WindowWidthSizeClass.Compact) }

    // Given third email is displayed
    composeTestRule.onNodeWithText(
        composeTestRule.activity.getString(LocalEmailsDataProvider.allEmails[2].body)
    ).assertIsDisplayed()

    // Open detailed page
    composeTestRule.onNodeWithText(
        composeTestRule.activity.getString(LocalEmailsDataProvider.allEmails[2].subject)
    ).performClick()
}
...
- 세 번째 이메일이 세부정보 화면에 표시되는지 확인합니다. 뒤로 버튼의 존재를 어설션하여 앱이 세부정보 화면에 있는지 확인하고, 세 번째 이메일의 텍스트가 표시되는지 확인합니다.
ReplyAppStateRestorationTest.kt
...
@Test
fun compactDevice_selectedEmailEmailRetained_afterConfigChange() {
    ...
    // Open detailed page
    composeTestRule.onNodeWithText(
        composeTestRule.activity.getString(LocalEmailsDataProvider.allEmails[2].subject)
    ).performClick()

    // Verify that it shows the detailed screen for the correct email
    composeTestRule.onNodeWithContentDescriptionForStringId(
        R.string.navigation_back
    ).assertExists()
    composeTestRule.onNodeWithText(
}
...
stateRestorationTester.emulateSavedInstanceStateRestore()를 사용하여 구성 변경을 시뮬레이션합니다.
ReplyAppStateRestorationTest.kt
...
@Test
fun compactDevice_selectedEmailEmailRetained_afterConfigChange() {
    ...
    // Verify that it shows the detailed screen for the correct email
    composeTestRule.onNodeWithContentDescriptionForStringId(
        R.string.navigation_back
    ).assertExists()
    composeTestRule.onNodeWithText(
        composeTestRule.activity.getString(LocalEmailsDataProvider.allEmails[2].body)
    ).assertExists()

    // Simulate a config change
    stateRestorationTester.emulateSavedInstanceStateRestore()
}
...
- 세 번째 이메일이 세부정보 화면에 표시되는지 다시 확인합니다. 뒤로 버튼의 존재를 어설션하여 앱이 세부정보 화면에 있는지 확인하고, 세 번째 이메일의 텍스트가 표시되는지 확인합니다.
ReplyAppStateRestorationTest.kt
...
@Test
fun compactDevice_selectedEmailEmailRetained_afterConfigChange() {
    // Setup compact window
    val stateRestorationTester = StateRestorationTester(composeTestRule)
    stateRestorationTester.setContent { ReplyApp(windowSize = WindowWidthSizeClass.Compact) }

    // Given third email is displayed
    composeTestRule.onNodeWithText(
        composeTestRule.activity.getString(LocalEmailsDataProvider.allEmails[2].body)
    ).assertIsDisplayed()

    // Open detailed page
    composeTestRule.onNodeWithText(
        composeTestRule.activity.getString(LocalEmailsDataProvider.allEmails[2].subject)
    ).performClick()

    // Verify that it shows the detailed screen for the correct email
    composeTestRule.onNodeWithContentDescriptionForStringId(
        R.string.navigation_back
    ).assertExists()
    composeTestRule.onNodeWithText(
        composeTestRule.activity.getString(LocalEmailsDataProvider.allEmails[2].body)
    ).assertExists()

    // Simulate a config change
    stateRestorationTester.emulateSavedInstanceStateRestore()

    // Verify that it still shows the detailed screen for the same email
    composeTestRule.onNodeWithContentDescriptionForStringId(
        R.string.navigation_back
    ).assertExists()
    composeTestRule.onNodeWithText(
        composeTestRule.activity.getString(LocalEmailsDataProvider.allEmails[2].body)
    ).assertExists()
}

...
- 휴대전화 에뮬레이터로 테스트를 실행하거나 전화 모드에서 크기 조절 가능한 에뮬레이터로 테스트를 실행합니다.
- 테스트를 통과하는지 확인합니다.
확장형 화면에서 구성 변경 테스트
구성 변경을 시뮬레이션하고 적절한 WindowWidthSizeClass를 전달하여 확장형 화면에서 구성 변경을 테스트하려면 다음 단계를 완료하세요.
- 구성 변경 후에도 세부정보 화면에서 이메일이 여전히 선택되어 있는지 확인하는 테스트 함수를 만듭니다.
ReplyAppStateRestorationTest.kt
...
@Test
fun expandedDevice_selectedEmailEmailRetained_afterConfigChange() {

}
...
구성 변경을 테스트하려면 StateRestorationTester를 사용해야 합니다.
composeTestRule을StateRestorationTester에 인수로 전달하여stateRestorationTester를 설정합니다.ReplyApp컴포저블과 함께setContent()를 사용하고WindowWidthSizeClass.Expanded를windowSize인수로 전달합니다.
ReplyAppStateRestorationTest.kt
...
@Test
fun expandedDevice_selectedEmailEmailRetained_afterConfigChange() {
    // Setup expanded window
    val stateRestorationTester = StateRestorationTester(composeTestRule)
    stateRestorationTester.setContent { ReplyApp(windowSize = WindowWidthSizeClass.Expanded) }
}
...
- 세 번째 이메일이 앱에 표시되는지 확인합니다. 세 번째 이메일의 텍스트를 찾는
composeTestRule에서assertIsDisplayed()메서드를 사용합니다.
ReplyAppStateRestorationTest.kt
...
@Test
fun expandedDevice_selectedEmailEmailRetained_afterConfigChange() {
    // Setup expanded window
    val stateRestorationTester = StateRestorationTester(composeTestRule)
    stateRestorationTester.setContent { ReplyApp(windowSize = WindowWidthSizeClass.Expanded) }

    // Given third email is displayed
    composeTestRule.onNodeWithText(
        composeTestRule.activity.getString(LocalEmailsDataProvider.allEmails[2].body)
    ).assertIsDisplayed()
}
...
- 세부정보 화면에서 세 번째 이메일을 선택합니다.
performClick()메서드를 사용하여 이메일을 선택합니다.
ReplyAppStateRestorationTest.kt
...
@Test
fun expandedDevice_selectedEmailEmailRetained_afterConfigChange() {
    // Setup expanded window
    val stateRestorationTester = StateRestorationTester(composeTestRule)
    stateRestorationTester.setContent { ReplyApp(windowSize = WindowWidthSizeClass.Expanded) }

    // Given third email is displayed
    composeTestRule.onNodeWithText(
        composeTestRule.activity.getString(LocalEmailsDataProvider.allEmails[2].body)
    ).assertIsDisplayed()

    // Select third email
    composeTestRule.onNodeWithText(
        composeTestRule.activity.getString(LocalEmailsDataProvider.allEmails[2].subject)
    ).performClick()
    ...
}

...
- 세부정보 화면에서
testTag를 사용하고 하위 요소의 텍스트를 찾아 세부정보 화면에 세 번째 이메일이 표시되는지 확인합니다. 이렇게 하면 이메일 목록이 아닌 세부정보 섹션에서 텍스트를 찾을 수 있습니다.
ReplyAppStateRestorationTest.kt
...

@Test
fun expandedDevice_selectedEmailEmailRetained_afterConfigChange() {
    ...
    // Select third email
    composeTestRule.onNodeWithText(
        composeTestRule.activity.getString(LocalEmailsDataProvider.allEmails[2].subject)
    ).performClick()

    // Verify that third email is displayed on the details screen
    composeTestRule.onNodeWithTagForStringId(R.string.details_screen).onChildren()
        .assertAny(hasAnyDescendant(hasText(
            composeTestRule.activity.getString(LocalEmailsDataProvider.allEmails[2].body)))
        )
...
}

...
stateRestorationTester.emulateSavedInstanceStateRestore()를 사용하여 구성 변경을 시뮬레이션합니다.
ReplyAppStateRestorationTest.kt
...
@Test
fun expandedDevice_selectedEmailEmailRetained_afterConfigChange() {
    ...
    // Verify that third email is displayed on the details screen
    composeTestRule.onNodeWithTagForStringId(R.string.details_screen).onChildren()
        .assertAny(hasAnyDescendant(hasText(
            composeTestRule.activity.getString(LocalEmailsDataProvider.allEmails[2].body)))
        )

    // Simulate a config change
    stateRestorationTester.emulateSavedInstanceStateRestore()
    ...
}
...
- 구성 변경 후 세부정보 화면에 세 번째 이메일이 표시되는지 다시 확인합니다.
ReplyAppStateRestorationTest.kt
...
@Test
fun expandedDevice_selectedEmailEmailRetained_afterConfigChange() {
    // Setup expanded window
    val stateRestorationTester = StateRestorationTester(composeTestRule)
    stateRestorationTester.setContent { ReplyApp(windowSize = WindowWidthSizeClass.Expanded) }

    // Given third email is displayed
    composeTestRule.onNodeWithText(
        composeTestRule.activity.getString(LocalEmailsDataProvider.allEmails[2].body)
    ).assertIsDisplayed()

    // Select third email
    composeTestRule.onNodeWithText(
        composeTestRule.activity.getString(LocalEmailsDataProvider.allEmails[2].subject)
    ).performClick()

    // Verify that third email is displayed on the details screen
    composeTestRule.onNodeWithTagForStringId(R.string.details_screen).onChildren()
        .assertAny(hasAnyDescendant(hasText(
            composeTestRule.activity.getString(LocalEmailsDataProvider.allEmails[2].body)))
        )

    // Simulate a config change
    stateRestorationTester.emulateSavedInstanceStateRestore()

    // Verify that third email is still displayed on the details screen
    composeTestRule.onNodeWithTagForStringId(R.string.details_screen).onChildren()
        .assertAny(hasAnyDescendant(hasText(
            composeTestRule.activity.getString(LocalEmailsDataProvider.allEmails[2].body)))
        )
}
...
- 태블릿 에뮬레이터로 테스트를 실행하거나 태블릿 모드에서 크기 조절 가능한 에뮬레이터로 테스트를 실행합니다.
- 테스트를 통과하는지 확인합니다.
주석을 사용하여 다양한 화면 크기 테스트 그룹화
화면 크기가 호환되지 않는 기기에서 실행하면 일부 테스트가 실패한다는 사실을 이전 테스트를 통해 알 수 있었습니다. 적절한 기기를 사용하여 테스트를 하나씩 실행할 수 있지만, 이 방법은 테스트 사례가 많을 때는 확장되지 않을 수 있습니다.
이 문제를 해결하려면 테스트를 실행할 수 있는 화면 크기를 나타내는 주석을 만들고 적절한 기기에 주석이 달린 테스트를 구성하면 됩니다.
화면 크기를 기반으로 테스트를 실행하려면 다음 단계를 완료하세요.
- 테스트 디렉터리에서 세 가지 주석 클래스
TestCompactWidth,TestMediumWidth,TestExpandedWidth가 포함된TestAnnotations.kt를 만듭니다.
TestAnnotations.kt
...
annotation class TestCompactWidth
annotation class TestMediumWidth
annotation class TestExpandedWidth
...
ReplyAppTest및ReplyAppStateRestorationTest에서 소형 테스트의 테스트 주석 뒤에TestCompactWidth주석을 배치하여 소형 테스트용 테스트 함수에 관한 주석을 사용합니다.
ReplyAppTest.kt
...
    @Test
    @TestCompactWidth
    fun compactDevice_verifyUsingBottomNavigation() {
...
ReplyAppStateRestorationTest.kt
...
    @Test
    @TestCompactWidth
    fun compactDevice_selectedEmailEmailRetained_afterConfigChange() {

...
ReplyAppTest에서 중형 테스트의 테스트 주석 뒤에TestMediumWidth주석을 배치하여 중형 테스트용 테스트 함수에 관한 주석을 사용합니다.
ReplyAppTest.kt
...
    @Test
    @TestMediumWidth
    fun mediumDevice_verifyUsingNavigationRail() {
...
ReplyAppTest및ReplyAppStateRestorationTest에서 확장형 테스트의 테스트 주석 뒤에TestExpandedWidth주석을 배치하여 확장형 테스트용 테스트 함수에 관한 주석을 사용합니다.
ReplyAppTest.kt
...
    @Test
    @TestExpandedWidth
    fun expandedDevice_verifyUsingNavigationDrawer() {
...
ReplyAppStateRestorationTest.kt
...
    @Test
    @TestExpandedWidth
    fun expandedDevice_selectedEmailEmailRetained_afterConfigChange() {
...
테스트가 성공하려면 TestCompactWidth 주석이 달린 테스트만 실행하도록 테스트를 구성해야 합니다.
- Android 스튜디오에서 Run > Edit Configurations...
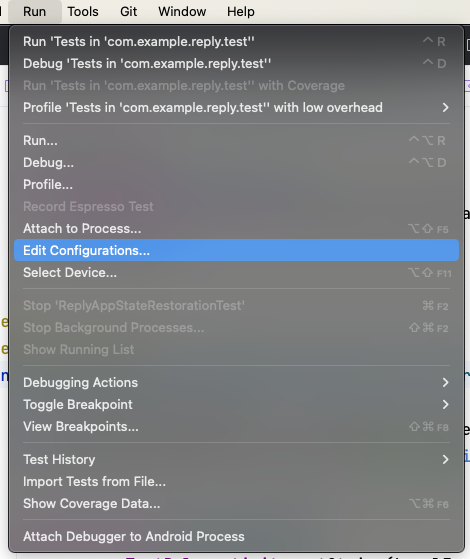 를 선택합니다.
 - 테스트 이름을 Compact tests로 변경하고 All in Package 테스트를 실행하도록 선택합니다.
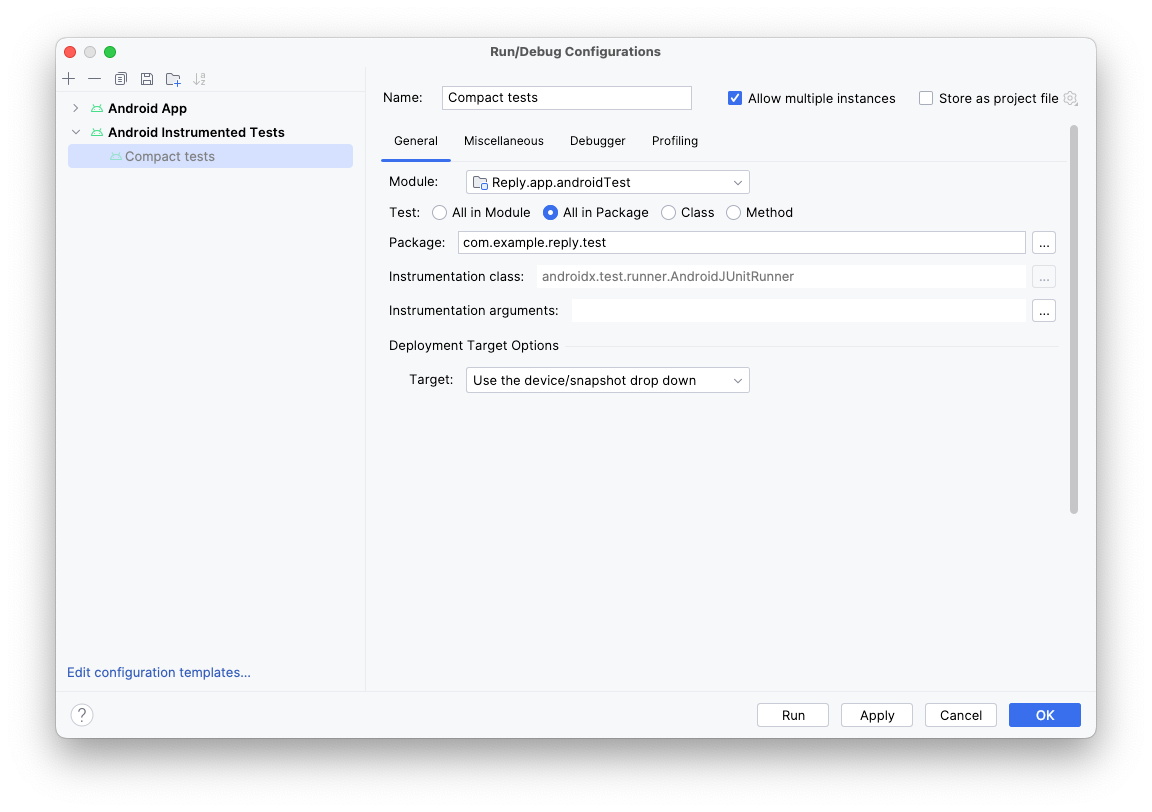
- Instrumentation arguments 필드 오른쪽에 있는 점 3개(...)를 클릭합니다.
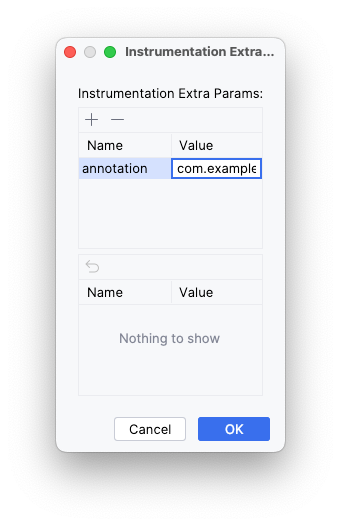
- 더하기(
+) 버튼을 클릭하고 값이 com.example.reply.test.TestCompactWidth인 annotation 매개변수를 추가합니다.
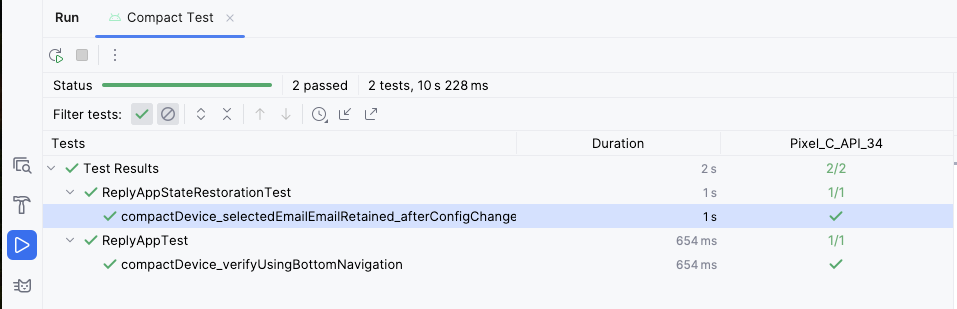
- 소형 에뮬레이터로 테스트를 실행합니다.
- 소형 테스트만 실행되었는지 확인합니다.
- 중형 화면과 확장형 화면에도 이 단계를 반복합니다.
6. 솔루션 코드 가져오기
완료된 Codelab의 코드를 다운로드하려면 다음 git 명령어를 사용하세요.
$ git clone https://github.com/google-developer-training/basic-android-kotlin-compose-training-reply-app.git
또는, ZIP 파일로 저장소를 다운로드한 다음 압축을 풀고 Android 스튜디오에서 열어도 됩니다.
솔루션 코드를 보려면 GitHub에서 확인하세요.
7. 결론
수고하셨습니다. 적응형 레이아웃을 구현하여 Reply 앱을 적응형으로 만들어 모든 앱 크기에 맞도록 했습니다. 미리보기를 사용하여 개발 속도를 높이고 다양한 테스트 메서드를 사용하여 앱 품질을 유지하는 방법도 배웠습니다.
#AndroidBasics를 사용해 작업한 결과물을 소셜 미디어로 공유해 보세요.