1. はじめに
前の Codelab では、ウィンドウ サイズクラスを使用してダイナミック ナビゲーションを実装することで、Reply アプリをアダプティブに変換する作業を始めました。こうした機能は、あらゆる画面サイズに対応したアプリを構築するための重要な基礎であり、第一歩です。「ダイナミック ナビゲーションを使用してアダプティブ アプリを作成する」Codelab を受講していない場合は、戻ってそこから開始することを強くおすすめします。
この Codelab では、学習したコンセプトを基に、アプリにアダプティブ レイアウトをさらに実装します。実装するアダプティブ レイアウトは、正規レイアウト(大画面ディスプレイでよく使用されるパターンのセット)の一部です。また、堅牢なアプリを迅速に構築するための、他のツールやテストの手法についても学習します。
前提条件
- 「ダイナミック ナビゲーションを使用してアダプティブ アプリを作成する」Codelab を修了している
- クラス、関数、条件文など、Kotlin プログラミングに精通している
ViewModelクラスをよく理解しているComposable関数をよく理解している- Jetpack Compose でレイアウトを作成した経験
- デバイスまたはエミュレータでアプリを実行した経験
WindowSizeClassAPI を使用した経験
学習内容
- Jetpack Compose を使用してリストビュー パターンのアダプティブ レイアウトを作成する方法
- さまざまな画面サイズのプレビューを作成する方法
- 複数の画面サイズのコードをテストする方法
作成するアプリの概要
- 引き続き、あらゆる画面サイズに適応するように Reply アプリを更新します。
完成したアプリの外観は次のようになります。
必要なもの
- インターネットにアクセスできるパソコン、ウェブブラウザ、Android Studio
- GitHub へのアクセス
スターター コードをダウンロードする
まず、スターター コードをダウンロードします。
または、GitHub リポジトリのクローンを作成してコードを入手することもできます。
$ git clone
https://github.com/google-developer-training/basic-android-kotlin-compose-training-reply-app.git
$ cd basic-android-kotlin-compose-training-reply-app
$ git checkout nav-update
スターター コードは Reply GitHub リポジトリで確認できます。
2. さまざまな画面サイズのプレビュー
さまざまな画面サイズのプレビューを作成する
「ダイナミック ナビゲーションを使用してアダプティブ アプリを作成する」Codelab では、プレビュー コンポーザブルを使用して開発プロセスに役立てる方法を学びました。アダプティブ アプリの場合、複数のプレビューを作成して、さまざまな画面サイズでアプリを表示することをおすすめします。複数のプレビューを使用すると、あらゆる画面サイズに対する変更を一度に確認できます。またプレビューは、コードをレビューする他のデベロッパーにとって、アプリがさまざまな画面サイズに対応していることを確認するうえでも役立ちます。
これまでは、コンパクト画面をサポートするプレビューが 1 つあるだけでした。今度はプレビューを増やします。
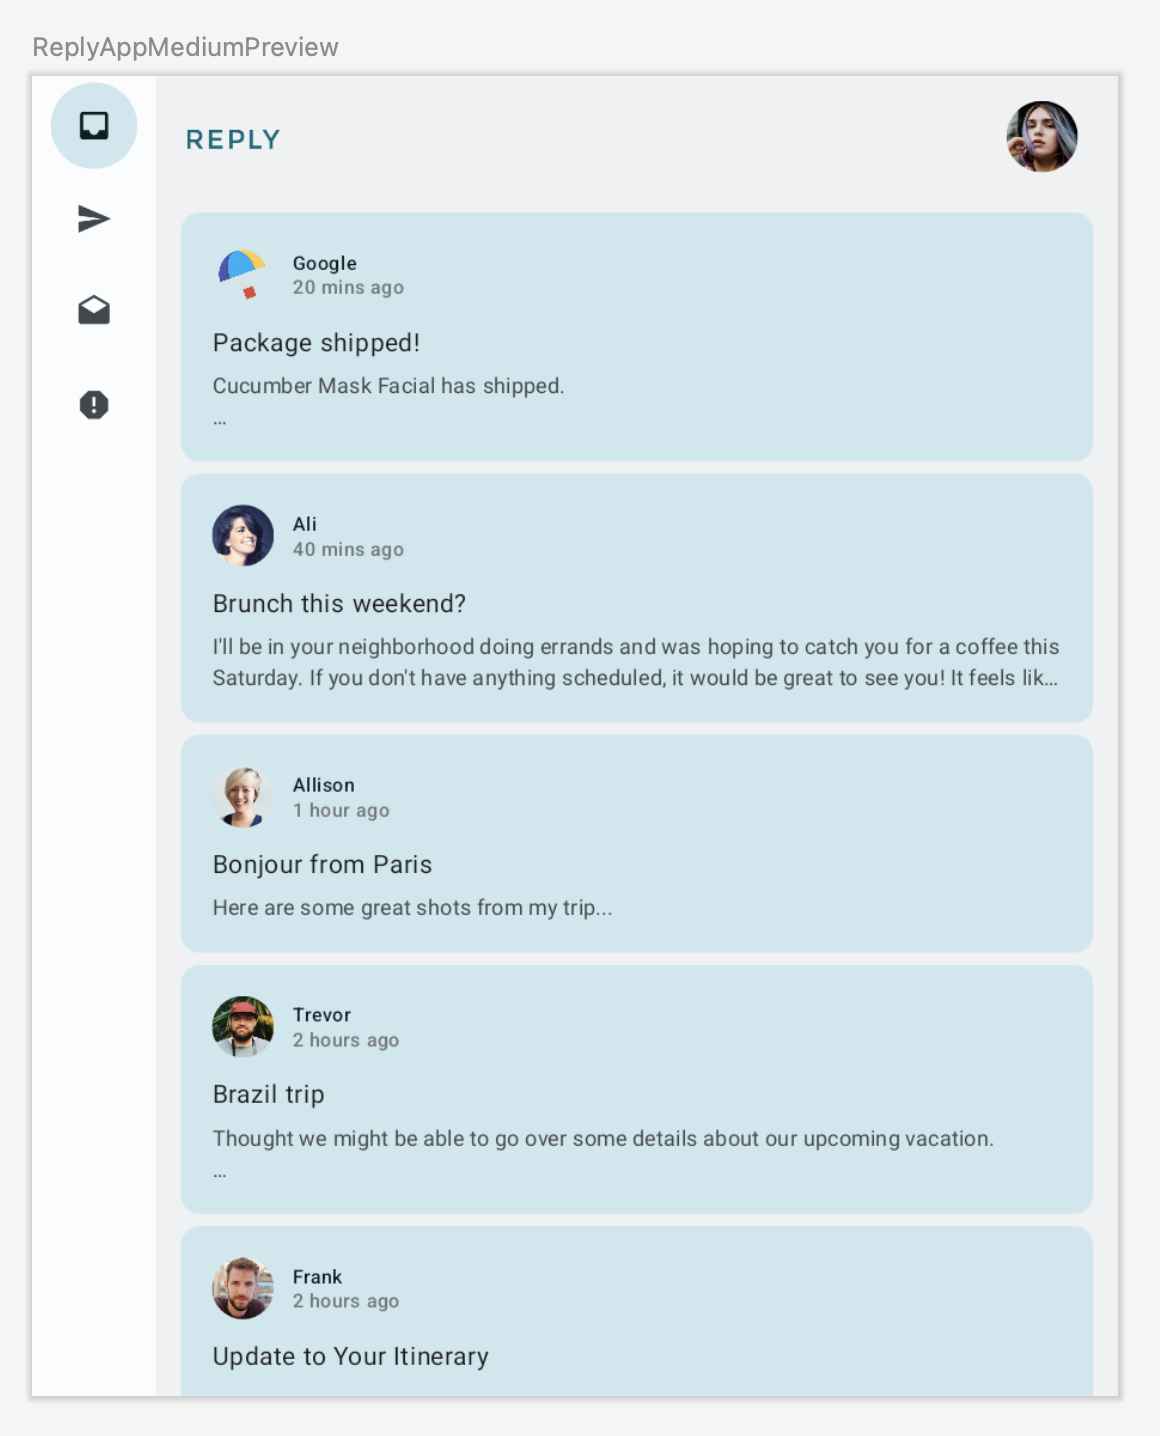
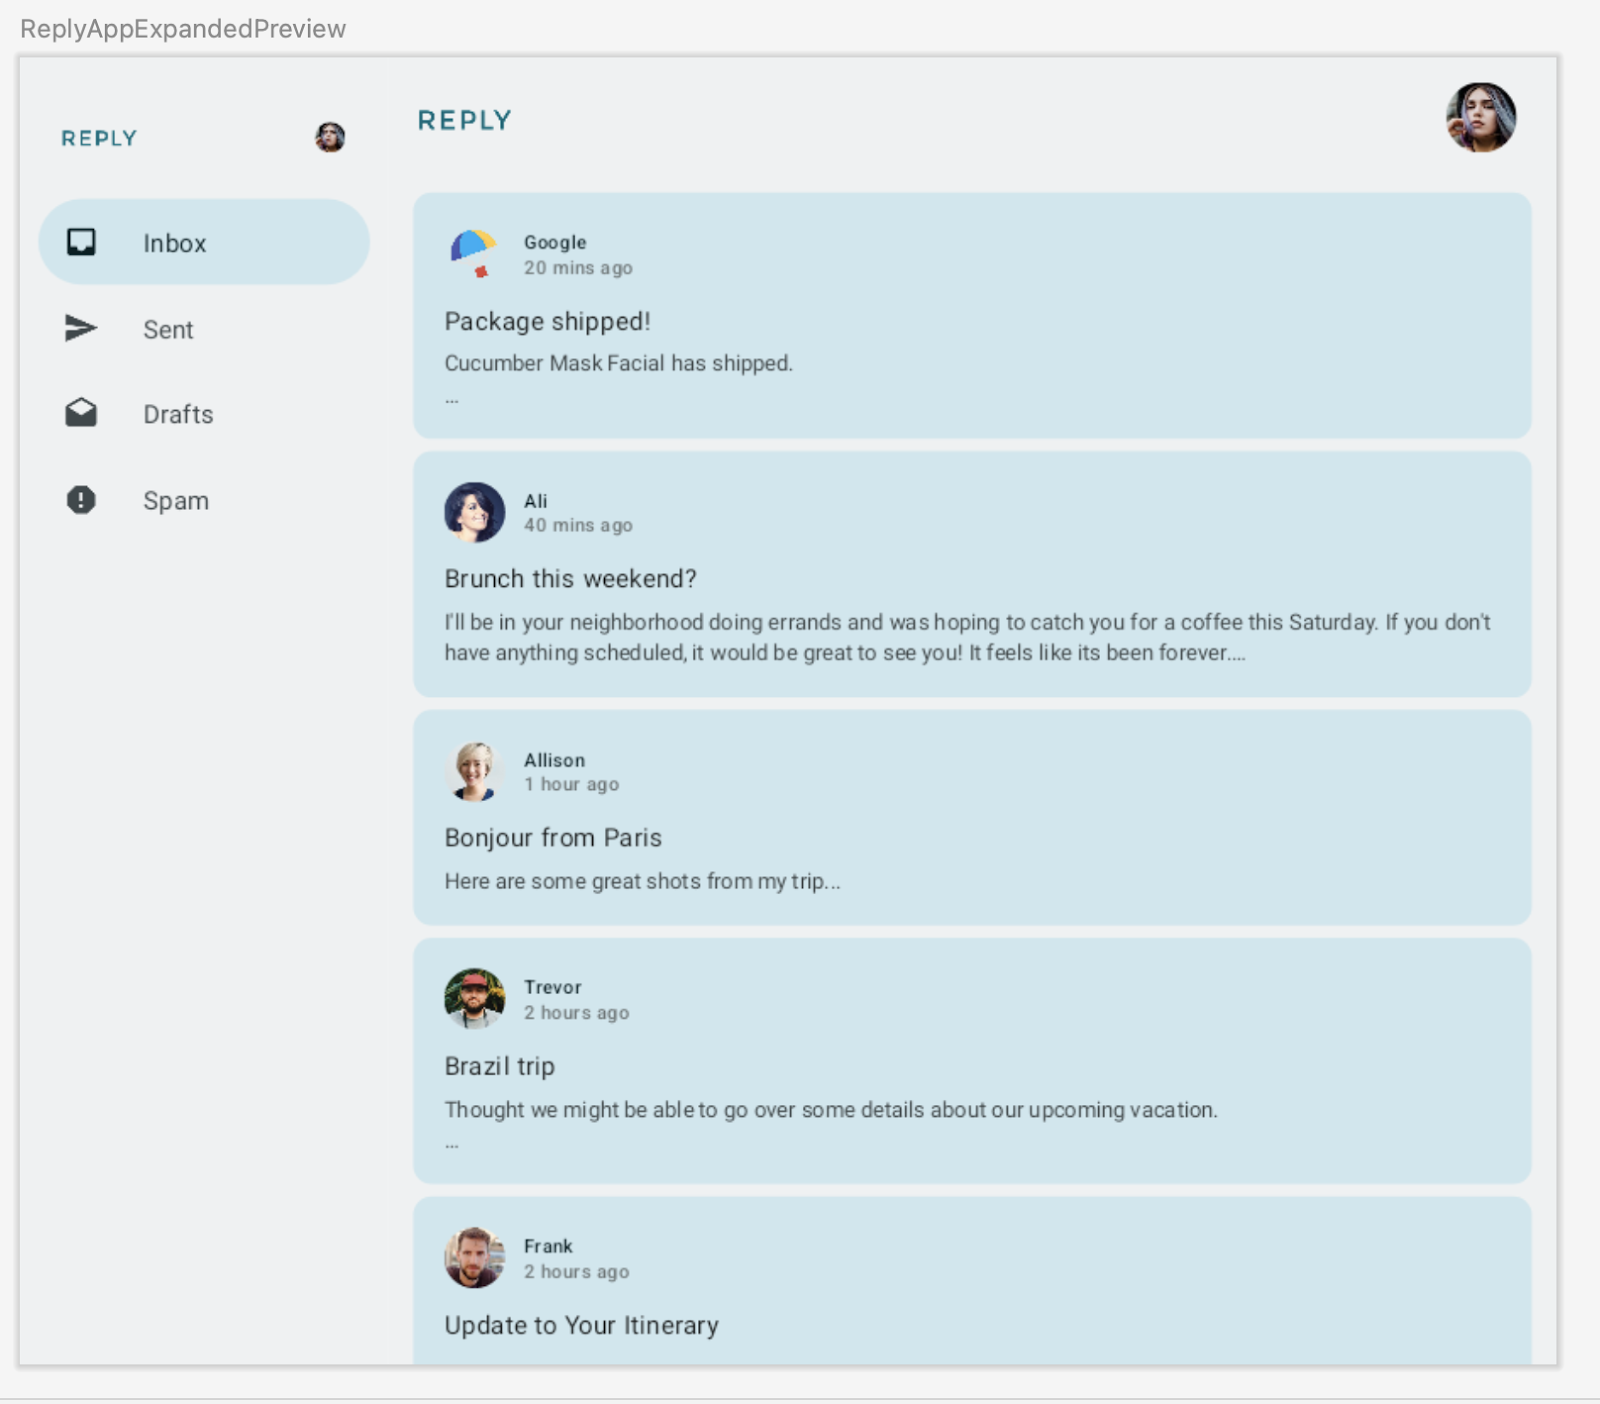
中画面と拡大画面のプレビューを追加する手順は次のとおりです。
Previewアノテーションのパラメータに中程度のwidthDp値を設定し、ReplyAppコンポーザブルのパラメータとしてWindowWidthSizeClass.Medium値を指定することで、中画面のプレビューを追加します。
MainActivity.kt
...
@Preview(showBackground = true, widthDp = 700)
@Composable
fun ReplyAppMediumPreview() {
    ReplyTheme {
        Surface {
            ReplyApp(windowSize = WindowWidthSizeClass.Medium)
        }
    }
}
...
Previewアノテーションのパラメータに大きなwidthDp値を設定し、ReplyAppコンポーザブルのパラメータとしてWindowWidthSizeClass.Expanded値を指定することで、拡大画面用の別のプレビューを追加します。
MainActivity.kt
...
@Preview(showBackground = true, widthDp = 1000)
@Composable
fun ReplyAppExpandedPreview() {
    ReplyTheme {
        Surface {
            ReplyApp(windowSize = WindowWidthSizeClass.Expanded)
        }
    }
}
...
- プレビューを作成すると次のようになります。
3. アダプティブ コンテンツ レイアウトを実装する
リスト詳細ビューについて
拡大画面ではコンテンツが引き伸ばされており、利用可能な画面スペースを有効活用できていないことがわかります。
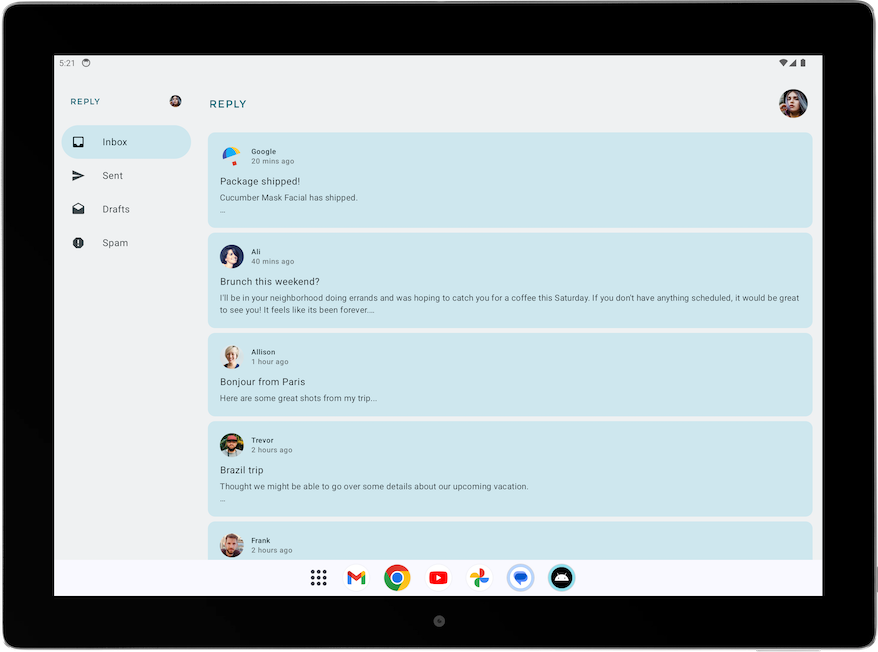
正規レイアウトのいずれかを適用すると、このレイアウトを改善できます。正規レイアウトは、設計と実装の出発点として機能する大画面構成です。アプリ、リストビュー、サポートパネル、フィードの共通要素をどのように整理するかの指針として、3 つのレイアウトを使用できます。各レイアウトは、共通するユースケースとコンポーネントを考慮し、アプリが画面サイズやブレークポイントにどのように適応するかについての期待とユーザーニーズに対応します。
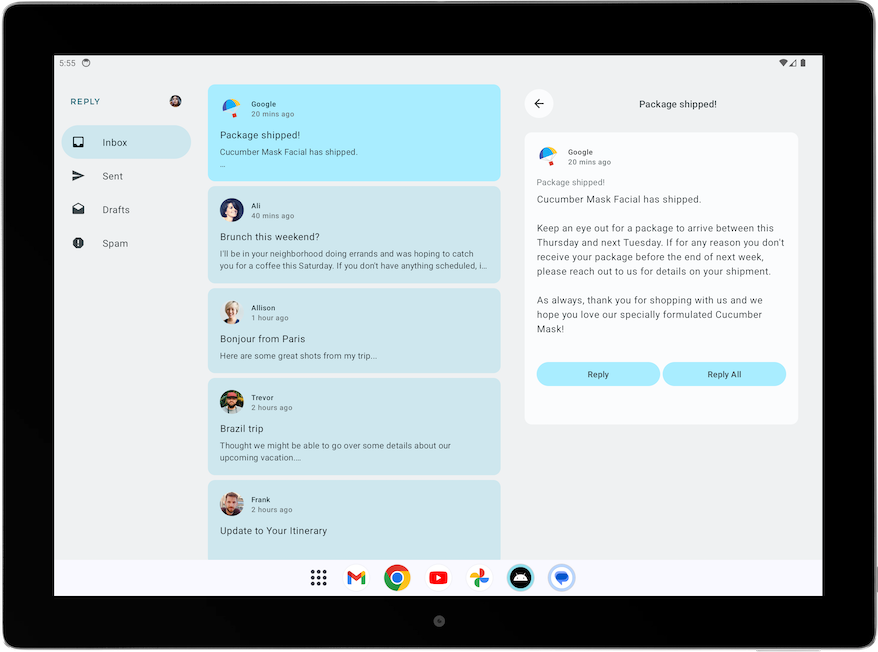
Reply アプリでは、コンテンツをブラウジングして詳細を素早く確認する場合に最適なリスト詳細ビューを実装します。リスト詳細ビューのレイアウトでは、メールリスト画面の横に別のペインを作成してメールの詳細を表示します。このレイアウトでは、利用可能な画面を使用して多くの情報を表示し、アプリの生産性を高めることができます。
リスト詳細ビューを実装する
拡大画面のリスト詳細ビューを実装する手順は次のとおりです。
- さまざまなコンテンツ タイプのレイアウトを表すために、
WindowStateUtils.ktで、コンテンツ タイプ別に新しいEnumクラスを作成します。拡大画面が使用されているときはLIST_AND_DETAIL値を使用し、それ以外の場合はLIST_ONLY値を使用します。
WindowStateUtils.kt
...
enum class ReplyContentType {
    LIST_ONLY, LIST_AND_DETAIL
}
...
ReplyApp.ktでcontentType変数を宣言し、さまざまなウィンドウ サイズに適したcontentTypeを代入して、画面サイズに応じて適切なコンテンツ タイプが選択されるようにします。
ReplyApp.kt
...
import com.example.reply.ui.utils.ReplyContentType
...

    val navigationType: ReplyNavigationType
    val contentType: ReplyContentType

    when (windowSize) {
        WindowWidthSizeClass.Compact -> {
            ...
            contentType = ReplyContentType.LIST_ONLY
        }
        WindowWidthSizeClass.Medium -> {
            ...
            contentType = ReplyContentType.LIST_ONLY
        }
        WindowWidthSizeClass.Expanded -> {
            ...
            contentType = ReplyContentType.LIST_AND_DETAIL
        }
        else -> {
            ...
            contentType = ReplyContentType.LIST_ONLY
        }
    }
...
次に、contentType 値を使用すると、ReplyAppContent コンポーザブルのレイアウトにさまざまな分岐を作成できます。
ReplyHomeScreen.ktで、ReplyHomeScreenコンポーザブルにパラメータとしてcontentTypeを追加します。
ReplyHomeScreen.kt
...
@OptIn(ExperimentalMaterial3Api::class)
@Composable
fun ReplyHomeScreen(
    navigationType: ReplyNavigationType,
    contentType: ReplyContentType,
    replyUiState: ReplyUiState,
    onTabPressed: (MailboxType) -> Unit,
    onEmailCardPressed: (Email) -> Unit,
    onDetailScreenBackPressed: () -> Unit,
    modifier: Modifier = Modifier
) {
...
contentType値をReplyHomeScreenコンポーザブルに渡します。
ReplyApp.kt
...
    ReplyHomeScreen(
        navigationType = navigationType,
        contentType = contentType,
        replyUiState = replyUiState,
        onTabPressed = { mailboxType: MailboxType ->
            viewModel.updateCurrentMailbox(mailboxType = mailboxType)
            viewModel.resetHomeScreenStates()
        },
        onEmailCardPressed = { email: Email ->
            viewModel.updateDetailsScreenStates(
                email = email
            )
        },
        onDetailScreenBackPressed = {
            viewModel.resetHomeScreenStates()
        },
        modifier = modifier
    )

...
contentTypeをReplyAppContentコンポーザブルのパラメータとして追加します。
ReplyHomeScreen.kt
...
@Composable
private fun ReplyAppContent(
    navigationType: ReplyNavigationType,
    contentType: ReplyContentType,
    replyUiState: ReplyUiState,
    onTabPressed: ((MailboxType) -> Unit),
    onEmailCardPressed: (Email) -> Unit,
    navigationItemContentList: List<NavigationItemContent>,
    modifier: Modifier = Modifier
) {
...
- 2 つの
ReplyAppContentコンポーザブルにcontentType値を渡します。
ReplyHomeScreen.kt
...
            ReplyAppContent(
                navigationType = navigationType,
                contentType = contentType,
                replyUiState = replyUiState,
                onTabPressed = onTabPressed,
                onEmailCardPressed = onEmailCardPressed,
                navigationItemContentList = navigationItemContentList,
                modifier = modifier
            )
        }
    } else {
        if (replyUiState.isShowingHomepage) {
            ReplyAppContent(
                navigationType = navigationType,
                contentType = contentType,
                replyUiState = replyUiState,
                onTabPressed = onTabPressed,
                onEmailCardPressed = onEmailCardPressed,
                navigationItemContentList = navigationItemContentList,
                modifier = modifier
            )
        } else {
            ReplyDetailsScreen(
                replyUiState = replyUiState,
                isFullScreen = true,
                onBackButtonClicked = onDetailScreenBackPressed,
                modifier = modifier
            )
        }
    }
...
contentType が LIST_AND_DETAIL の場合はリストと詳細の完全な画面を表示し、contentType が LIST_ONLY の場合はリストのみのメール コンテンツを表示しましょう。
ReplyHomeScreen.ktで、ReplyAppContentコンポーザブルにif/elseステートメントを追加して、contentType値がLIST_AND_DETAILのときにReplyListAndDetailContentコンポーザブルを表示し、elseブランチでReplyListOnlyContentコンポーザブルを表示します。
ReplyHomeScreen.kt
...
        Column(
            modifier = modifier
                .fillMaxSize()
                .background(MaterialTheme.colorScheme.inverseOnSurface)
        ) {
            if (contentType == ReplyContentType.LIST_AND_DETAIL) {
                ReplyListAndDetailContent(
                    replyUiState = replyUiState,
                    onEmailCardPressed = onEmailCardPressed,
                    modifier = Modifier.weight(1f)
                )
            } else {
                ReplyListOnlyContent(
                    replyUiState = replyUiState,
                    onEmailCardPressed = onEmailCardPressed,
                    modifier = Modifier.weight(1f)
                        .padding(
                            horizontal = dimensionResource(R.dimen.email_list_only_horizontal_padding)
                        )
                )
            }
            AnimatedVisibility(visible = navigationType == ReplyNavigationType.BOTTOM_NAVIGATION) {
                ReplyBottomNavigationBar(
                    currentTab = replyUiState.currentMailbox,
                    onTabPressed = onTabPressed,
                    navigationItemContentList = navigationItemContentList
                )
            }
        }
...
- ユーザーが拡大ビューを使用している場合は詳細ビューに移動する必要がないため、
replyUiState.isShowingHomepage条件を削除して固定的なナビゲーション ドロワーを表示します。
ReplyHomeScreen.kt
...
    if (navigationType == ReplyNavigationType.PERMANENT_NAVIGATION_DRAWER) {
        PermanentNavigationDrawer(
            drawerContent = {
                PermanentDrawerSheet(Modifier.width(dimensionResource(R.dimen.drawer_width))) {
                    NavigationDrawerContent(
                        selectedDestination = replyUiState.currentMailbox,
                        onTabPressed = onTabPressed,
                        navigationItemContentList = navigationItemContentList,
                        modifier = Modifier
                            .wrapContentWidth()
                            .fillMaxHeight()
                            .background(MaterialTheme.colorScheme.inverseOnSurface)
                            .padding(dimensionResource(R.dimen.drawer_padding_content))
                    )
                }
            }
        ) {

...
- タブレット モードでアプリを実行すると、以下の画面が表示されます。
リストの詳細ビューの UI 要素を改善する
現在、アプリはホーム画面に拡大画面の詳細ペインを表示しています。
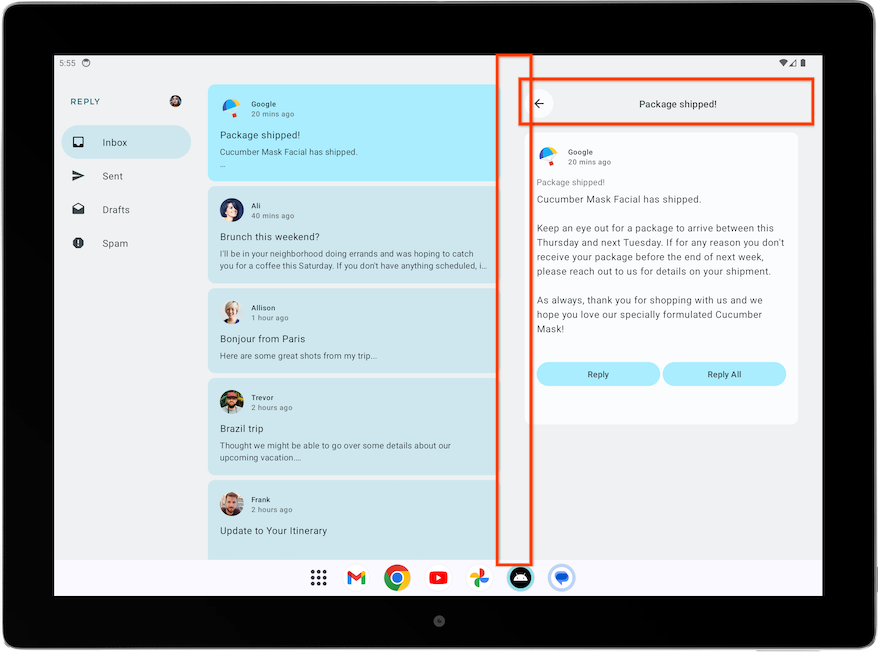
しかし、この画面は単体の詳細画面用にデザインされているため、戻るボタン、件名ヘッダー、追加のパディングなど、余分な要素があります。これは少し調整するだけで改善できます。
拡大ビューの詳細画面を改善する手順は次のとおりです。
ReplyDetailsScreen.ktで、ReplyDetailsScreenコンポーザブルにBooleanパラメータとしてisFullScreen変数を追加します。
この追加により、コンポーザブルを単体で使用する場合とホーム画面で使用する場合で差異を生じさせることができます。
ReplyDetailsScreen.kt
...
@Composable
fun ReplyDetailsScreen(
    replyUiState: ReplyUiState,
    onBackPressed: () -> Unit,
    modifier: Modifier = Modifier,
    isFullScreen: Boolean = false
) {
...
ReplyDetailsScreenコンポーザブル内で、ReplyDetailsScreenTopBarコンポーザブルをifステートメントでラップし、アプリが全画面表示されたときだけ表示されるようにします。
ReplyDetailsScreen.kt
...
    LazyColumn(
        modifier = modifier
            .fillMaxSize()
            .background(color = MaterialTheme.colorScheme.inverseOnSurface)
            .padding(top = dimensionResource(R.dimen.detail_card_list_padding_top))
    ) {
        item {
            if (isFullScreen) {
                ReplyDetailsScreenTopBar(
                    onBackPressed,
                    replyUiState,
                    Modifier
                        .fillMaxWidth()
                        .padding(bottom = dimensionResource(R.dimen.detail_topbar_padding_bottom))
                    )
                )
            }

...
パディングを追加できるようになりました。ReplyEmailDetailsCard コンポーザブルに必要なパディングは、全画面として使用するかどうかによって異なります。拡大画面で ReplyEmailDetailsCard を他のコンポーザブルと使用すると、他のコンポーザブルからパディングが追加されます。
isFullScreen値をReplyEmailDetailsCardコンポーザブルに渡します。画面が全画面表示の場合は左右パディングR.dimen.detail_card_outer_padding_horizontalの修飾子を渡し、それ以外の場合は右パディングR.dimen.detail_card_outer_padding_horizontalの修飾子を渡します。
ReplyDetailsScreen.kt
...
        item {
            if (isFullScreen) {
                ReplyDetailsScreenTopBar(
                    onBackPressed,
                    replyUiState,
                    Modifier
                        .fillMaxWidth()
                        .padding(bottom = dimensionResource(R.dimen.detail_topbar_padding_bottom))
                    )
                )
            }
            ReplyEmailDetailsCard(
                email = replyUiState.currentSelectedEmail,
                mailboxType = replyUiState.currentMailbox,
                isFullScreen = isFullScreen,
                modifier = if (isFullScreen) {
                    Modifier.padding(horizontal = dimensionResource(R.dimen.detail_card_outer_padding_horizontal))
                } else {
                    Modifier.padding(end = dimensionResource(R.dimen.detail_card_outer_padding_horizontal))
                }
            )
        }
...
ReplyEmailDetailsCardコンポーザブルにパラメータとしてisFullScreen値を追加します。
ReplyDetailsScreen.kt
...
@OptIn(ExperimentalMaterial3Api::class)
@Composable
private fun ReplyEmailDetailsCard(
    email: Email,
    mailboxType: MailboxType,
    modifier: Modifier = Modifier,
    isFullScreen: Boolean = false
) {
...
ReplyEmailDetailsCardコンポーザブル内では、アプリが全画面表示でない場合にのみメールの件名テキストを表示します。これは、全画面レイアウトではすでにメールの件名をヘッダーとして表示しているためです。全画面表示の場合は、高さR.dimen.detail_content_padding_topのスペーサーを追加します。
ReplyDetailsScreen.kt
...
Column(
    modifier = Modifier
        .fillMaxWidth()
        .padding(dimensionResource(R.dimen.detail_card_inner_padding))
) {
    DetailsScreenHeader(
        email,
        Modifier.fillMaxWidth()
    )
    if (isFullScreen) {
        Spacer(modifier = Modifier.height(dimensionResource(R.dimen.detail_content_padding_top)))
    } else {
        Text(
            text = stringResource(email.subject),
            style = MaterialTheme.typography.bodyMedium,
            color = MaterialTheme.colorScheme.outline,
            modifier = Modifier.padding(
                top = dimensionResource(R.dimen.detail_content_padding_top),
                bottom = dimensionResource(R.dimen.detail_expanded_subject_body_spacing)
            ),
        )
    }
    Text(
        text = stringResource(email.body),
        style = MaterialTheme.typography.bodyLarge,
        color = MaterialTheme.colorScheme.onSurfaceVariant,
    )
    DetailsScreenButtonBar(mailboxType, displayToast)
}

...
ReplyHomeScreen.ktのReplyHomeScreenコンポーザブル内で、ReplyDetailsScreenコンポーザブルを単独で作成するとき、isFullScreenパラメータにtrue値を渡します。
ReplyHomeScreen.kt
...
        } else {
            ReplyDetailsScreen(
                replyUiState = replyUiState,
                isFullScreen = true,
                onBackPressed = onDetailScreenBackPressed,
                modifier = modifier
            )
        }
...
- タブレット モードでアプリを実行すると、次のレイアウトが表示されます。
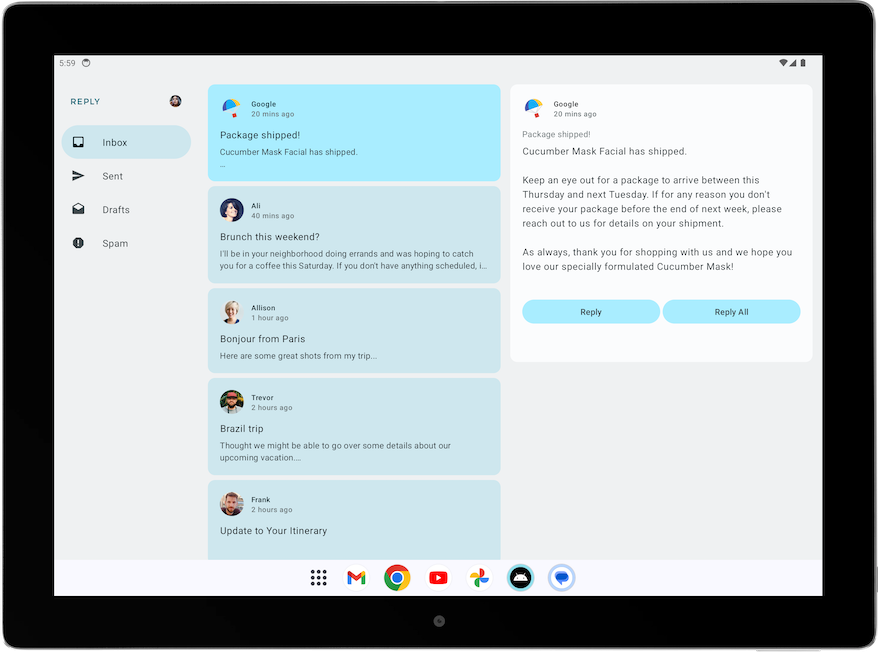
リストの詳細ビューの戻る操作の処理を調整する
拡大画面では、ReplyDetailsScreen に移動する必要はまったくありません。代わりに、ユーザーが戻るボタンを選択したときにアプリを閉じるようにします。そのため、戻る操作のハンドラを調整する必要があります。
activity.finish() 関数を ReplyListAndDetailContent コンポーザブル内の ReplyDetailsScreen コンポーザブルの onBackPressed パラメータとして渡すことで、戻る操作のハンドラを変更します。
ReplyHomeContent.kt
...
import android.app.Activity
import androidx.compose.ui.platform.LocalContext
...
        val activity = LocalContext.current as Activity
        ReplyDetailsScreen(
            replyUiState = replyUiState,
            modifier = Modifier.weight(1f),
            onBackPressed = { activity.finish() }
        )
...
4. さまざまな画面サイズについて確認する
大画面アプリの品質に関するガイドライン
Android で一貫性のある優れたユーザー エクスペリエンスを実現するには、品質を念頭に置いてアプリを構築し、テストすることが重要です。アプリの品質を向上させる方法については、アプリの中核品質ガイドラインをご覧ください。
すべてのフォーム ファクタに適した高品質アプリを作成するには、大画面アプリの品質ガイドラインをご確認ください。また、アプリは Tier 3 - 大画面対応の要件も満たす必要があります。
アプリの大画面対応を手動でテストする
アプリの品質に関するガイドラインでは、アプリの品質を確認するための、テストデバイスの推奨事項と手順が示されています。Reply アプリに関連するテスト例を見てみましょう。
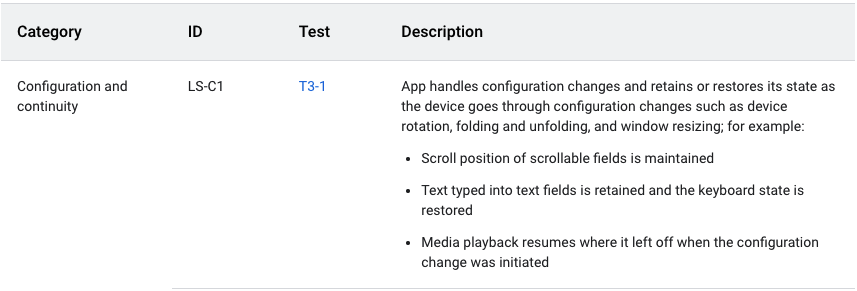
上記のアプリの品質に関するガイドラインでは、構成の変更後にアプリの状態を保持または復元することが求められています。またこのガイドラインには、下図のように、アプリのテスト方法も記載されています。
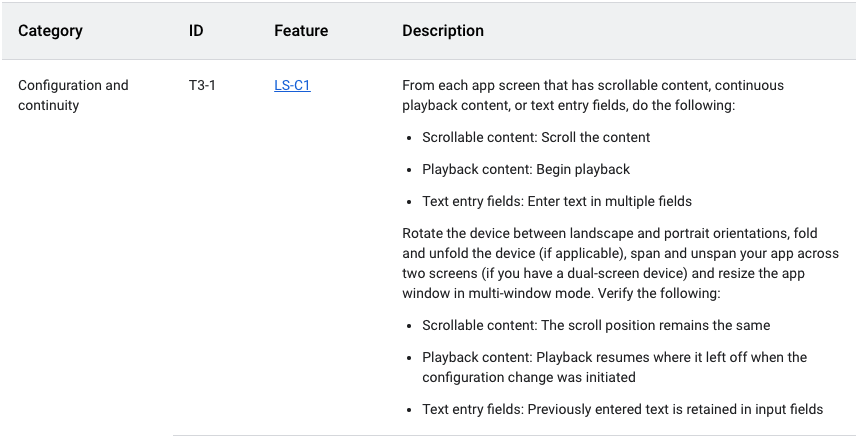
Reply アプリの構成の継続性を手動でテストする手順は次のとおりです。
- Reply アプリを中サイズのデバイスで実行するか、サイズ変更可能なエミュレータを使用している場合は、開いた状態の折りたたみ式モードで実行します。
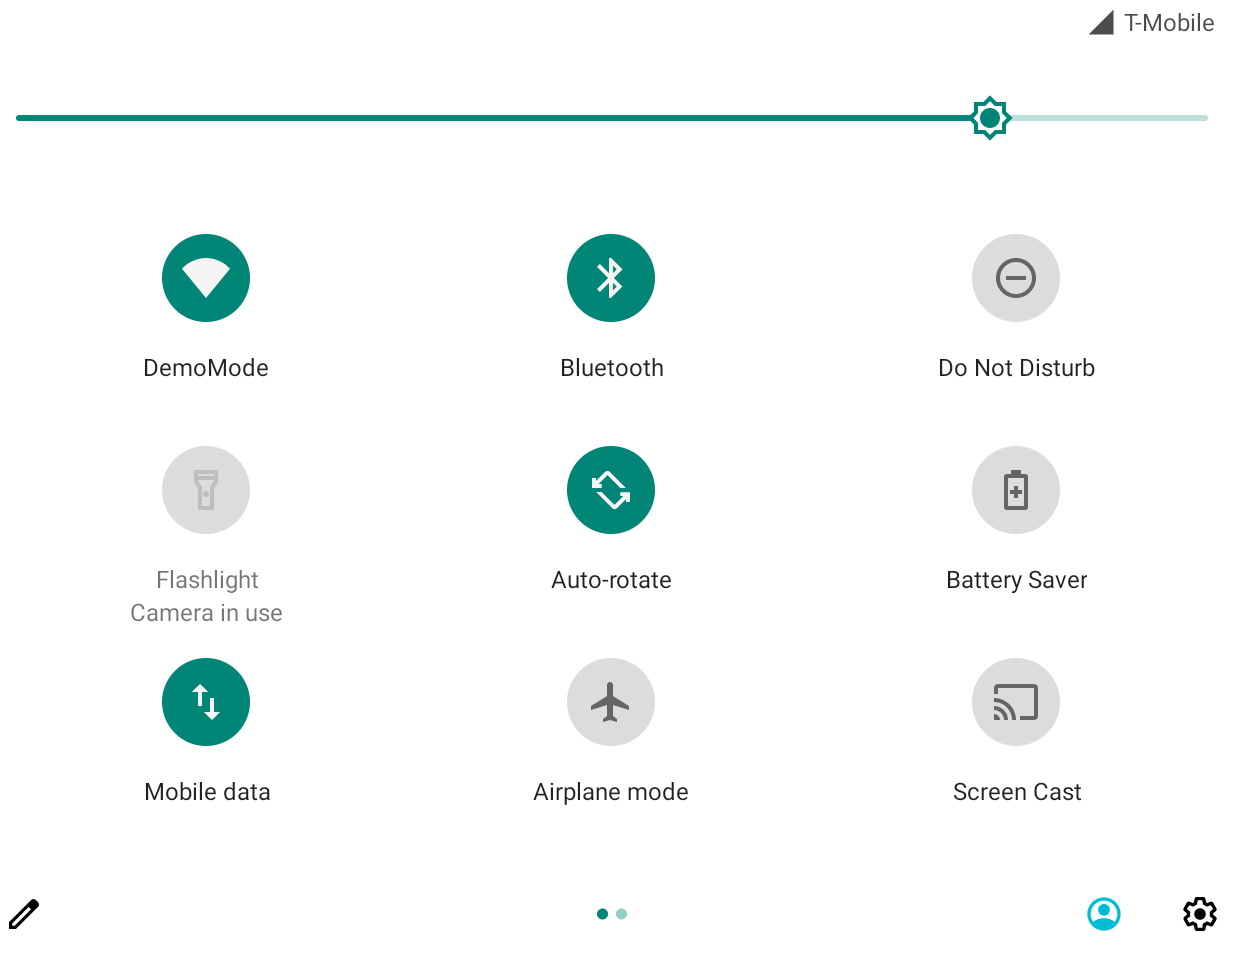
- エミュレータで [自動回転] が [ON] に設定されていることを確認します。
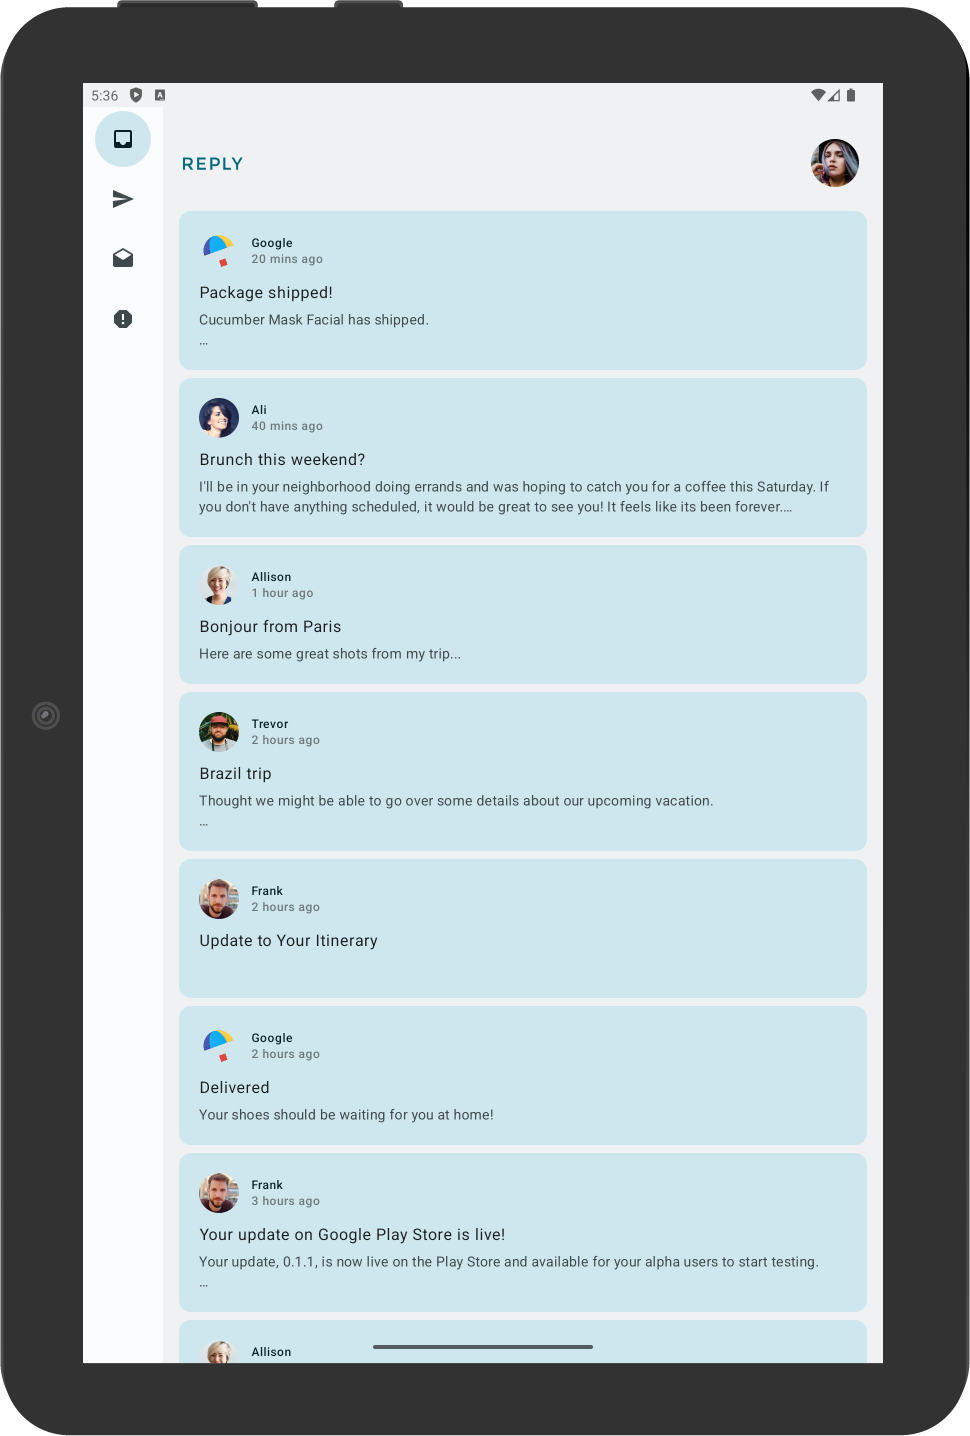
- メールリストを下にスクロールします。
- メールカードをクリックします。たとえば、Ali からのメールを開きます。
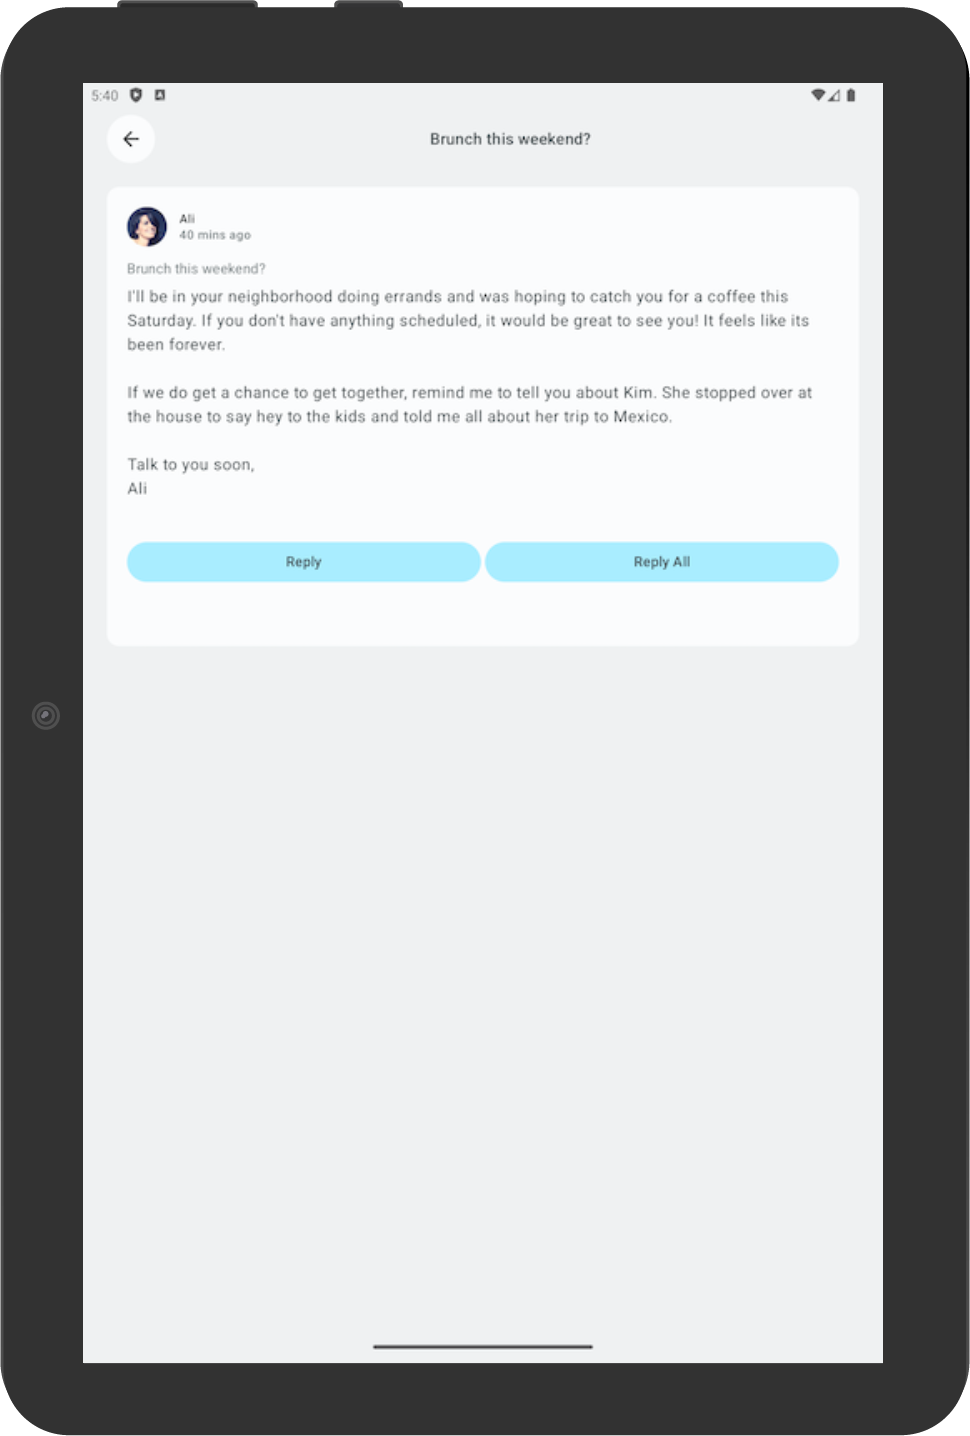
- デバイスを回転させても、縦向きの状態で選択したメールが引き続き選択されていることを確認します。この例では、Ali からのメールが引き続き表示されています。
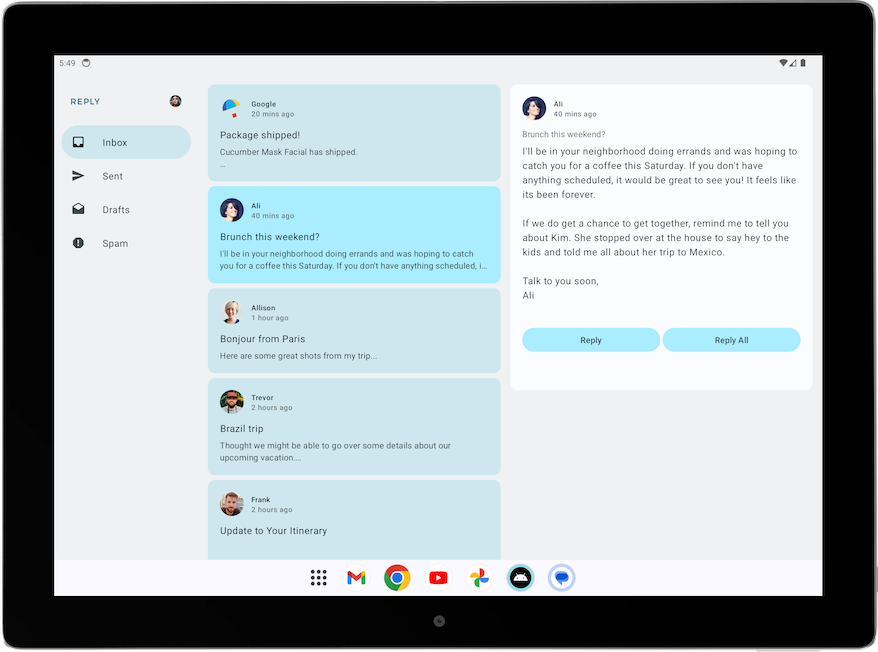
- 縦向きに戻して、同じメールが引き続きアプリに表示されることを確認します。

5. アダプティブ アプリの自動テストを追加する
コンパクト画面のテストを構成する
「Cupcake アプリをテストする」Codelab では、UI テストの作成について学習しました。ここでは、さまざまな画面サイズ向けに固有のテストを作成する方法を学習しましょう。
Reply アプリでは、画面サイズに応じて異なるナビゲーション要素を使用します。たとえば、ユーザーが拡大画面を表示したときは固定的なナビゲーション ドロワーを表示することが想定されます。さまざまな画面サイズについて、ボトム ナビゲーション、ナビゲーション レール、ナビゲーション ドロワーなど、さまざまなナビゲーション要素の存在を確認するためのテストを作成すると便利です。
コンパクト画面について、ボトム ナビゲーション要素の存在を確認するためのテストを作成する手順は次のとおりです。
- テスト ディレクトリで、
ReplyAppTest.ktという新しい Kotlin クラスを作成します。 ReplyAppTestクラスで、createAndroidComposeRuleを使用しComponentActivityを型パラメータとして渡すテストルールを作成します。空のアクティビティへのアクセスには、MainActivityではなくComponentActivityが使用されます。
ReplyAppTest.kt
...
class ReplyAppTest {

    @get:Rule
    val composeTestRule = createAndroidComposeRule<ComponentActivity>()
...
画面上のナビゲーション要素を区別するには、ReplyBottomNavigationBar コンポーザブルに testTag を追加します。
- Navigation Bottom の文字列リソースを定義します。
strings.xml
...
<resources>
...
    <string name="navigation_bottom">Navigation Bottom</string>
...
</resources>
ReplyBottomNavigationBarコンポーザブルで、ModifierのtestTagメソッドのtestTag引数として文字列名を追加します。
ReplyHomeScreen.kt
...
val bottomNavigationContentDescription = stringResource(R.string.navigation_bottom)
ReplyBottomNavigationBar(
    ...
    modifier = Modifier
        .fillMaxWidth()
        .testTag(bottomNavigationContentDescription)
)
...
ReplyAppTestクラスで、コンパクト サイズ画面をテストするテスト関数を作成します。composeTestRuleのコンテンツをReplyAppコンポーザブルで設定し、windowSize引数としてWindowWidthSizeClass.Compactを渡します。
ReplyAppTest.kt
...
    @Test
    fun compactDevice_verifyUsingBottomNavigation() {
        // Set up compact window
        composeTestRule.setContent {
            ReplyApp(
                windowSize = WindowWidthSizeClass.Compact
            )
        }
    }
- テストタグでボトム ナビゲーション要素の存在をアサートします。
composeTestRuleで拡張関数onNodeWithTagForStringIdを呼び出し、ナビゲーションの下部の文字列を渡してassertExists()メソッドを呼び出します。
ReplyAppTest.kt
...
    @Test
    fun compactDevice_verifyUsingBottomNavigation() {
        // Set up compact window
        composeTestRule.setContent {
            ReplyApp(
                windowSize = WindowWidthSizeClass.Compact
            )
        }
        // Bottom navigation is displayed
        composeTestRule.onNodeWithTagForStringId(
            R.string.navigation_bottom
        ).assertExists()
    }
- テストを実行し、合格することを確認します。
中画面と拡大画面のテストを構成する
コンパクト画面のテストが正常に作成できたところで、今度は中画面と拡大画面のテストを作成してみましょう。
中画面と拡大画面について、ナビゲーション レールと固定的なナビゲーション ドロワーの存在を確認するためのテストを作成する手順は次のとおりです。
- 後でテストタグとして使用する Navigation Rail の文字列リソースを定義します。
strings.xml
...
<resources>
...
    <string name="navigation_rail">Navigation Rail</string>
...
</resources>
PermanentNavigationDrawerコンポーザブルのModifierを通じて、文字列をテストタグとして渡します。
ReplyHomeScreen.kt
...
    val navigationDrawerContentDescription = stringResource(R.string.navigation_drawer)
        PermanentNavigationDrawer(
...
modifier = Modifier.testTag(navigationDrawerContentDescription)
)
...
ReplyNavigationRailコンポーザブルのModifierを通じて、文字列をテストタグとして渡します。
ReplyHomeScreen.kt
...
val navigationRailContentDescription = stringResource(R.string.navigation_rail)
ReplyNavigationRail(
    ...
    modifier = Modifier
        .testTag(navigationRailContentDescription)
)
...
- 中画面にナビゲーション レール要素が存在することを確認するテストを追加します。
ReplyAppTest.kt
...
@Test
fun mediumDevice_verifyUsingNavigationRail() {
    // Set up medium window
    composeTestRule.setContent {
        ReplyApp(
            windowSize = WindowWidthSizeClass.Medium
        )
    }
    // Navigation rail is displayed
    composeTestRule.onNodeWithTagForStringId(
        R.string.navigation_rail
    ).assertExists()
}
- 拡大画面にナビゲーション ドロワー要素が存在することを確認するテストを追加します。
ReplyAppTest.kt
...
@Test
fun expandedDevice_verifyUsingNavigationDrawer() {
    // Set up expanded window
    composeTestRule.setContent {
        ReplyApp(
            windowSize = WindowWidthSizeClass.Expanded
        )
    }
    // Navigation drawer is displayed
    composeTestRule.onNodeWithTagForStringId(
        R.string.navigation_drawer
    ).assertExists()
}
- タブレット エミュレータを使用して、またはサイズ変更可能なエミュレータをタブレット モードで使用して、テストを実行します。
- すべてのテストを実行し、合格することを確認します。
コンパクト画面の構成変更をテストする
構成変更は、アプリのライフサイクルで頻繁に発生します。たとえば、画面の向きを縦向きから横向きに変更すると構成変更が発生します。構成変更が発生した場合、アプリが状態を保持しているかどうかをテストすることが重要です。次に、構成変更をシミュレートするテストを作成して、アプリがコンパクト画面で状態を保持しているかどうかをテストします。
コンパクト画面で構成変更をテストするには:
- テスト ディレクトリで、
ReplyAppStateRestorationTest.ktという新しい Kotlin クラスを作成します。 ReplyAppStateRestorationTestクラスで、createAndroidComposeRuleを使用しComponentActivityを型パラメータとして渡すテストルールを作成します。
ReplyAppStateRestorationTest.kt
...
class ReplyAppStateRestorationTest {

    /**
     * Note: To access to an empty activity, the code uses ComponentActivity instead of
     * MainActivity.
     */
    @get:Rule
    val composeTestRule = createAndroidComposeRule<ComponentActivity>()
}
...
- 構成変更後もコンパクト画面でメールが選択されていることを確認するテスト関数を作成します。
ReplyAppStateRestorationTest.kt
...
@Test
fun compactDevice_selectedEmailEmailRetained_afterConfigChange() {

}
...
構成変更をテストするには、StateRestorationTester を使用する必要があります。
StateRestorationTesterに引数としてcomposeTestRuleを渡し、stateRestorationTesterをセットアップします。setContent()をReplyAppコンポーザブルとともに使用し、windowSize引数としてWindowWidthSizeClass.Compactを渡します。
ReplyAppStateRestorationTest.kt
...
@Test
fun compactDevice_selectedEmailEmailRetained_afterConfigChange() {
    // Setup compact window
    val stateRestorationTester = StateRestorationTester(composeTestRule)
    stateRestorationTester.setContent { ReplyApp(windowSize = WindowWidthSizeClass.Compact) }

}
...
- アプリに 3 通目のメールが表示されていることを確認します。
composeTestRuleでassertIsDisplayed()メソッドを使用し、3 通目のメールのテキストを探します。
ReplyAppStateRestorationTest.kt
...
@Test
fun compactDevice_selectedEmailEmailRetained_afterConfigChange() {
    // Setup compact window
    val stateRestorationTester = StateRestorationTester(composeTestRule)
    stateRestorationTester.setContent { ReplyApp(windowSize = WindowWidthSizeClass.Compact) }

    // Given third email is displayed
    composeTestRule.onNodeWithText(
        composeTestRule.activity.getString(LocalEmailsDataProvider.allEmails[2].body)
    ).assertIsDisplayed()
}
...
- メールの件名をクリックして、メールの詳細画面に移動します。
performClick()メソッドを使用して移動します。
ReplyAppStateRestorationTest.kt
...
@Test
fun compactDevice_selectedEmailEmailRetained_afterConfigChange() {
    // Setup compact window
    val stateRestorationTester = StateRestorationTester(composeTestRule)
    stateRestorationTester.setContent { ReplyApp(windowSize = WindowWidthSizeClass.Compact) }

    // Given third email is displayed
    composeTestRule.onNodeWithText(
        composeTestRule.activity.getString(LocalEmailsDataProvider.allEmails[2].body)
    ).assertIsDisplayed()

    // Open detailed page
    composeTestRule.onNodeWithText(
        composeTestRule.activity.getString(LocalEmailsDataProvider.allEmails[2].subject)
    ).performClick()
}
...
- 詳細画面に 3 通目のメールが表示されていることを確認します。戻るボタンの存在をアサートして、アプリが詳細画面を表示していること、3 通目のメールのテキストが表示されていることを確認します。
ReplyAppStateRestorationTest.kt
...
@Test
fun compactDevice_selectedEmailEmailRetained_afterConfigChange() {
    ...
    // Open detailed page
    composeTestRule.onNodeWithText(
        composeTestRule.activity.getString(LocalEmailsDataProvider.allEmails[2].subject)
    ).performClick()

    // Verify that it shows the detailed screen for the correct email
    composeTestRule.onNodeWithContentDescriptionForStringId(
        R.string.navigation_back
    ).assertExists()
    composeTestRule.onNodeWithText(
}
...
stateRestorationTester.emulateSavedInstanceStateRestore()を使用して構成変更をシミュレートします。
ReplyAppStateRestorationTest.kt
...
@Test
fun compactDevice_selectedEmailEmailRetained_afterConfigChange() {
    ...
    // Verify that it shows the detailed screen for the correct email
    composeTestRule.onNodeWithContentDescriptionForStringId(
        R.string.navigation_back
    ).assertExists()
    composeTestRule.onNodeWithText(
        composeTestRule.activity.getString(LocalEmailsDataProvider.allEmails[2].body)
    ).assertExists()

    // Simulate a config change
    stateRestorationTester.emulateSavedInstanceStateRestore()
}
...
- 詳細画面に 3 通目のメールが表示されていることを再度確認します。戻るボタンの存在をアサートして、アプリが詳細画面を表示していること、3 通目のメールのテキストが表示されていることを確認します。
ReplyAppStateRestorationTest.kt
...
@Test
fun compactDevice_selectedEmailEmailRetained_afterConfigChange() {
    // Setup compact window
    val stateRestorationTester = StateRestorationTester(composeTestRule)
    stateRestorationTester.setContent { ReplyApp(windowSize = WindowWidthSizeClass.Compact) }

    // Given third email is displayed
    composeTestRule.onNodeWithText(
        composeTestRule.activity.getString(LocalEmailsDataProvider.allEmails[2].body)
    ).assertIsDisplayed()

    // Open detailed page
    composeTestRule.onNodeWithText(
        composeTestRule.activity.getString(LocalEmailsDataProvider.allEmails[2].subject)
    ).performClick()

    // Verify that it shows the detailed screen for the correct email
    composeTestRule.onNodeWithContentDescriptionForStringId(
        R.string.navigation_back
    ).assertExists()
    composeTestRule.onNodeWithText(
        composeTestRule.activity.getString(LocalEmailsDataProvider.allEmails[2].body)
    ).assertExists()

    // Simulate a config change
    stateRestorationTester.emulateSavedInstanceStateRestore()

    // Verify that it still shows the detailed screen for the same email
    composeTestRule.onNodeWithContentDescriptionForStringId(
        R.string.navigation_back
    ).assertExists()
    composeTestRule.onNodeWithText(
        composeTestRule.activity.getString(LocalEmailsDataProvider.allEmails[2].body)
    ).assertExists()
}

...
- スマートフォン エミュレータで、またはサイズ変更可能なエミュレータのスマートフォン モードで、テストを実行します。
- テストに合格することを確認します。
拡大画面の構成変更をテストする
構成変更をシミュレートし、適切な WindowWidthSizeClass を渡すことで、拡大画面の構成変更をテストする手順は次のとおりです。
- 構成変更後も詳細画面でメールが選択されていることを確認するテスト関数を作成します。
ReplyAppStateRestorationTest.kt
...
@Test
fun expandedDevice_selectedEmailEmailRetained_afterConfigChange() {

}
...
構成変更をテストするには、StateRestorationTester を使用する必要があります。
StateRestorationTesterに引数としてcomposeTestRuleを渡し、stateRestorationTesterをセットアップします。setContent()をReplyAppコンポーザブルとともに使用し、windowSize引数としてWindowWidthSizeClass.Expandedを渡します。
ReplyAppStateRestorationTest.kt
...
@Test
fun expandedDevice_selectedEmailEmailRetained_afterConfigChange() {
    // Setup expanded window
    val stateRestorationTester = StateRestorationTester(composeTestRule)
    stateRestorationTester.setContent { ReplyApp(windowSize = WindowWidthSizeClass.Expanded) }
}
...
- アプリに 3 通目のメールが表示されていることを確認します。
composeTestRuleでassertIsDisplayed()メソッドを使用し、3 通目のメールのテキストを探します。
ReplyAppStateRestorationTest.kt
...
@Test
fun expandedDevice_selectedEmailEmailRetained_afterConfigChange() {
    // Setup expanded window
    val stateRestorationTester = StateRestorationTester(composeTestRule)
    stateRestorationTester.setContent { ReplyApp(windowSize = WindowWidthSizeClass.Expanded) }

    // Given third email is displayed
    composeTestRule.onNodeWithText(
        composeTestRule.activity.getString(LocalEmailsDataProvider.allEmails[2].body)
    ).assertIsDisplayed()
}
...
- 詳細画面で 3 通目のメールを選択します。
performClick()メソッドを使用してメールを選択します。
ReplyAppStateRestorationTest.kt
...
@Test
fun expandedDevice_selectedEmailEmailRetained_afterConfigChange() {
    // Setup expanded window
    val stateRestorationTester = StateRestorationTester(composeTestRule)
    stateRestorationTester.setContent { ReplyApp(windowSize = WindowWidthSizeClass.Expanded) }

    // Given third email is displayed
    composeTestRule.onNodeWithText(
        composeTestRule.activity.getString(LocalEmailsDataProvider.allEmails[2].body)
    ).assertIsDisplayed()

    // Select third email
    composeTestRule.onNodeWithText(
        composeTestRule.activity.getString(LocalEmailsDataProvider.allEmails[2].subject)
    ).performClick()
    ...
}

...
- 詳細画面で
testTagを使用し、その子でテキストを探すことにより、詳細画面に 3 通目のメールが表示されることを確認します。こうすることで、メールリストではなく詳細セクションでテキストを探すことができます。
ReplyAppStateRestorationTest.kt
...

@Test
fun expandedDevice_selectedEmailEmailRetained_afterConfigChange() {
    ...
    // Select third email
    composeTestRule.onNodeWithText(
        composeTestRule.activity.getString(LocalEmailsDataProvider.allEmails[2].subject)
    ).performClick()

    // Verify that third email is displayed on the details screen
    composeTestRule.onNodeWithTagForStringId(R.string.details_screen).onChildren()
        .assertAny(hasAnyDescendant(hasText(
            composeTestRule.activity.getString(LocalEmailsDataProvider.allEmails[2].body)))
        )
...
}

...
stateRestorationTester.emulateSavedInstanceStateRestore()を使用して構成変更をシミュレートします。
ReplyAppStateRestorationTest.kt
...
@Test
fun expandedDevice_selectedEmailEmailRetained_afterConfigChange() {
    ...
    // Verify that third email is displayed on the details screen
    composeTestRule.onNodeWithTagForStringId(R.string.details_screen).onChildren()
        .assertAny(hasAnyDescendant(hasText(
            composeTestRule.activity.getString(LocalEmailsDataProvider.allEmails[2].body)))
        )

    // Simulate a config change
    stateRestorationTester.emulateSavedInstanceStateRestore()
    ...
}
...
- 構成変更後、詳細画面に 3 通目のメールが表示されることを再度確認します。
ReplyAppStateRestorationTest.kt
...
@Test
fun expandedDevice_selectedEmailEmailRetained_afterConfigChange() {
    // Setup expanded window
    val stateRestorationTester = StateRestorationTester(composeTestRule)
    stateRestorationTester.setContent { ReplyApp(windowSize = WindowWidthSizeClass.Expanded) }

    // Given third email is displayed
    composeTestRule.onNodeWithText(
        composeTestRule.activity.getString(LocalEmailsDataProvider.allEmails[2].body)
    ).assertIsDisplayed()

    // Select third email
    composeTestRule.onNodeWithText(
        composeTestRule.activity.getString(LocalEmailsDataProvider.allEmails[2].subject)
    ).performClick()

    // Verify that third email is displayed on the details screen
    composeTestRule.onNodeWithTagForStringId(R.string.details_screen).onChildren()
        .assertAny(hasAnyDescendant(hasText(
            composeTestRule.activity.getString(LocalEmailsDataProvider.allEmails[2].body)))
        )

    // Simulate a config change
    stateRestorationTester.emulateSavedInstanceStateRestore()

    // Verify that third email is still displayed on the details screen
    composeTestRule.onNodeWithTagForStringId(R.string.details_screen).onChildren()
        .assertAny(hasAnyDescendant(hasText(
            composeTestRule.activity.getString(LocalEmailsDataProvider.allEmails[2].body)))
        )
}
...
- タブレット エミュレータで、またはサイズ変更可能なエミュレータのタブレット モードで、テストを実行します。
- テストに合格することを確認します。
アノテーションを使用してさまざまな画面サイズのテストをグループ化する
これまでのテストから、対応していない画面サイズのデバイスに対してテストを行うと一部のテストが失敗することがわかります。適切なデバイスを使用して 1 つずつテストを行うこともできますが、テストケースが多い場合、この方法では対応できない可能性があります。
この問題を解決するには、テストを行うことができる画面サイズを示すアノテーションを作成し、該当するデバイス向けにアノテーション付きのテストを構成します。
画面サイズに基づいてテストを行う手順は次のとおりです。
- テスト ディレクトリで、
TestCompactWidth、TestMediumWidth、TestExpandedWidthの 3 つのアノテーション クラスを含むTestAnnotations.ktを作成します。
TestAnnotations.kt
...
annotation class TestCompactWidth
annotation class TestMediumWidth
annotation class TestExpandedWidth
...
- コンパクト画面テストのテスト関数では、
ReplyAppTestとReplyAppStateRestorationTestのコンパクト画面テスト用のテスト アノテーションの後にTestCompactWidthアノテーションを配置して、このアノテーションを使用します。
ReplyAppTest.kt
...
    @Test
    @TestCompactWidth
    fun compactDevice_verifyUsingBottomNavigation() {
...
ReplyAppStateRestorationTest.kt
...
    @Test
    @TestCompactWidth
    fun compactDevice_selectedEmailEmailRetained_afterConfigChange() {

...
- 中画面テスト用のテスト関数では、
ReplyAppTestで中画面テスト用のテスト アノテーションの後にTestMediumWidthアノテーションを配置して、このアノテーションを使用します。
ReplyAppTest.kt
...
    @Test
    @TestMediumWidth
    fun mediumDevice_verifyUsingNavigationRail() {
...
- 拡大画面テストのテスト関数では、
ReplyAppTestとReplyAppStateRestorationTestの拡大画面テスト用のテスト アノテーションの後にTestExpandedWidthアノテーションを配置して、このアノテーションを使用します。
ReplyAppTest.kt
...
    @Test
    @TestExpandedWidth
    fun expandedDevice_verifyUsingNavigationDrawer() {
...
ReplyAppStateRestorationTest.kt
...
    @Test
    @TestExpandedWidth
    fun expandedDevice_selectedEmailEmailRetained_afterConfigChange() {
...
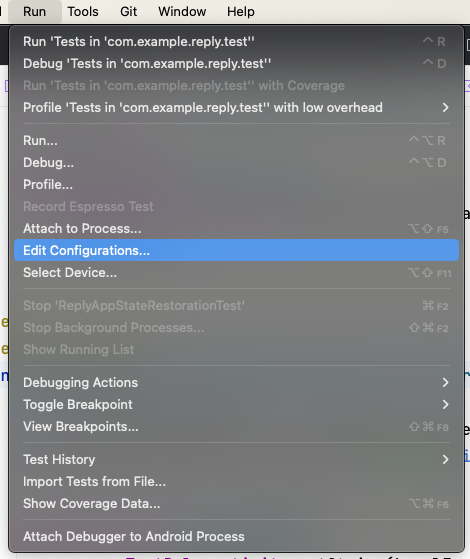
確実に成功させるために、TestCompactWidth アノテーション付きのテストのみを実行するようにテストを構成します。
- Android Studio で、[Run] > [Edit Configurations] を選択します。
- テストの名前を「Compact tests」に変更し、[All in Package] でテストを実行するように選択します。
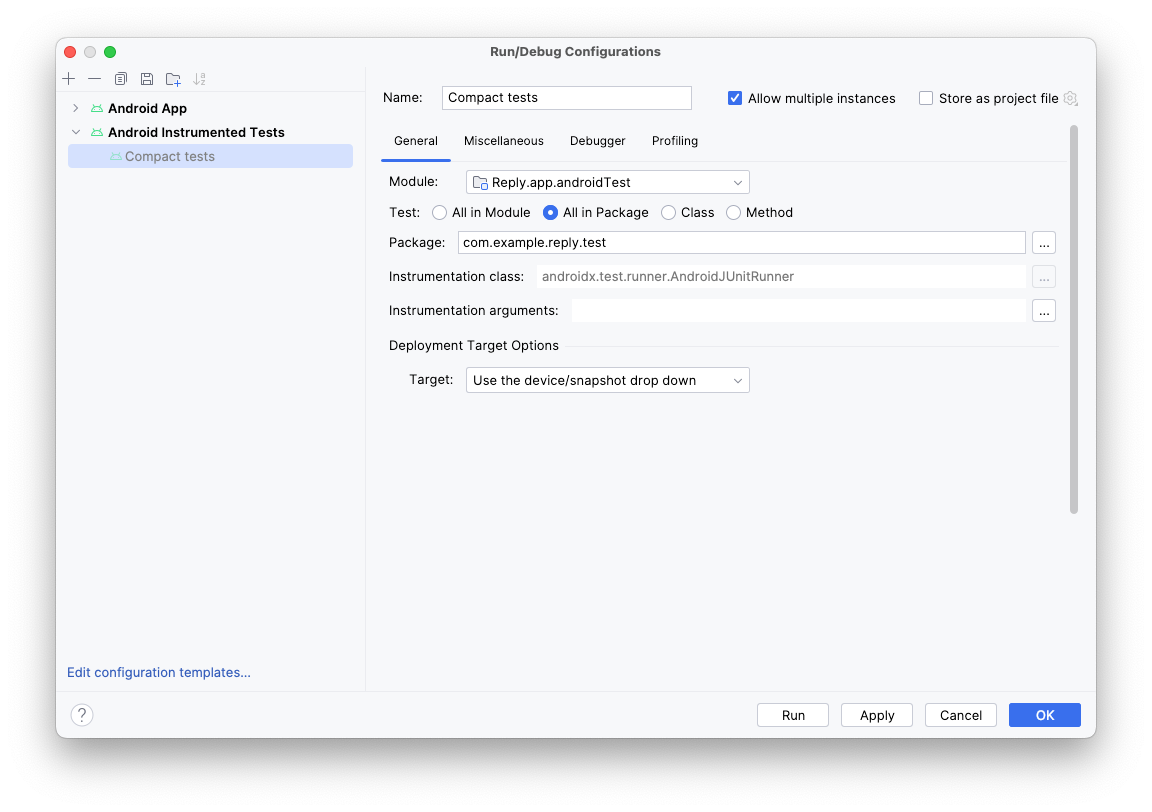
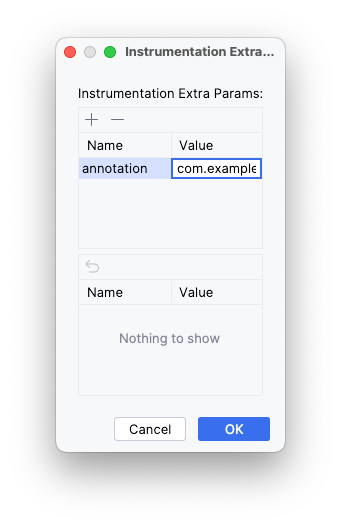
- [Instrumentation arguments] フィールドの右側にあるその他アイコン(...)をクリックします。
- プラス(
+)ボタンをクリックし、その他のパラメータ(値 com.example.reply.test.TestCompactWidth の annotation)を追加します。
- コンパクト エミュレータでテストを実行します。
- コンパクト画面テストのみが実行されたことを確認します。

- 中画面、拡大画面でも上記の手順を繰り返します。
6. 解答コードを取得する
この Codelab の完成したコードをダウンロードするには、次の git コマンドを使用します。
$ git clone https://github.com/google-developer-training/basic-android-kotlin-compose-training-reply-app.git
または、リポジトリを ZIP ファイルとしてダウンロードし、Android Studio で開くこともできます。
解答コードを確認する場合は、GitHub で表示します。
7. まとめ
おめでとうございます。アダプティブ レイアウトを実装することで、Reply アプリをあらゆる画面サイズに適応させました。また、プレビューで開発時間を短縮することや、さまざまなテスト方法を使用してアプリの品質を維持することについても学びました。
#AndroidBasics を付けて、ソーシャル メディアで共有しましょう。
