
1. 簡介
在先前的程式碼研究室中,您曾使用視窗大小類別並實作動態導覽,將 Reply 應用程式轉換為自動調整式應用程式。如想建構適合所有螢幕大小的應用程式,以上功能是第一步,也是十分重要的基礎。如果您未學習「使用動態導覽建構自動調整式應用程式」程式碼研究室,強烈建議您返回並從該程式碼研究室開始學習。
在本程式碼研究室中,您將以所學概念為基礎,進一步在應用程式中實作自動調整式版面配置。這類版面配置是標準版面配置的一部分,而標準版面配置是適合大螢幕的常用版面配置模式。您也會學到更多工具和測試技巧,可用來快速建構強大的應用程式。
必要條件
- 完成「使用動態導覽建構自動調整式應用程式」程式碼研究室
- 熟悉 Kotlin 程式設計的概念,包括類別、函式和條件
- 熟悉
ViewModel類別 - 熟悉
Composable函式 - 有使用 Jetpack Compose 建構版面配置的經驗
- 有在裝置或模擬器上執行應用程式的經驗
- 有使用
WindowSizeClassAPI 的經驗
課程內容
- 如何使用 Jetpack Compose 建立清單檢視畫面模式的自動調整式版面配置
- 如何針對不同螢幕大小建立預覽畫面
- 如何針對多種螢幕大小測試程式碼
建構項目
- 您將繼續更新 Reply 應用程式,讓此應用程式能針對所有螢幕大小自動調整。
完成的應用程式將如下所示:
軟硬體需求
- 可連上網路、具備網路瀏覽器且已安裝 Android Studio 的電腦
- GitHub 存取權
下載範例程式碼
首先請下載範例程式碼:
或者,您也可以複製 GitHub 存放區的程式碼:
$ git clone
https://github.com/google-developer-training/basic-android-kotlin-compose-training-reply-app.git
$ cd basic-android-kotlin-compose-training-reply-app
$ git checkout nav-update
您可以瀏覽 Reply GitHub 存放區中的範例程式碼。
2. 不同螢幕大小的預覽畫面
針對不同螢幕大小建立預覽畫面
在「使用動態導覽建構自動調整式應用程式」程式碼研究室中,您學到如何使用預覽可組合項協助開發程序。如果是自動調整式應用程式,最好的做法是建立多個預覽畫面,以便在不同大小的螢幕上顯示應用程式。您可以透過多種預覽功能,一次查看所有螢幕大小的變更。此外,其他開發人員也可以查看預覽畫面,這些程式碼會用來檢查您的應用程式是否與不同螢幕大小相容。
之前,您只有一個支援小型螢幕的單一預覽畫面。接下來,您要新增更多預覽畫面。
請完成下列步驟,為中型和展開式螢幕新增預覽畫面:
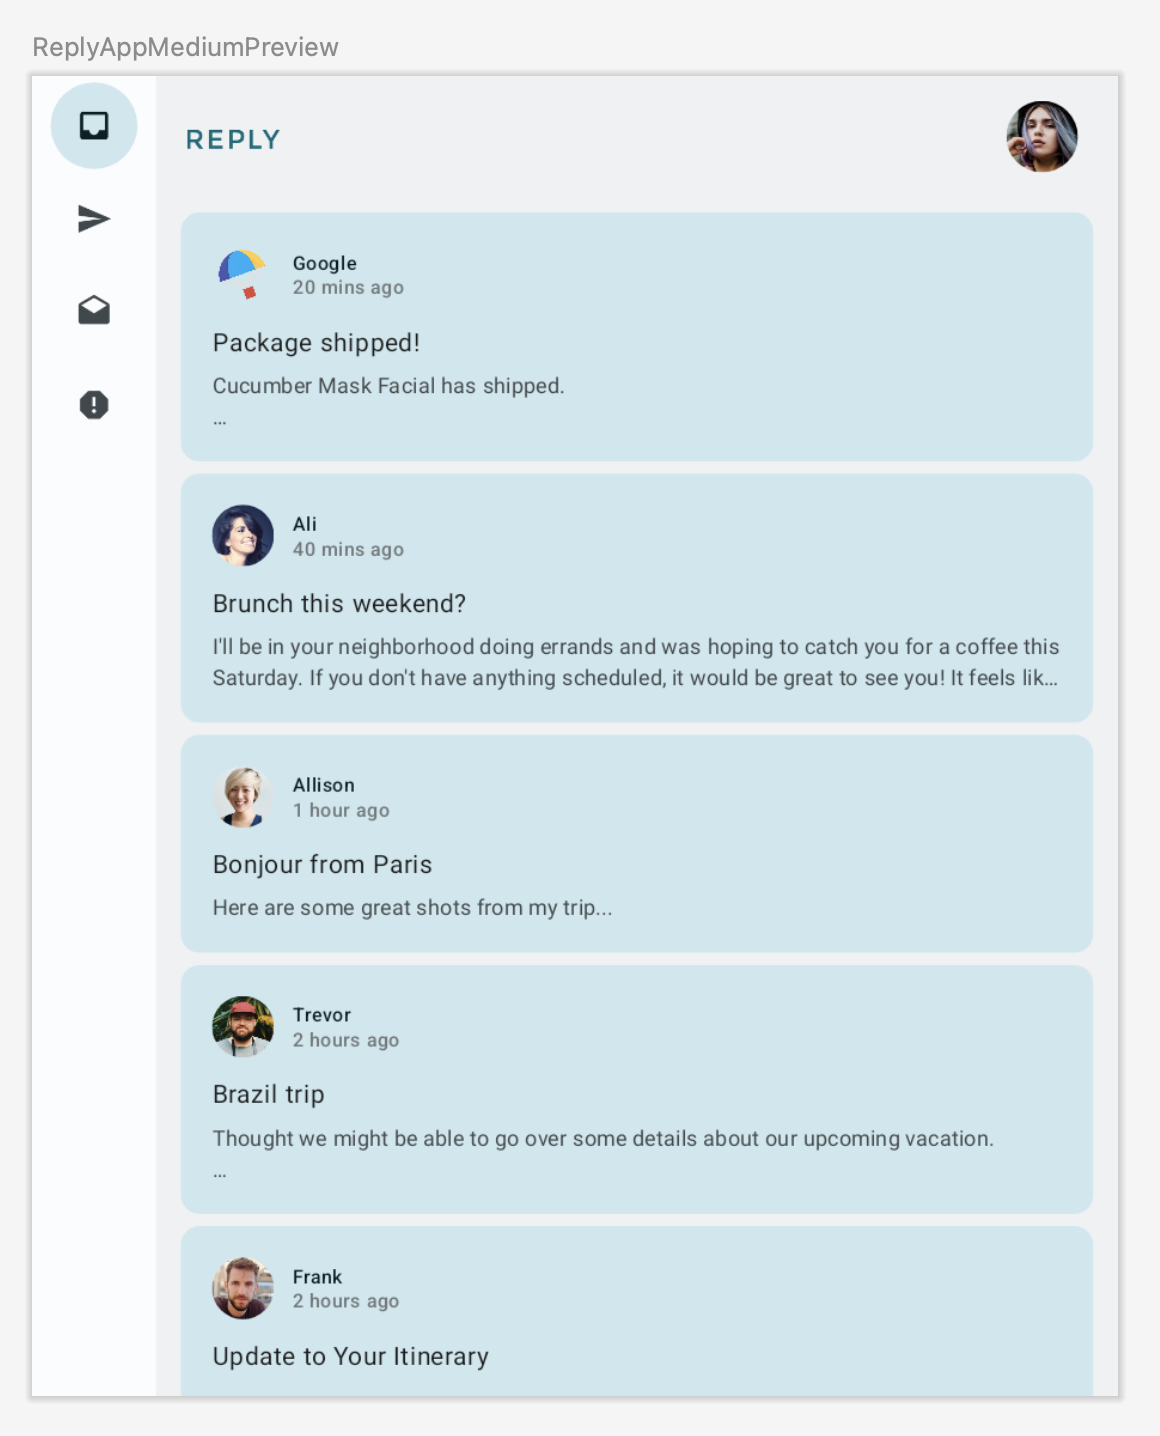
- 為中型螢幕新增預覽畫面,方法是在
Preview註解參數中設定中型螢幕的widthDp值,然後將WindowWidthSizeClass.Medium值指定為ReplyApp可組合項的參數。
MainActivity.kt
...
@Preview(showBackground = true, widthDp = 700)
@Composable
fun ReplyAppMediumPreview() {
    ReplyTheme {
        Surface {
            ReplyApp(windowSize = WindowWidthSizeClass.Medium)
        }
    }
}
...
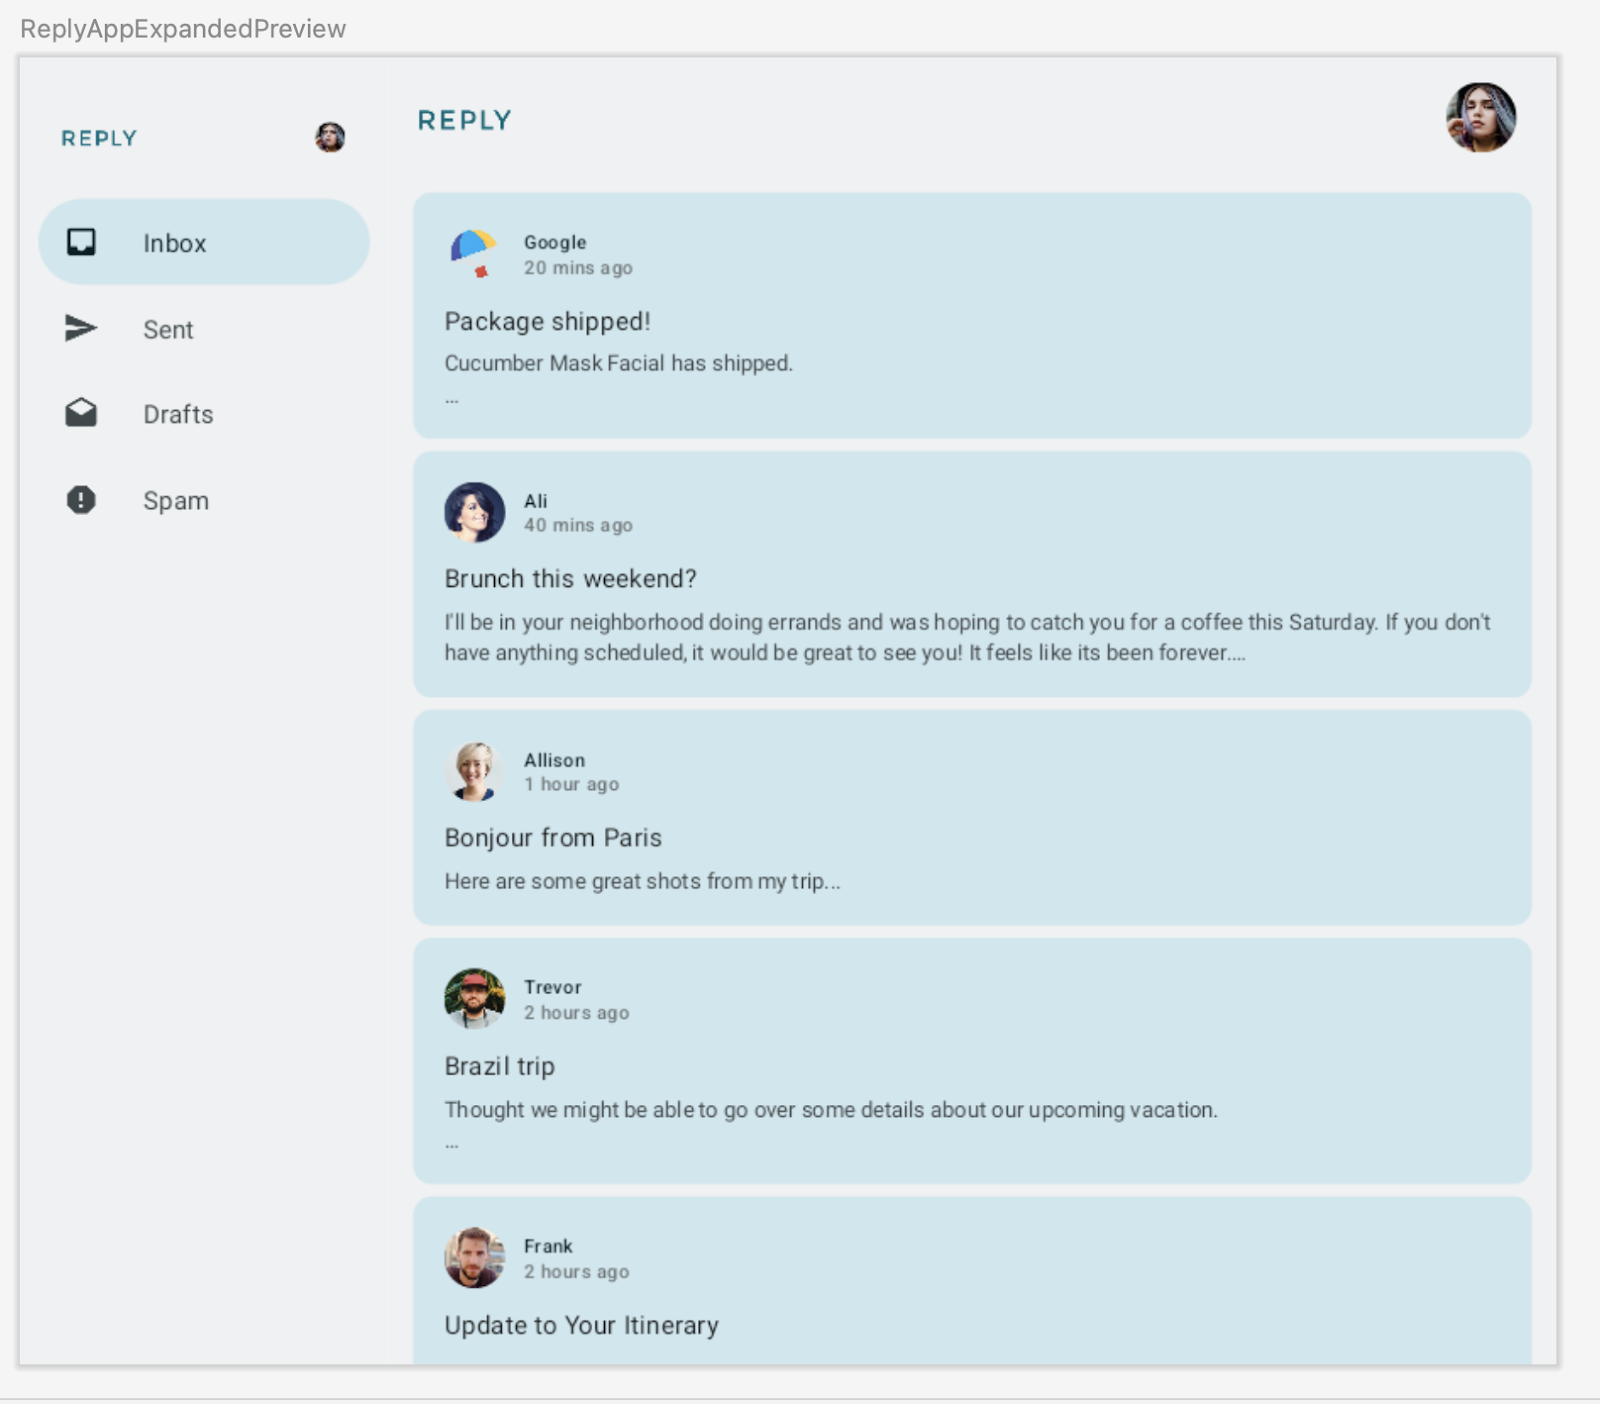
- 為展開式螢幕新增另一個預覽畫面,方法是在
Preview註解參數中設定大型螢幕的widthDp值,然後將WindowWidthSizeClass.Expanded值指定為ReplyApp可組合項的參數。
MainActivity.kt
...
@Preview(showBackground = true, widthDp = 1000)
@Composable
fun ReplyAppExpandedPreview() {
    ReplyTheme {
        Surface {
            ReplyApp(windowSize = WindowWidthSizeClass.Expanded)
        }
    }
}
...
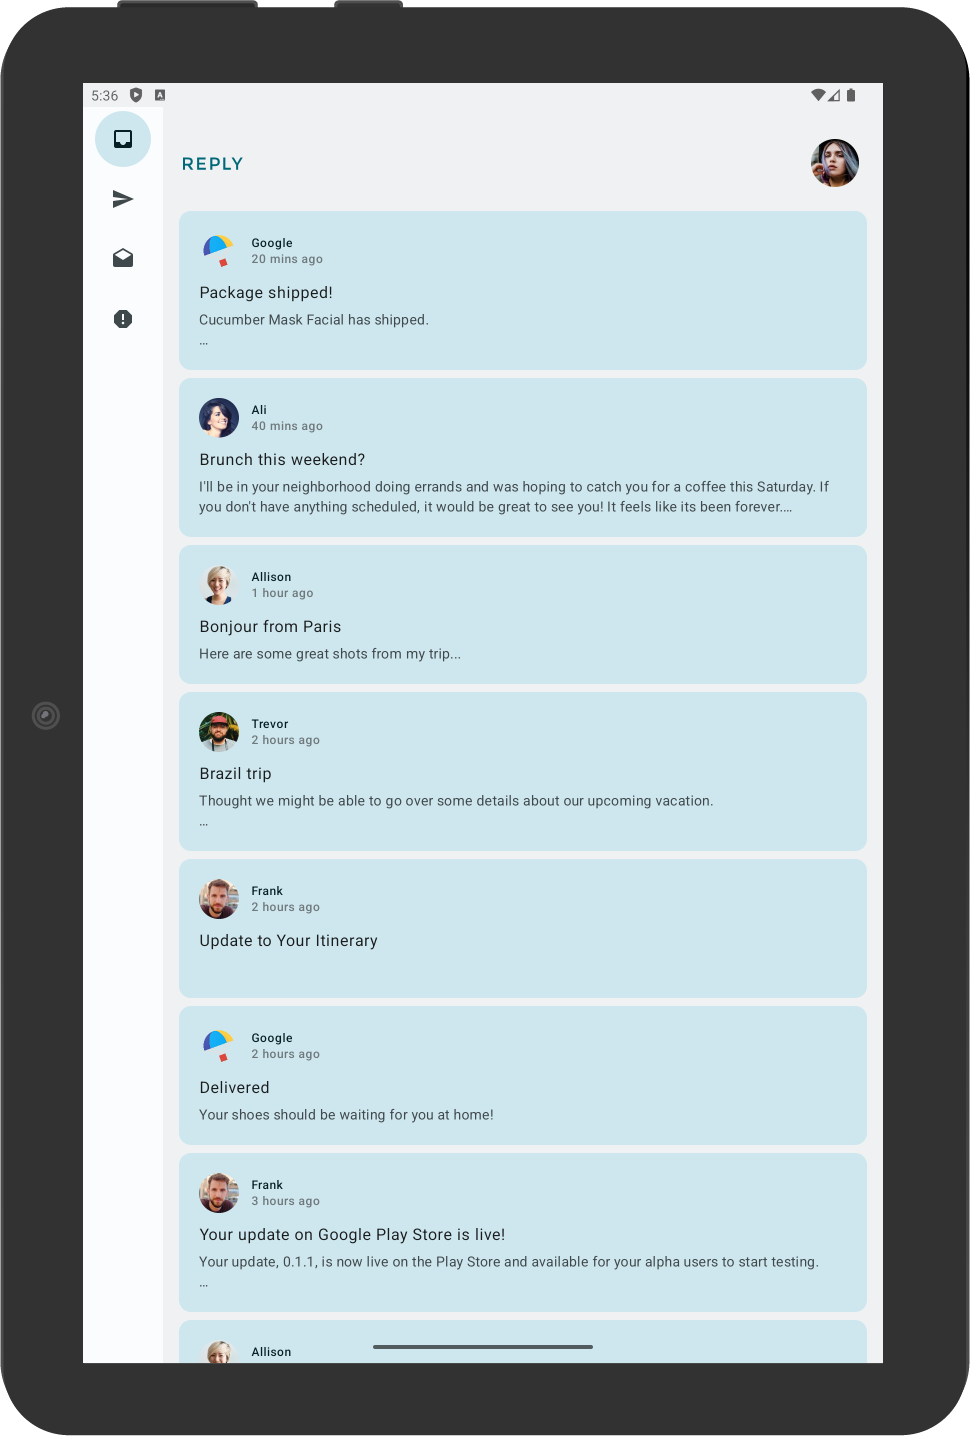
- 建構預覽畫面,用來查看以下項目:
3. 實作自動調整內容的版面配置
清單/詳細資料檢視畫面簡介
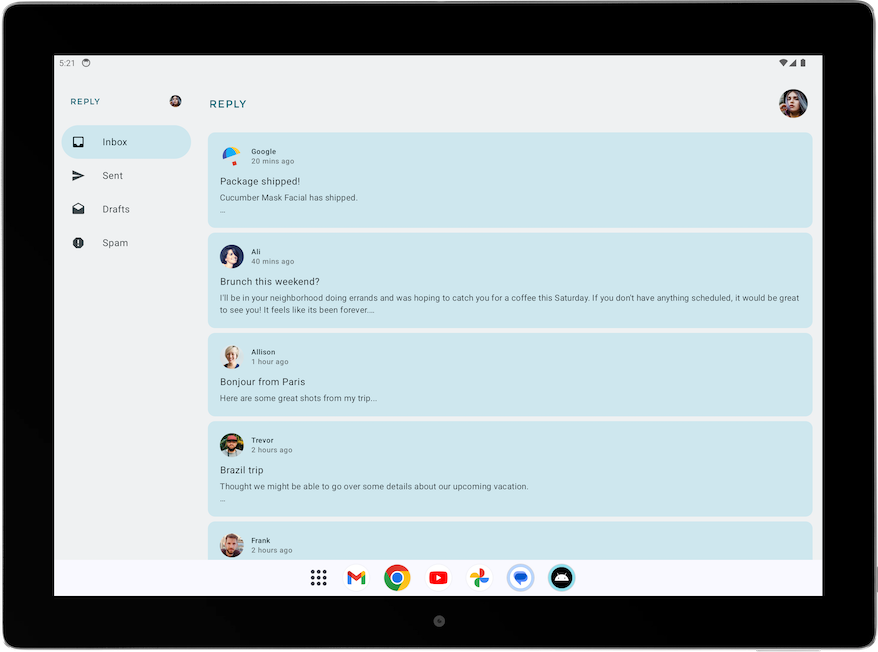
您可能會發現,在展開式螢幕中,內容看起來只是向外延伸,並未充分運用可用的螢幕空間。
如要改善此版面配置,可以套用其中一種標準版面配置。標準版面配置是大型螢幕組合,可做為設計和實作的起點。您可以運用三種可用的版面配置,協助整理應用程式、清單檢視、支援面板和動態饋給中的常用元素。每個版面配置都會考量常見的用途和元件,評估應用程式要如何針對整個螢幕大小和中斷點進行調整,以滿足各項期望和使用者需求。
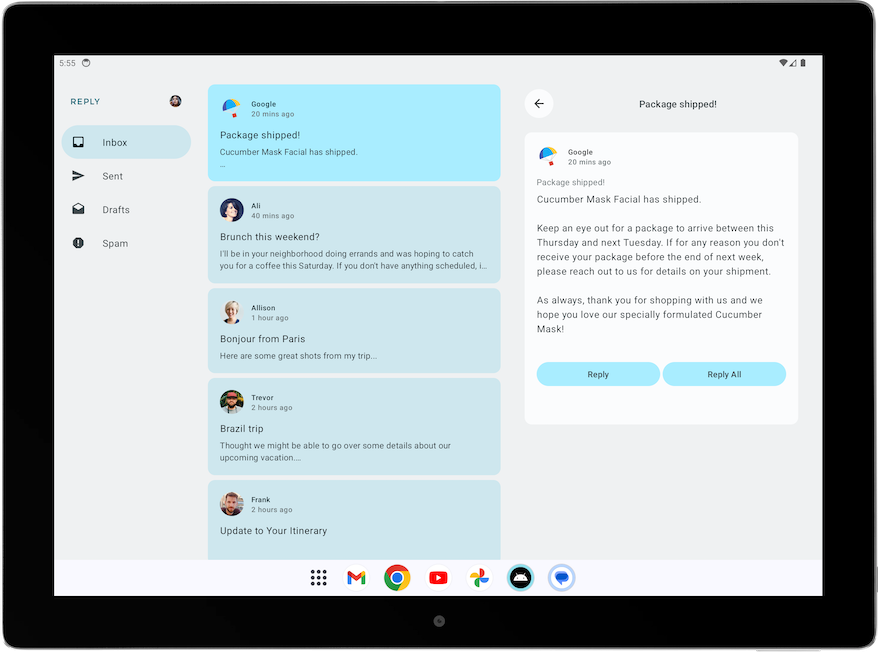
讓我們來為 Reply 應用程式實作「清單/詳細資料檢視畫面」,因為它最適合用來瀏覽內容及快速查看詳細資料。使用清單/詳細資料檢視畫面的版面配置時,您需要在電子郵件清單畫面旁新增另一個窗格,用來顯示電子郵件詳細資料。您可以使用這個版面配置,透過可用的螢幕畫面讓使用者看到更多資訊,並且提高應用程式的效率。
實作清單/詳細資料檢視畫面
如要針對展開式螢幕實作清單/詳細資料檢視畫面,請完成下列步驟:
- 如要表示不同類型的內容版面配置,請在
WindowStateUtils.kt上為不同的內容類型建立新的Enum類別。如果使用的是展開式螢幕,請使用LIST_AND_DETAIL值,其他螢幕則使用LIST_ONLY。
WindowStateUtils.kt
...
enum class ReplyContentType {
    LIST_ONLY, LIST_AND_DETAIL
}
...
- 在
ReplyApp.kt上宣告contentType變數,並針對各種視窗大小指派適當的contentType,以便根據螢幕大小決定適當的內容類型選項。
ReplyApp.kt
...
import com.example.reply.ui.utils.ReplyContentType
...

    val navigationType: ReplyNavigationType
    val contentType: ReplyContentType

    when (windowSize) {
        WindowWidthSizeClass.Compact -> {
            ...
            contentType = ReplyContentType.LIST_ONLY
        }
        WindowWidthSizeClass.Medium -> {
            ...
            contentType = ReplyContentType.LIST_ONLY
        }
        WindowWidthSizeClass.Expanded -> {
            ...
            contentType = ReplyContentType.LIST_AND_DETAIL
        }
        else -> {
            ...
            contentType = ReplyContentType.LIST_ONLY
        }
    }
...
接下來,您可以使用 contentType 值,在 ReplyAppContent 可組合項中為版面配置建立不同的分支。
- 在
ReplyHomeScreen.kt中,將contentType做為參數新增至ReplyHomeScreen可組合項。
ReplyHomeScreen.kt
...
@OptIn(ExperimentalMaterial3Api::class)
@Composable
fun ReplyHomeScreen(
    navigationType: ReplyNavigationType,
    contentType: ReplyContentType,
    replyUiState: ReplyUiState,
    onTabPressed: (MailboxType) -> Unit,
    onEmailCardPressed: (Email) -> Unit,
    onDetailScreenBackPressed: () -> Unit,
    modifier: Modifier = Modifier
) {
...
- 將
contentType值傳遞至ReplyHomeScreen可組合項。
ReplyApp.kt
...
    ReplyHomeScreen(
        navigationType = navigationType,
        contentType = contentType,
        replyUiState = replyUiState,
        onTabPressed = { mailboxType: MailboxType ->
            viewModel.updateCurrentMailbox(mailboxType = mailboxType)
            viewModel.resetHomeScreenStates()
        },
        onEmailCardPressed = { email: Email ->
            viewModel.updateDetailsScreenStates(
                email = email
            )
        },
        onDetailScreenBackPressed = {
            viewModel.resetHomeScreenStates()
        },
        modifier = modifier
    )

...
- 將
contentType新增為ReplyAppContent可組合項的參數。
ReplyHomeScreen.kt
...
@Composable
private fun ReplyAppContent(
    navigationType: ReplyNavigationType,
    contentType: ReplyContentType,
    replyUiState: ReplyUiState,
    onTabPressed: ((MailboxType) -> Unit),
    onEmailCardPressed: (Email) -> Unit,
    navigationItemContentList: List<NavigationItemContent>,
    modifier: Modifier = Modifier
) {
...
- 將
contentType值傳遞至兩個ReplyAppContent可組合項。
ReplyHomeScreen.kt
...
            ReplyAppContent(
                navigationType = navigationType,
                contentType = contentType,
                replyUiState = replyUiState,
                onTabPressed = onTabPressed,
                onEmailCardPressed = onEmailCardPressed,
                navigationItemContentList = navigationItemContentList,
                modifier = modifier
            )
        }
    } else {
        if (replyUiState.isShowingHomepage) {
            ReplyAppContent(
                navigationType = navigationType,
                contentType = contentType,
                replyUiState = replyUiState,
                onTabPressed = onTabPressed,
                onEmailCardPressed = onEmailCardPressed,
                navigationItemContentList = navigationItemContentList,
                modifier = modifier
            )
        } else {
            ReplyDetailsScreen(
                replyUiState = replyUiState,
                isFullScreen = true,
                onBackButtonClicked = onDetailScreenBackPressed,
                modifier = modifier
            )
        }
    }
...
我們會在 contentType 為 LIST_AND_DETAIL 時顯示完整清單和詳細資料畫面,或在 contentType 是 LIST_ONLY 時只顯示清單電子郵件內容。
- 在
ReplyHomeScreen.kt中,對ReplyAppContent可組合項新增if/else陳述式,以在contentType值為LIST_AND_DETAIL時顯示ReplyListAndDetailContent可組合項,並在else分支中顯示ReplyListOnlyContent可組合項。
ReplyHomeScreen.kt
...
        Column(
            modifier = modifier
                .fillMaxSize()
                .background(MaterialTheme.colorScheme.inverseOnSurface)
        ) {
            if (contentType == ReplyContentType.LIST_AND_DETAIL) {
                ReplyListAndDetailContent(
                    replyUiState = replyUiState,
                    onEmailCardPressed = onEmailCardPressed,
                    modifier = Modifier.weight(1f)
                )
            } else {
                ReplyListOnlyContent(
                    replyUiState = replyUiState,
                    onEmailCardPressed = onEmailCardPressed,
                    modifier = Modifier.weight(1f)
                        .padding(
                            horizontal = dimensionResource(R.dimen.email_list_only_horizontal_padding)
                        )
                )
            }
            AnimatedVisibility(visible = navigationType == ReplyNavigationType.BOTTOM_NAVIGATION) {
                ReplyBottomNavigationBar(
                    currentTab = replyUiState.currentMailbox,
                    onTabPressed = onTabPressed,
                    navigationItemContentList = navigationItemContentList
                )
            }
        }
...
- 移除
replyUiState.isShowingHomepage條件以顯示固定式導覽匣,因為如果使用者採用展開式檢視畫面,就不需要前往詳細資料檢視畫面。
ReplyHomeScreen.kt
...
    if (navigationType == ReplyNavigationType.PERMANENT_NAVIGATION_DRAWER) {
        PermanentNavigationDrawer(
            drawerContent = {
                PermanentDrawerSheet(Modifier.width(dimensionResource(R.dimen.drawer_width))) {
                    NavigationDrawerContent(
                        selectedDestination = replyUiState.currentMailbox,
                        onTabPressed = onTabPressed,
                        navigationItemContentList = navigationItemContentList,
                        modifier = Modifier
                            .wrapContentWidth()
                            .fillMaxHeight()
                            .background(MaterialTheme.colorScheme.inverseOnSurface)
                            .padding(dimensionResource(R.dimen.drawer_padding_content))
                    )
                }
            }
        ) {

...
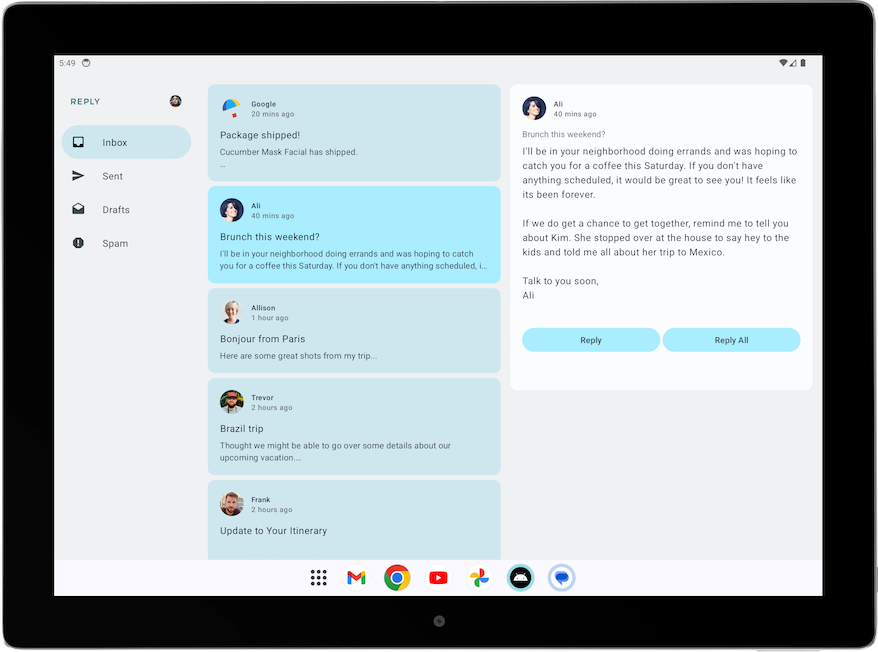
- 在平板模式下執行應用程式,即可看到以下畫面:
強化清單/詳細資料檢視畫面的 UI 元素
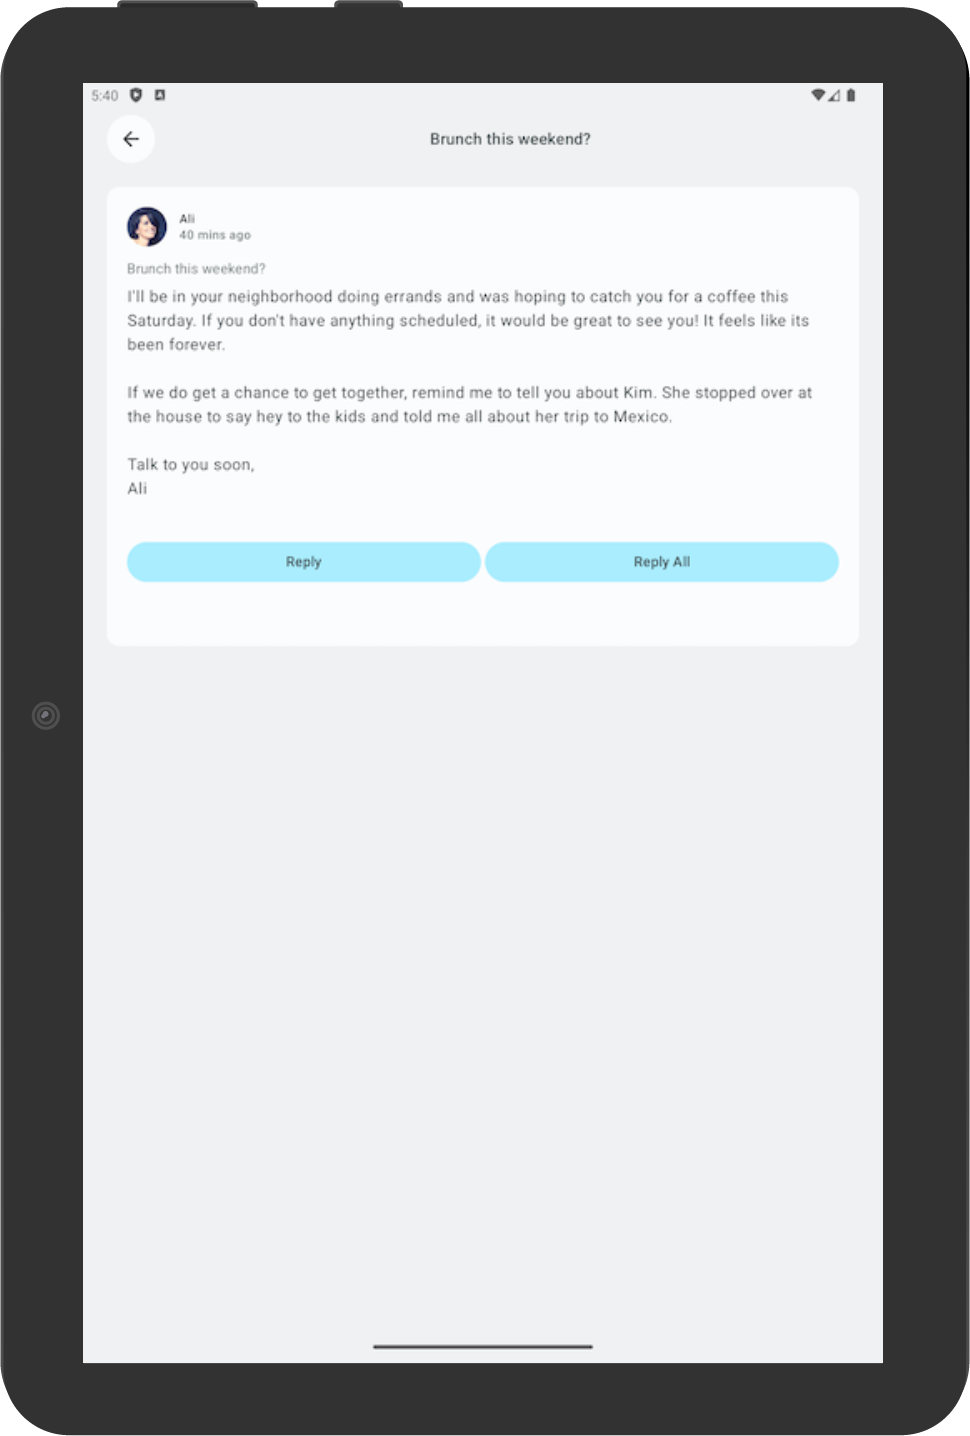
目前,您的應用程式會在展開式螢幕的主畫面中顯示詳細資料窗格。
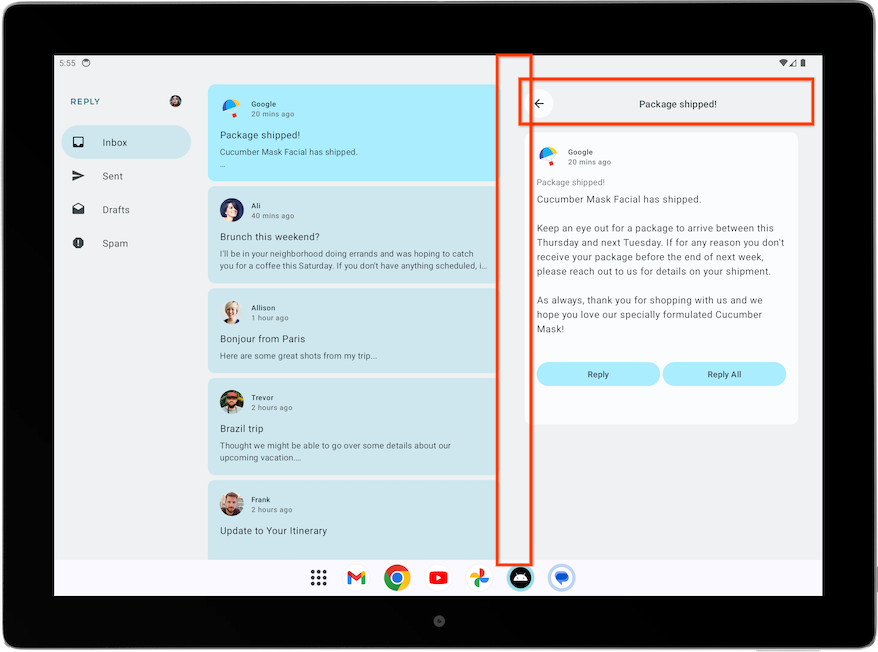
不過,該畫面含有多餘元素,例如返回按鈕、主旨標頭和額外的邊框間距,因為這類畫面是專門用於獨立的詳細資料畫面。接下來,您只要略為調整即可改善效果。
如要改善展開式螢幕檢視畫面的詳細資料畫面,請完成下列步驟:
- 在
ReplyDetailsScreen.kt中,將isFullScreen變數作為Boolean參數新增至ReplyDetailsScreen可組合項。
新增該參數後,獨立使用該可組合項或在主畫面中使用,結果會有所不同。
ReplyDetailsScreen.kt
...
@Composable
fun ReplyDetailsScreen(
    replyUiState: ReplyUiState,
    onBackPressed: () -> Unit,
    modifier: Modifier = Modifier,
    isFullScreen: Boolean = false
) {
...
- 在
ReplyDetailsScreen可組合項中,使用if陳述式包裝ReplyDetailsScreenTopBar可組合項,讓它只有在應用程式為全螢幕模式時才會顯示。
ReplyDetailsScreen.kt
...
    LazyColumn(
        modifier = modifier
            .fillMaxSize()
            .background(color = MaterialTheme.colorScheme.inverseOnSurface)
            .padding(top = dimensionResource(R.dimen.detail_card_list_padding_top))
    ) {
        item {
            if (isFullScreen) {
                ReplyDetailsScreenTopBar(
                    onBackPressed,
                    replyUiState,
                    Modifier
                        .fillMaxWidth()
                        .padding(bottom = dimensionResource(R.dimen.detail_topbar_padding_bottom))
                    )
                )
            }

...
您現在可以新增邊框間距。ReplyEmailDetailsCard 可組合項所需的邊框間距,取決於您是否將其做為全螢幕畫面。在展開式螢幕畫面將 ReplyEmailDetailsCard 與其他可組合項搭配使用時,其他可組合項會產生額外的邊框間距。
- 將
isFullScreen值傳遞至ReplyEmailDetailsCard可組合項。如果畫面採用全螢幕模式,請傳遞水平邊框間距為R.dimen.detail_card_outer_padding_horizontal的修飾符;若是其他情況,則傳遞結尾邊框間距為R.dimen.detail_card_outer_padding_horizontal的修飾符。
ReplyDetailsScreen.kt
...
        item {
            if (isFullScreen) {
                ReplyDetailsScreenTopBar(
                    onBackPressed,
                    replyUiState,
                    Modifier
                        .fillMaxWidth()
                        .padding(bottom = dimensionResource(R.dimen.detail_topbar_padding_bottom))
                    )
                )
            }
            ReplyEmailDetailsCard(
                email = replyUiState.currentSelectedEmail,
                mailboxType = replyUiState.currentMailbox,
                isFullScreen = isFullScreen,
                modifier = if (isFullScreen) {
                    Modifier.padding(horizontal = dimensionResource(R.dimen.detail_card_outer_padding_horizontal))
                } else {
                    Modifier.padding(end = dimensionResource(R.dimen.detail_card_outer_padding_horizontal))
                }
            )
        }
...
- 將
isFullScreen值做為參數新增至ReplyEmailDetailsCard可組合項。
ReplyDetailsScreen.kt
...
@OptIn(ExperimentalMaterial3Api::class)
@Composable
private fun ReplyEmailDetailsCard(
    email: Email,
    mailboxType: MailboxType,
    modifier: Modifier = Modifier,
    isFullScreen: Boolean = false
) {
...
- 在
ReplyEmailDetailsCard可組合項中,只有在應用程式並非處於全螢幕模式時,才會顯示電子郵件主旨文字,這是因為全螢幕版面配置已將電子郵件主旨顯示為標題。如果是全螢幕模式,請新增高度為R.dimen.detail_content_padding_top的空格字元。
ReplyDetailsScreen.kt
...
Column(
    modifier = Modifier
        .fillMaxWidth()
        .padding(dimensionResource(R.dimen.detail_card_inner_padding))
) {
    DetailsScreenHeader(
        email,
        Modifier.fillMaxWidth()
    )
    if (isFullScreen) {
        Spacer(modifier = Modifier.height(dimensionResource(R.dimen.detail_content_padding_top)))
    } else {
        Text(
            text = stringResource(email.subject),
            style = MaterialTheme.typography.bodyMedium,
            color = MaterialTheme.colorScheme.outline,
            modifier = Modifier.padding(
                top = dimensionResource(R.dimen.detail_content_padding_top),
                bottom = dimensionResource(R.dimen.detail_expanded_subject_body_spacing)
            ),
        )
    }
    Text(
        text = stringResource(email.body),
        style = MaterialTheme.typography.bodyLarge,
        color = MaterialTheme.colorScheme.onSurfaceVariant,
    )
    DetailsScreenButtonBar(mailboxType, displayToast)
}

...
- 當以獨立方式建立
ReplyDetailsScreen時,在ReplyHomeScreen.kt中的ReplyHomeScreen可組合項內,為isFullScreen參數傳遞true值。
ReplyHomeScreen.kt
...
        } else {
            ReplyDetailsScreen(
                replyUiState = replyUiState,
                isFullScreen = true,
                onBackPressed = onDetailScreenBackPressed,
                modifier = modifier
            )
        }
...
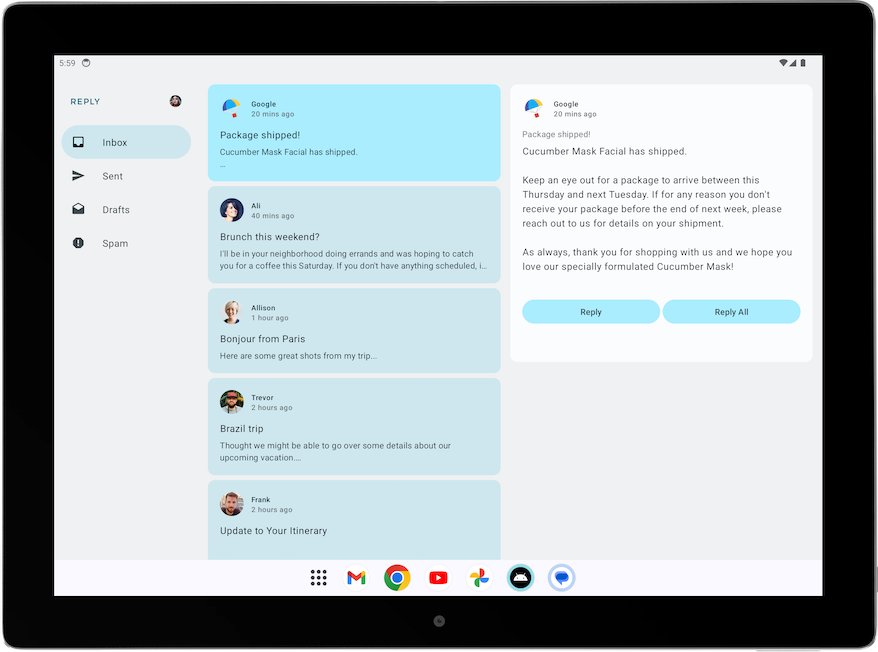
- 在平板模式下執行應用程式,並查看以下版面配置:
針對清單/詳細資料檢視畫面調整返回功能的處理方式
使用展開式螢幕時,您完全不必前往 ReplyDetailsScreen。相對的,應用程式應在使用者點選返回按鈕時關閉。因此,我們應調整返回處理常式。
修改返回處理常式的方法是在 ReplyListAndDetailContent 可組合項中,將 activity.finish() 函式做為 ReplyDetailsScreen 可組合項的 onBackPressed 參數傳遞。
ReplyHomeContent.kt
...
import android.app.Activity
import androidx.compose.ui.platform.LocalContext
...
        val activity = LocalContext.current as Activity
        ReplyDetailsScreen(
            replyUiState = replyUiState,
            modifier = Modifier.weight(1f),
            onBackPressed = { activity.finish() }
        )
...
4. 針對不同的螢幕大小進行驗證
大型螢幕應用程式品質指南
如要為 Android 使用者打造優質且一致的體驗,建構及測試應用程式時請務必留意品質。您可以參考核心應用程式品質指南,瞭解如何提升應用程式品質。
如要打造適用於所有板型規格的高品質應用程式,請參閱大型螢幕應用程式品質指南。您的應用程式也必須符合「第 3 級 — 可供大螢幕使用」規定。
針對大型螢幕的完備性進行應用程式手動測試
應用程式品質指南提供了測試裝置建議與處理程序,可用來檢查應用程式品質。我們來看看與 Reply 應用程式相關的測試示例。
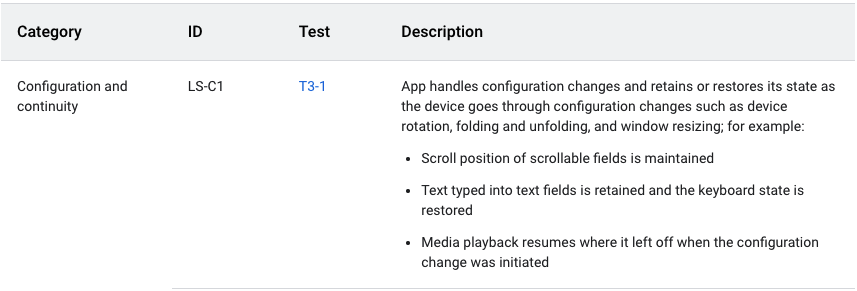
根據上述應用程式品質指南,應用程式必須在設定變更後保留或還原狀態。這份指南也提供了測試應用程式的操作說明,如下圖所示:
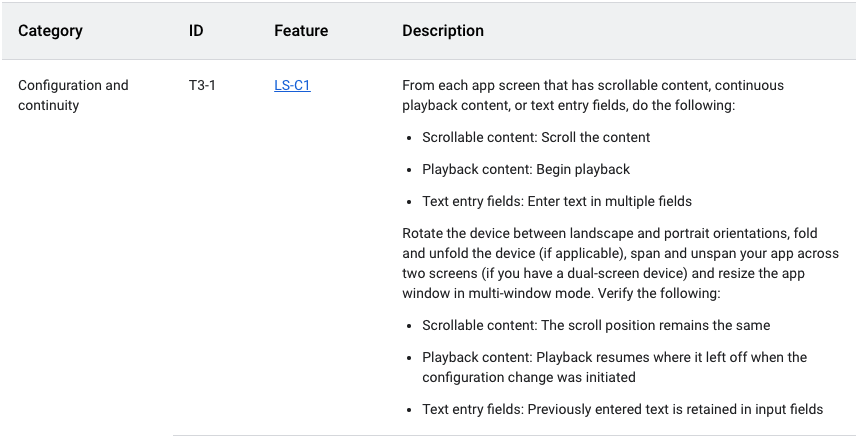
如要手動測試 Reply 應用程式以確保設定連續性,請完成下列步驟:
- 在中等螢幕大小的裝置上執行 Reply 應用程式。此外,如果您使用的是可調整螢幕大小的模擬器,可以在未摺疊螢幕的摺疊模式中執行。
- 確認模擬器上的「Auto rotate」已設為「on」。

- 向下捲動電子郵件清單。
- 按一下電子郵件資訊卡。例如,開啟來自 Ali 的電子郵件。
- 旋轉裝置,檢查所選電子郵件是否仍與螢幕方向為直向時選取的電子郵件一致。在這個範例中,畫面上仍會顯示來自 Ali 的電子郵件。
- 將裝置轉回直向,檢查應用程式是否仍會顯示相同的電子郵件。
5. 針對自動調整式應用程式新增自動化測試功能
為小型螢幕大小設定測試
在「測試 Cupcake 應用程式」程式碼研究室中,您已瞭解如何建立 UI 測試。現在我們來學習如何針對不同螢幕大小建立專屬測試。
在 Reply 應用程式中,您會針對不同的螢幕大小使用不同導覽元素。例如,您希望使用者在查看展開式螢幕畫面時,畫面上會顯示固定式導覽匣。建議您建立測試來確認各種導覽元素是否存在,例如適用於不同螢幕大小的底部導覽、導覽邊欄和導覽匣。
如要建立測試來驗證小型螢幕畫面中是否存在底部導覽元素,請完成下列步驟:
- 在測試目錄中,建立名為
ReplyAppTest.kt的新 Kotlin 類別。 - 在
ReplyAppTest類別中使用createAndroidComposeRule建立測試規則,並將ComponentActivity做為類型參數傳遞。ComponentActivity是用來存取空白活動,而非MainActivity。
ReplyAppTest.kt
...
class ReplyAppTest {

    @get:Rule
    val composeTestRule = createAndroidComposeRule<ComponentActivity>()
...
如要區分畫面中的導覽元素,請在 ReplyBottomNavigationBar 可組合項中新增 testTag。
- 為 Navigation Bottom 定義字串資源。
strings.xml
...
<resources>
...
    <string name="navigation_bottom">Navigation Bottom</string>
...
</resources>
- 在
ReplyBottomNavigationBar可組合項中,將字串名稱新增為Modifier的testTag方法的testTag引數。
ReplyHomeScreen.kt
...
val bottomNavigationContentDescription = stringResource(R.string.navigation_bottom)
ReplyBottomNavigationBar(
    ...
    modifier = Modifier
        .fillMaxWidth()
        .testTag(bottomNavigationContentDescription)
)
...
- 在
ReplyAppTest類別中,建立測試函式來測試小型螢幕。使用ReplyApp可組合項設定composeTestRule的內容,並將WindowWidthSizeClass.Compact做為windowSize引數傳遞。
ReplyAppTest.kt
...
    @Test
    fun compactDevice_verifyUsingBottomNavigation() {
        // Set up compact window
        composeTestRule.setContent {
            ReplyApp(
                windowSize = WindowWidthSizeClass.Compact
            )
        }
    }
- 使用測試標記斷言含有底部導覽元素。呼叫
composeTestRule上的擴充功能函式onNodeWithTagForStringId並傳遞導覽底部字串,然後呼叫assertExists()方法。
ReplyAppTest.kt
...
    @Test
    fun compactDevice_verifyUsingBottomNavigation() {
        // Set up compact window
        composeTestRule.setContent {
            ReplyApp(
                windowSize = WindowWidthSizeClass.Compact
            )
        }
        // Bottom navigation is displayed
        composeTestRule.onNodeWithTagForStringId(
            R.string.navigation_bottom
        ).assertExists()
    }
- 執行測試,驗證是否已通過測試。
針對中型和展開式螢幕大小設定測試
現在,您已成功為小型螢幕畫面建立測試,接著我們來針對中型和展開式螢幕畫面建立對應的測試。
如要針對中型和展開式螢幕畫面建立測試,用來驗證導覽邊欄和固定式導覽匣是否存在,請完成下列步驟:
- 為導覽邊欄定義字串資源,用來在之後做為測試標記。
strings.xml
...
<resources>
...
    <string name="navigation_rail">Navigation Rail</string>
...
</resources>
- 透過
PermanentNavigationDrawer可組合項中的Modifier,將字串做為測試標記傳遞。
ReplyHomeScreen.kt
...
    val navigationDrawerContentDescription = stringResource(R.string.navigation_drawer)
        PermanentNavigationDrawer(
...
modifier = Modifier.testTag(navigationDrawerContentDescription)
)
...
- 透過
ReplyNavigationRail可組合項中的Modifier,將字串做為測試標記傳遞。
ReplyHomeScreen.kt
...
val navigationRailContentDescription = stringResource(R.string.navigation_rail)
ReplyNavigationRail(
    ...
    modifier = Modifier
        .testTag(navigationRailContentDescription)
)
...
- 新增測試,驗證中型螢幕畫面中是否有導覽邊欄元素。
ReplyAppTest.kt
...
@Test
fun mediumDevice_verifyUsingNavigationRail() {
    // Set up medium window
    composeTestRule.setContent {
        ReplyApp(
            windowSize = WindowWidthSizeClass.Medium
        )
    }
    // Navigation rail is displayed
    composeTestRule.onNodeWithTagForStringId(
        R.string.navigation_rail
    ).assertExists()
}
- 新增測試,驗證展開式螢幕畫面中是否有導覽匣元素。
ReplyAppTest.kt
...
@Test
fun expandedDevice_verifyUsingNavigationDrawer() {
    // Set up expanded window
    composeTestRule.setContent {
        ReplyApp(
            windowSize = WindowWidthSizeClass.Expanded
        )
    }
    // Navigation drawer is displayed
    composeTestRule.onNodeWithTagForStringId(
        R.string.navigation_drawer
    ).assertExists()
}
- 使用平板電腦模擬器,或平板電腦模式中可調整螢幕大小的模擬器執行測試。
- 執行所有測試,並驗證是否通過測試。
在小型螢幕中測試設定變更
設定變更是應用程式生命週期中常發生的情況。舉例來說,如果您將螢幕方向從直向改為橫向,就會發生設定變更。發生設定變更時,請務必測試應用程式是否仍保留原本的狀態。接下來,您將建立測試來模擬設定變更的情況,測試應用程式是否能在小型螢幕畫面中保留狀態。
如何測試小型螢幕畫面中的設定變更:
- 在測試目錄中,建立名為
ReplyAppStateRestorationTest.kt的新 Kotlin 類別。 - 在
ReplyAppStateRestorationTest類別中使用createAndroidComposeRule建立測試規則,並將ComponentActivity做為類型參數傳遞。
ReplyAppStateRestorationTest.kt
...
class ReplyAppStateRestorationTest {

    /**
     * Note: To access to an empty activity, the code uses ComponentActivity instead of
     * MainActivity.
     */
    @get:Rule
    val composeTestRule = createAndroidComposeRule<ComponentActivity>()
}
...
- 建立測試函式,驗證在設定變更後,電子郵件在小型螢幕畫面中是否仍為已選取狀態。
ReplyAppStateRestorationTest.kt
...
@Test
fun compactDevice_selectedEmailEmailRetained_afterConfigChange() {

}
...
如要測試設定變更,您需要使用 StateRestorationTester。
- 將
composeTestRule做為引數傳遞至StateRestorationTester,以設定stateRestorationTester。 - 將
setContent()與ReplyApp可組合項搭配使用,並將WindowWidthSizeClass.Compact做為windowSize引數傳遞。
ReplyAppStateRestorationTest.kt
...
@Test
fun compactDevice_selectedEmailEmailRetained_afterConfigChange() {
    // Setup compact window
    val stateRestorationTester = StateRestorationTester(composeTestRule)
    stateRestorationTester.setContent { ReplyApp(windowSize = WindowWidthSizeClass.Compact) }

}
...
- 驗證第三封電子郵件是否會在應用程式中顯示。請對
composeTestRule使用assertIsDisplayed()方法,尋找第三封電子郵件包含的文字內容。
ReplyAppStateRestorationTest.kt
...
@Test
fun compactDevice_selectedEmailEmailRetained_afterConfigChange() {
    // Setup compact window
    val stateRestorationTester = StateRestorationTester(composeTestRule)
    stateRestorationTester.setContent { ReplyApp(windowSize = WindowWidthSizeClass.Compact) }

    // Given third email is displayed
    composeTestRule.onNodeWithText(
        composeTestRule.activity.getString(LocalEmailsDataProvider.allEmails[2].body)
    ).assertIsDisplayed()
}
...
- 點選電子郵件主旨,前往電子郵件的詳細資料頁面。請使用
performClick()方法前往。
ReplyAppStateRestorationTest.kt
...
@Test
fun compactDevice_selectedEmailEmailRetained_afterConfigChange() {
    // Setup compact window
    val stateRestorationTester = StateRestorationTester(composeTestRule)
    stateRestorationTester.setContent { ReplyApp(windowSize = WindowWidthSizeClass.Compact) }

    // Given third email is displayed
    composeTestRule.onNodeWithText(
        composeTestRule.activity.getString(LocalEmailsDataProvider.allEmails[2].body)
    ).assertIsDisplayed()

    // Open detailed page
    composeTestRule.onNodeWithText(
        composeTestRule.activity.getString(LocalEmailsDataProvider.allEmails[2].subject)
    ).performClick()
}
...
- 驗證第三個電子郵件地址已顯示在詳細資料畫面中。斷言返回按鈕已存在,藉此確認應用程式位於詳細資料畫面中,並驗證第三封電子郵件的文字內容是否已顯示。
ReplyAppStateRestorationTest.kt
...
@Test
fun compactDevice_selectedEmailEmailRetained_afterConfigChange() {
    ...
    // Open detailed page
    composeTestRule.onNodeWithText(
        composeTestRule.activity.getString(LocalEmailsDataProvider.allEmails[2].subject)
    ).performClick()

    // Verify that it shows the detailed screen for the correct email
    composeTestRule.onNodeWithContentDescriptionForStringId(
        R.string.navigation_back
    ).assertExists()
    composeTestRule.onNodeWithText(
}
...
- 使用
stateRestorationTester.emulateSavedInstanceStateRestore()模擬設定變更。
ReplyAppStateRestorationTest.kt
...
@Test
fun compactDevice_selectedEmailEmailRetained_afterConfigChange() {
    ...
    // Verify that it shows the detailed screen for the correct email
    composeTestRule.onNodeWithContentDescriptionForStringId(
        R.string.navigation_back
    ).assertExists()
    composeTestRule.onNodeWithText(
        composeTestRule.activity.getString(LocalEmailsDataProvider.allEmails[2].body)
    ).assertExists()

    // Simulate a config change
    stateRestorationTester.emulateSavedInstanceStateRestore()
}
...
- 再次驗證第三封電子郵件是否已顯示在詳細資料畫面中。斷言返回按鈕已存在,藉此確認應用程式位於詳細資料畫面中,並驗證第三封電子郵件的文字內容是否已顯示。
ReplyAppStateRestorationTest.kt
...
@Test
fun compactDevice_selectedEmailEmailRetained_afterConfigChange() {
    // Setup compact window
    val stateRestorationTester = StateRestorationTester(composeTestRule)
    stateRestorationTester.setContent { ReplyApp(windowSize = WindowWidthSizeClass.Compact) }

    // Given third email is displayed
    composeTestRule.onNodeWithText(
        composeTestRule.activity.getString(LocalEmailsDataProvider.allEmails[2].body)
    ).assertIsDisplayed()

    // Open detailed page
    composeTestRule.onNodeWithText(
        composeTestRule.activity.getString(LocalEmailsDataProvider.allEmails[2].subject)
    ).performClick()

    // Verify that it shows the detailed screen for the correct email
    composeTestRule.onNodeWithContentDescriptionForStringId(
        R.string.navigation_back
    ).assertExists()
    composeTestRule.onNodeWithText(
        composeTestRule.activity.getString(LocalEmailsDataProvider.allEmails[2].body)
    ).assertExists()

    // Simulate a config change
    stateRestorationTester.emulateSavedInstanceStateRestore()

    // Verify that it still shows the detailed screen for the same email
    composeTestRule.onNodeWithContentDescriptionForStringId(
        R.string.navigation_back
    ).assertExists()
    composeTestRule.onNodeWithText(
        composeTestRule.activity.getString(LocalEmailsDataProvider.allEmails[2].body)
    ).assertExists()
}

...
- 使用手機模擬器,或手機模式中可調整螢幕大小的模擬器執行測試。
- 驗證測試是否通過。
測試展開式螢幕中的設定變更
如要透過模擬設定變更來測試展開式螢幕中的設定變更,並傳遞適當的 WindowWidthSizeClass,請完成下列步驟:
- 建立測試函式,用來驗證在設定變更後,電子郵件在詳細資料畫面中是否仍為已選取狀態。
ReplyAppStateRestorationTest.kt
...
@Test
fun expandedDevice_selectedEmailEmailRetained_afterConfigChange() {

}
...
如要測試設定變更,您需要使用 StateRestorationTester。
- 將
composeTestRule做為引數傳遞至StateRestorationTester,以設定stateRestorationTester。 - 將
setContent()與ReplyApp可組合項搭配使用,並將WindowWidthSizeClass.Expanded做為windowSize引數傳遞。
ReplyAppStateRestorationTest.kt
...
@Test
fun expandedDevice_selectedEmailEmailRetained_afterConfigChange() {
    // Setup expanded window
    val stateRestorationTester = StateRestorationTester(composeTestRule)
    stateRestorationTester.setContent { ReplyApp(windowSize = WindowWidthSizeClass.Expanded) }
}
...
- 驗證第三封電子郵件是否會在應用程式中顯示。請對
composeTestRule使用assertIsDisplayed()方法,尋找第三封電子郵件包含的文字內容。
ReplyAppStateRestorationTest.kt
...
@Test
fun expandedDevice_selectedEmailEmailRetained_afterConfigChange() {
    // Setup expanded window
    val stateRestorationTester = StateRestorationTester(composeTestRule)
    stateRestorationTester.setContent { ReplyApp(windowSize = WindowWidthSizeClass.Expanded) }

    // Given third email is displayed
    composeTestRule.onNodeWithText(
        composeTestRule.activity.getString(LocalEmailsDataProvider.allEmails[2].body)
    ).assertIsDisplayed()
}
...
- 在詳細資料畫面上選取第三封電子郵件。請使用
performClick()方法選取電子郵件。
ReplyAppStateRestorationTest.kt
...
@Test
fun expandedDevice_selectedEmailEmailRetained_afterConfigChange() {
    // Setup expanded window
    val stateRestorationTester = StateRestorationTester(composeTestRule)
    stateRestorationTester.setContent { ReplyApp(windowSize = WindowWidthSizeClass.Expanded) }

    // Given third email is displayed
    composeTestRule.onNodeWithText(
        composeTestRule.activity.getString(LocalEmailsDataProvider.allEmails[2].body)
    ).assertIsDisplayed()

    // Select third email
    composeTestRule.onNodeWithText(
        composeTestRule.activity.getString(LocalEmailsDataProvider.allEmails[2].subject)
    ).performClick()
    ...
}

...
- 對詳細資料畫面使用
testTag,並在子項中尋找郵件的文字內容,驗證詳細資料畫面上是否顯示第三封電子郵件,這麼做可確保您是在詳細資料部分中尋找文字,而非在電子郵件清單中尋找。
ReplyAppStateRestorationTest.kt
...

@Test
fun expandedDevice_selectedEmailEmailRetained_afterConfigChange() {
    ...
    // Select third email
    composeTestRule.onNodeWithText(
        composeTestRule.activity.getString(LocalEmailsDataProvider.allEmails[2].subject)
    ).performClick()

    // Verify that third email is displayed on the details screen
    composeTestRule.onNodeWithTagForStringId(R.string.details_screen).onChildren()
        .assertAny(hasAnyDescendant(hasText(
            composeTestRule.activity.getString(LocalEmailsDataProvider.allEmails[2].body)))
        )
...
}

...
- 使用
stateRestorationTester.emulateSavedInstanceStateRestore()模擬設定變更。
ReplyAppStateRestorationTest.kt
...
@Test
fun expandedDevice_selectedEmailEmailRetained_afterConfigChange() {
    ...
    // Verify that third email is displayed on the details screen
    composeTestRule.onNodeWithTagForStringId(R.string.details_screen).onChildren()
        .assertAny(hasAnyDescendant(hasText(
            composeTestRule.activity.getString(LocalEmailsDataProvider.allEmails[2].body)))
        )

    // Simulate a config change
    stateRestorationTester.emulateSavedInstanceStateRestore()
    ...
}
...
- 設定變更後,再次驗證詳細資料畫面上是否顯示第三封電子郵件。
ReplyAppStateRestorationTest.kt
...
@Test
fun expandedDevice_selectedEmailEmailRetained_afterConfigChange() {
    // Setup expanded window
    val stateRestorationTester = StateRestorationTester(composeTestRule)
    stateRestorationTester.setContent { ReplyApp(windowSize = WindowWidthSizeClass.Expanded) }

    // Given third email is displayed
    composeTestRule.onNodeWithText(
        composeTestRule.activity.getString(LocalEmailsDataProvider.allEmails[2].body)
    ).assertIsDisplayed()

    // Select third email
    composeTestRule.onNodeWithText(
        composeTestRule.activity.getString(LocalEmailsDataProvider.allEmails[2].subject)
    ).performClick()

    // Verify that third email is displayed on the details screen
    composeTestRule.onNodeWithTagForStringId(R.string.details_screen).onChildren()
        .assertAny(hasAnyDescendant(hasText(
            composeTestRule.activity.getString(LocalEmailsDataProvider.allEmails[2].body)))
        )

    // Simulate a config change
    stateRestorationTester.emulateSavedInstanceStateRestore()

    // Verify that third email is still displayed on the details screen
    composeTestRule.onNodeWithTagForStringId(R.string.details_screen).onChildren()
        .assertAny(hasAnyDescendant(hasText(
            composeTestRule.activity.getString(LocalEmailsDataProvider.allEmails[2].body)))
        )
}
...
- 使用平板電腦模擬器,或平板電腦模式中可調整螢幕大小的模擬器執行測試。
- 驗證測試是否通過。
使用註解為不同螢幕大小的測試分組
在之前的測試中,您可能會發現某些測試在螢幕大小不相容的裝置上執行時會失敗。雖然您可以使用適當的裝置逐一執行測試,但是如果有許多測試案例,此方法就無法擴充。
如要解決這個問題,您可以建立註解來指示測試可執行的螢幕大小,並為適用裝置設定含有註解的測試。
如要根據螢幕大小執行測試,請完成下列步驟:
- 在測試目錄中建立
TestAnnotations.kt,其中包含三個註解類別:TestCompactWidth、TestMediumWidth、TestExpandedWidth。
TestAnnotations.kt
...
annotation class TestCompactWidth
annotation class TestMediumWidth
annotation class TestExpandedWidth
...
- 如要對小型螢幕測試的測試函式使用註解,請將
TestCompactWidth註解放在ReplyAppTest和ReplyAppStateRestorationTest中小型螢幕測試的測試註解之後。
ReplyAppTest.kt
...
    @Test
    @TestCompactWidth
    fun compactDevice_verifyUsingBottomNavigation() {
...
ReplyAppStateRestorationTest.kt
...
    @Test
    @TestCompactWidth
    fun compactDevice_selectedEmailEmailRetained_afterConfigChange() {

...
- 如要對中型螢幕測試的測試函式使用註解,請將
TestMediumWidth註解放在ReplyAppTest內中型測試的測試註解之後。
ReplyAppTest.kt
...
    @Test
    @TestMediumWidth
    fun mediumDevice_verifyUsingNavigationRail() {
...
- 如要對展開式螢幕測試的測試函式使用註解,請將
TestExpandedWidth註解放在ReplyAppTest和ReplyAppStateRestorationTest中展開式螢幕測試的測試註解之後。
ReplyAppTest.kt
...
    @Test
    @TestExpandedWidth
    fun expandedDevice_verifyUsingNavigationDrawer() {
...
ReplyAppStateRestorationTest.kt
...
    @Test
    @TestExpandedWidth
    fun expandedDevice_selectedEmailEmailRetained_afterConfigChange() {
...
為確保測試成功,請將測試設為僅執行加上 TestCompactWidth 註解的測試。
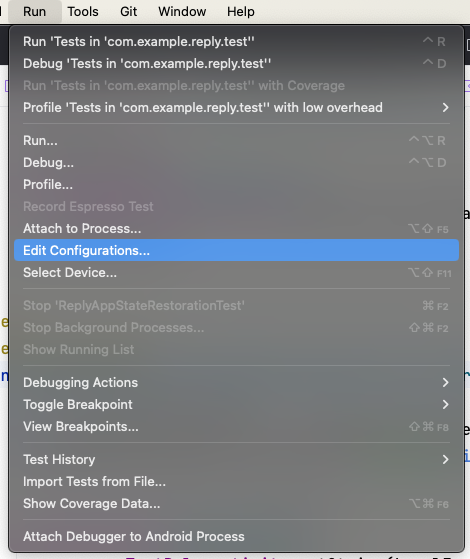
- 在 Android Studio 中,依序選取「Run」>「Edit Configurations...」
- 將測試重新命名為「Compact Test」,然後選取「All in Package」來執行套件內的所有測試。
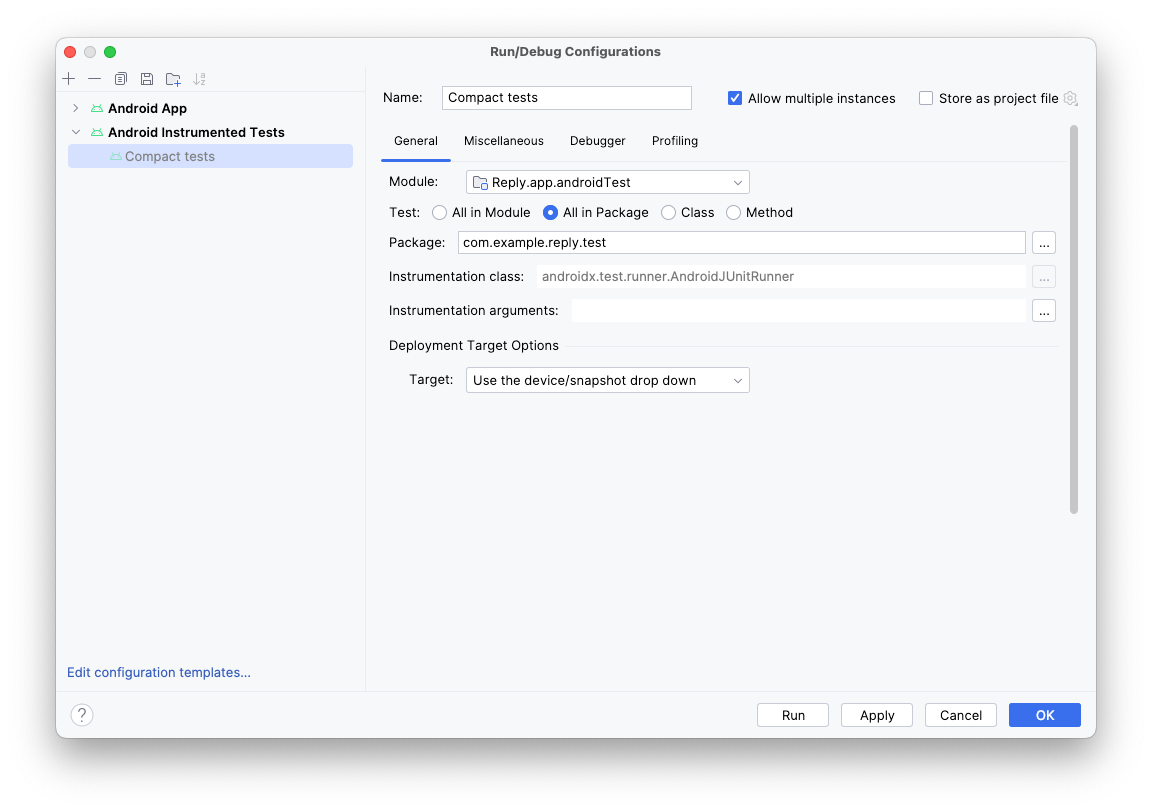
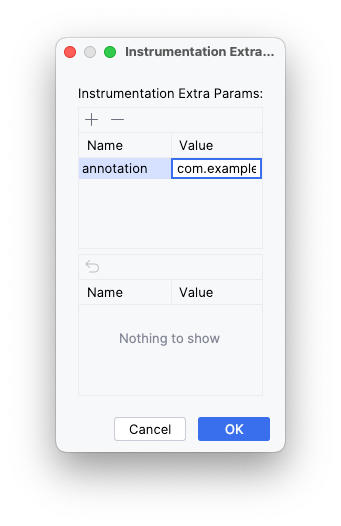
- 按一下「Instrumentation arguments」欄位右側的三點圖示 (...)。
- 按一下加號 (
+) 按鈕,然後加入其他參數:annotation,值為 com.example.reply.test.TestCompactWidth。
- 使用小型螢幕模擬器執行測試。
- 檢查是否只執行了小型螢幕測試。

- 針對中等和展開螢幕重複以上步驟。
6. 取得解決方案程式碼
完成程式碼研究室後,如要下載當中用到的程式碼,請使用以下 Git 指令:
$ git clone https://github.com/google-developer-training/basic-android-kotlin-compose-training-reply-app.git
另外,您也能以 ZIP 檔案格式下載存放區,再將檔案解壓縮,然後在 Android Studio 中開啟。
如要查看解決方案程式碼,請前往 GitHub。
7. 結語
恭喜!您已實作自動調整式版面配置,讓 Reply 應用程式能針對所有螢幕大小自動調整。此外,您也學到如何使用預覽畫面加快開發作業,以及如何透過各種測試方法維持應用程式品質。
記得使用 #AndroidBasics,透過社群媒體分享您的作品!