
1. Welcome
Introduction
In this practical you learn more about the activity lifecycle. The lifecycle is the set of states an activity can be in during its entire lifetime, from when it's created to when it's destroyed and the system reclaims its resources. As a user navigates between activities in your app (as well as into and out of your app), activities transition between different states in their lifecycles.
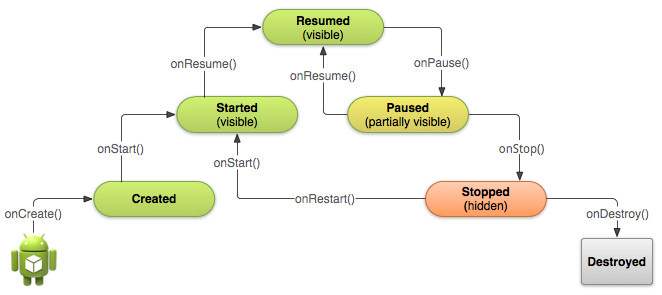
Each stage in an activity's lifecycle has a corresponding callback method: onCreate(), onStart(), onPause(), and so on. When an activity changes state, the associated callback method is invoked. You've already seen one of these methods: onCreate(). By overriding any of the lifecycle callback methods in your Activity classes, you can change the activity's default behavior in response to user or system actions.
The activity state can also change in response to device-configuration changes, for example when the user rotates the device from portrait to landscape. When these configuration changes happen, the activity is destroyed and recreated in its default state, and the user might lose information that they've entered in the activity. To avoid confusing your users, it's important that you develop your app to prevent unexpected data loss. Later in this practical you experiment with configuration changes and learn how to preserve an activity's state in response to device configuration changes and other activity lifecycle events.
In this practical you add logging statements to the TwoActivities app and observe activity lifecycle changes as you use the app. You then begin working with these changes and exploring how to handle user input under these conditions.
What you should already know
You should be able to:
- Create and run an app project in Android Studio.
- Add log statements to your app and view those logs in the Logcat pane.
- Understand and work with an
Activityand anIntent, and be comfortable interacting with them.
What you'll learn
- How the
Activitylifecycle works. - When an
Activitystarts, pauses, stops, and is destroyed. - About the lifecycle callback methods associated with
Activitychanges. - The effect of actions (such as configuration changes) that can result in
Activitylifecycle events. - How to retain
Activitystate across lifecycle events.
What you'll do
- Add code to the TwoActivities app from the previous practical to implement the various
Activitylifecycle callbacks to include logging statements. - Observe the state changes as your app runs and as you interact with each
Activityin your app. - Modify your app to retain the instance state of an
Activitythat is unexpectedly recreated in response to user behavior or configuration change on the device.
2. App overview
In this practical you add to the TwoActivities app. The app looks and behaves roughly the same as it did in the last codelab. It contains two Activity implementations and gives the user the ability to send between them. The changes you make to the app in this practical will not affect its visible user behavior.
3. Task 1: Add lifecycle callbacks to TwoActivities
In this task you will implement all of the Activity lifecycle callback methods to print messages to logcat when those methods are invoked. These log messages will allow you to see when the Activity lifecycle changes state, and how those lifecycle state changes affect your app as it runs.
1.1 (Optional) Copy the TwoActivities project
For the tasks in this practical, you will modify the existing TwoActivities project you built in the last practical. If you'd prefer to keep the previous TwoActivities project intact, follow the steps in Appendix: Utilities to make a copy of the project.
1.2 Implement callbacks into MainActivity
- Open the TwoActivities project in Android Studio, and open MainActivity in the Project > Android pane.
- In the
onCreate()method, add the following log statements:
Log.d(LOG_TAG, "-------");
Log.d(LOG_TAG, "onCreate");
- Add an override for the
onStart()callback, with a statement to the log for that event:
@Override
public void onStart(){
    super.onStart();
    Log.d(LOG_TAG, "onStart");
}
For a shortcut, select Code > Override Methods in Android Studio. A dialog appears with all of the possible methods you can override in your class. Choosing one or more callback methods from the list inserts a complete template for those methods, including the required call to the superclass.
- Use the
onStart()method as a template to implement theonPause(),onRestart(),onResume(),onStop(), andonDestroy()lifecycle callbacks.
All the callback methods have the same signatures (except for the name). If you Copy and Paste onStart() to create these other callback methods, don't forget to update the contents to call the right method in the superclass, and to log the correct method.
- Run your app.
- Click the Logcat tab at the bottom of Android Studio to show the Logcat pane. You should see three log messages showing the three lifecycle states the
Activityhas transitioned through as it started:
D/MainActivity: -------
D/MainActivity: onCreate
D/MainActivity: onStart
D/MainActivity: onResume
1.3 Implement lifecycle callbacks in SecondActivity
Now that you've implemented the lifecycle callback methods for MainActivity, do the same for SecondActivity.
- Open SecondActivity.
- At the top of the class, add a constant for the
LOG_TAGvariable:
private static final String LOG_TAG = SecondActivity.class.getSimpleName();
- Add the lifecycle callbacks and log statements to the second
Activity. (You can Copy and Paste the callback methods fromMainActivity.) - Add a log statement to the
returnReply()method just before thefinish()method:
Log.d(LOG_TAG, "End SecondActivity");
1.4 Observe the logs as the app runs
- Run your app.
- Click the Logcat tab at the bottom of Android Studio to show the Logcat pane.
- Enter Activity in the search box. The Android logcat can be very long and cluttered. Because the
LOG_TAGvariable in each class contains either the wordsMainActivityorSecondActivity, this keyword lets you filter the log for only the things you're interested in.
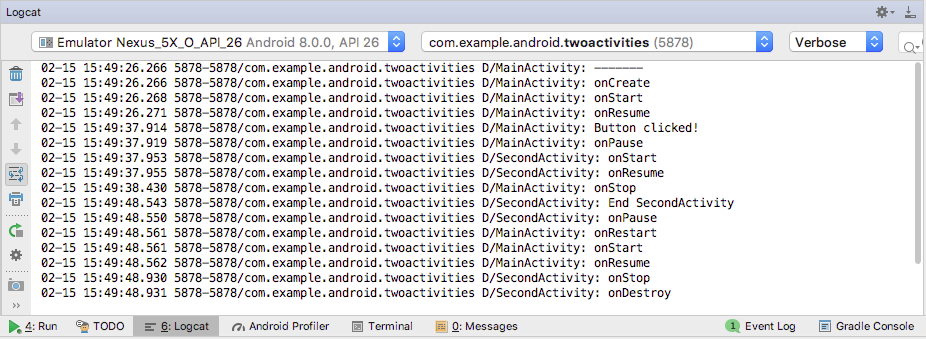
Experiment using your app and note that the lifecycle events that occur in response to different actions. In particular, try these things:
- Use the app normally (send a message, reply with another message).
- Use the Back button to go back from the second
Activityto the mainActivity. - Use the Up arrow in the app bar to go back from the second
Activityto the mainActivity. - Rotate the device on both the main and second
Activityat different times in your app and observe what happens in the log and on the screen. - Press the overview button (the square button to the right of Home) and close the app (tap the X).
- Return to the home screen and restart your app.
TIP: If you're running your app in an emulator, you can simulate rotation with Control+F11 or Control+Function+F11.
Task 1 solution code
The following code snippets show the solution code for the first task.
MainActivity
The following code snippets show the added code in MainActivity, but not the entire class.
The onCreate() method:
@Override
protected void onCreate(Bundle savedInstanceState) {
        super.onCreate(savedInstanceState);
        setContentView(R.layout.activity_main);

        // Log the start of the onCreate() method.
        Log.d(LOG_TAG, "-------");
        Log.d(LOG_TAG, "onCreate");

        // Initialize all the view variables.
        mMessageEditText = findViewById(R.id.editText_main);
        mReplyHeadTextView = findViewById(R.id.text_header_reply);
        mReplyTextView = findViewById(R.id.text_message_reply);
}
The other lifecycle methods:
@Override
protected void onStart() {
        super.onStart();
        Log.d(LOG_TAG, "onStart");
}

@Override
protected void onPause() {
        super.onPause();
        Log.d(LOG_TAG, "onPause");
}

@Override
protected void onRestart() {
        super.onRestart();
        Log.d(LOG_TAG, "onRestart");
}

@Override
protected void onResume() {
        super.onResume();
        Log.d(LOG_TAG, "onResume");
}

@Override
protected void onStop() {
        super.onStop();
        Log.d(LOG_TAG, "onStop");
}

@Override
protected void onDestroy() {
        super.onDestroy();
        Log.d(LOG_TAG, "onDestroy");
}
SecondActivity
The following code snippets show the added code in SecondActivity, but not the entire class.
At the top of the SecondActivity class:
private static final String LOG_TAG = SecondActivity.class.getSimpleName();
The returnReply() method:
public void returnReply(View view) {
        String reply = mReply.getText().toString();
        Intent replyIntent = new Intent();
        replyIntent.putExtra(EXTRA_REPLY, reply);
        setResult(RESULT_OK, replyIntent);
        Log.d(LOG_TAG, "End SecondActivity");
        finish();
}
The other lifecycle methods:
Same as for MainActivity, above.
4. Task 2: Save and restore the Activity instance state
Depending on system resources and user behavior, each Activity in your app may be destroyed and reconstructed far more frequently than you might think.
You may have noticed this behavior in the last section when you rotated the device or emulator. Rotating the device is one example of a device configuration change. Although rotation is the most common one, all configuration changes result in the current Activity being destroyed and recreated as if it were new. If you don't account for this behavior in your code, when a configuration change occurs, your Activity layout may revert to its default appearance and initial values, and your users may lose their place, their data, or the state of their progress in your app.
The state of each Activity is stored as a set of key/value pairs in a Bundle object called the Activity instance state. The system saves default state information to instance state Bundle just before the Activity is stopped, and passes that Bundle to the new Activity instance to restore.
To keep from losing data in an Activity when it is unexpectedly destroyed and recreated, you need to implement the onSaveInstanceState() method. The system calls this method on your Activity (between onPause() and onStop()) when there is a possibility the Activity may be destroyed and recreated.
The data you save in the instance state is specific to only this instance of this specific Activity during the current app session. When you stop and restart a new app session, the Activity instance state is lost and the Activity reverts to its default appearance. If you need to save user data between app sessions, use shared preferences or a database. You learn about both of these in a later practical.
2.1 Save the Activity instance state with onSaveInstanceState()
You may have noticed that rotating the device does not affect the state of the second Activity at all. This is because the second Activity layout and state are generated from the layout and the Intent that activated it. Even if the Activity is recreated, the Intent is still there and the data in that Intent is still used each time the onCreate() method in the second Activity is called.
In addition, you may notice that in each Activity, any text you typed into message or reply EditText elements is retained even when the device is rotated. This is because the state information of some of the View elements in your layout are automatically saved across configuration changes, and the current value of an EditText is one of those cases.
So the only Activity state you're interested in are the TextView elements for the reply header and the reply text in the main Activity. Both TextView elements are invisible by default; they only appear once you send a message back to the main Activity from the second Activity.
In this task you add code to preserve the instance state of these two TextView elements using onSaveInstanceState().
- Open MainActivity.
- Add this skeleton implementation of
onSaveInstanceState()to theActivity, or use Code > Override Methods to insert a skeleton override.
@Override
public void onSaveInstanceState(Bundle outState) {
          super.onSaveInstanceState(outState);
}
- Check to see if the header is currently visible, and if so put that visibility state into the state
Bundlewith theputBoolean()method and the key"reply_visible".
    if (mReplyHeadTextView.getVisibility() == View.VISIBLE) {
        outState.putBoolean("reply_visible", true);
    }
Remember that the reply header and text are marked invisible until there is a reply from the second Activity. If the header is visible, then there is reply data that needs to be saved. Note that we're only interested in that visibility state — the actual text of the header doesn't need to be saved, because that text never changes.
- Inside that same check, add the reply text into the
Bundle.
outState.putString("reply_text",mReplyTextView.getText().toString());
If the header is visible you can assume that the reply message itself is also visible. You don't need to test for or save the current visibility state of the reply message. Only the actual text of the message goes into the state Bundle with the key "reply_text".
You save the state of only those View elements that might change after the Activity is created. The other View elements in your app (the EditText, the Button) can be recreated from the default layout at any time.
Note that the system will save the state of some View elements, such as the contents of the EditText.
2.2 Restore the Activity instance state in onCreate()
Once you've saved the Activity instance state, you also need to restore it when the Activity is recreated. You can do this either in onCreate(), or by implementing the onRestoreInstanceState() callback, which is called after onStart() after the Activity is created.
Most of the time the better place to restore the Activity state is in onCreate(), to ensure that the UI, including the state, is available as soon as possible. It is sometimes convenient to do it in onRestoreInstanceState() after all of the initialization has been done, or to allow subclasses to decide whether to use your default implementation.
- In the
onCreate()method, after theViewvariables are initialized withfindViewById(), add a test to make sure thatsavedInstanceStateis not null.
// Initialize all the view variables.
mMessageEditText = findViewById(R.id.editText_main);
mReplyHeadTextView = findViewById(R.id.text_header_reply);
mReplyTextView = findViewById(R.id.text_message_reply);

// Restore the state.
if (savedInstanceState != null) {
}
When your Activity is created, the system passes the state Bundle to onCreate() as its only argument. The first time onCreate() is called and your app starts, the Bundle is null—there's no existing state the first time your app starts. Subsequent calls to onCreate() have a bundle populated with the data you stored in onSaveInstanceState().
- Inside that check, get the current visibility (true or false) out of the
Bundlewith the key"reply_visible".
if (savedInstanceState != null) {
    boolean isVisible =
                     savedInstanceState.getBoolean("reply_visible");
}
- Add a test below that previous line for the isVisible variable.
if (isVisible) {
}
If there's a reply_visible key in the state Bundle (and isVisible is therefore true), you will need to restore the state.
- Inside the
isVisibletest, make the header visible.
mReplyHeadTextView.setVisibility(View.VISIBLE);
- Get the text reply message from the
Bundlewith the key"reply_text", and set the replyTextViewto show that string.
mReplyTextView.setText(savedInstanceState.getString("reply_text"));
- Make the reply
TextViewvisible as well:
mReplyTextView.setVisibility(View.VISIBLE);
- Run the app. Try rotating the device or the emulator to ensure that the reply message (if there is one) remains on the screen after the
Activityis recreated.
Task 2 solution code
The following code snippets show the solution code for this task.
MainActivity
The following code snippets show the added code in MainActivity, but not the entire class.
The onSaveInstanceState() method:
@Override
public void onSaveInstanceState(Bundle outState) {
   super.onSaveInstanceState(outState);
   // If the heading is visible, message needs to be saved.
   // Otherwise we're still using default layout.
   if (mReplyHeadTextView.getVisibility() == View.VISIBLE) {
       outState.putBoolean("reply_visible", true);
       outState.putString("reply_text",
                      mReplyTextView.getText().toString());
   }
}
The onCreate() method:
@Override
protected void onCreate(Bundle savedInstanceState) {
   super.onCreate(savedInstanceState);
   setContentView(R.layout.activity_main);

   Log.d(LOG_TAG, "-------");
   Log.d(LOG_TAG, "onCreate");

   // Initialize all the view variables.
   mMessageEditText = findViewById(R.id.editText_main);
   mReplyHeadTextView = findViewById(R.id.text_header_reply);
   mReplyTextView = findViewById(R.id.text_message_reply);

   // Restore the saved state.
   // See onSaveInstanceState() for what gets saved.
   if (savedInstanceState != null) {
       boolean isVisible =
                     savedInstanceState.getBoolean("reply_visible");
       // Show both the header and the message views. If isVisible is
       // false or missing from the bundle, use the default layout.
       if (isVisible) {
           mReplyHeadTextView.setVisibility(View.VISIBLE);
           mReplyTextView.setText(savedInstanceState
                                  .getString("reply_text"));
           mReplyTextView.setVisibility(View.VISIBLE);
       }
   }
}
The complete project:
Android Studio Project: TwoActivitiesLifecycle
5. Coding challenge
Challenge: Create a simple shopping-list app with a main activity for the list the user is building, and a second activity for a list of common shopping items.
- The main activity should contain the list to build, which should be made up of ten empty
TextViewelements. - An Add Item button on the main activity launches a second activity that contains a list of common shopping items (Cheese, Rice, Apples, and so on). Use
Buttonelements to display the items. - Choosing an item returns the user to the main activity, and updates an empty
TextViewto include the chosen item.
Use an Intent to pass information from one Activity to another. Make sure that the current state of the shopping list is saved when the user rotates the device.
6. Summary
- The Activity lifecycle is a set of states an
Activitymigrates through, beginning when it is first created and ending when the Android system reclaims the resources for thatActivity. - As the user navigates from one
Activityto another, and inside and outside of your app, eachActivitymoves between states in theActivitylifecycle. - Each state in the
Activitylifecycle has a corresponding callback method you can override in yourActivityclass. - The lifecycle methods are
onCreate(),onStart(),onPause(),onRestart(),onResume(),onStop(),onDestroy(). - Overriding a lifecycle callback method allows you to add behavior that occurs when your
Activitytransitions into that state. - You can add skeleton override methods to your classes in Android Studio with Code > Override.
- Device configuration changes such as rotation results in the
Activitybeing destroyed and recreated as if it were new. - A portion of the
Activitystate is preserved on a configuration change, including the current values ofEditTextelements. For all other data, you must explicitly save that data yourself. - Save
Activityinstance state in theonSaveInstanceState()method. - Instance state data is stored as simple key/value pairs in a
Bundle. Use theBundlemethods to put data into and get data back out of theBundle. - Restore the instance state in
onCreate(), which is the preferred way, oronRestoreInstanceState().
7. Related concept
The related concept documentation is in 2.2: Activity lifecycle and state.
8. Learn more
Android Studio documentation:
Android developer documentation:
9. Homework
This section lists possible homework assignments for students who are working through this codelab as part of a course led by an instructor. It's up to the instructor to do the following:
- Assign homework if required.
- Communicate to students how to submit homework assignments.
- Grade the homework assignments.
Instructors can use these suggestions as little or as much as they want, and should feel free to assign any other homework they feel is appropriate.
If you're working through this codelab on your own, feel free to use these homework assignments to test your knowledge.
Build and run an app
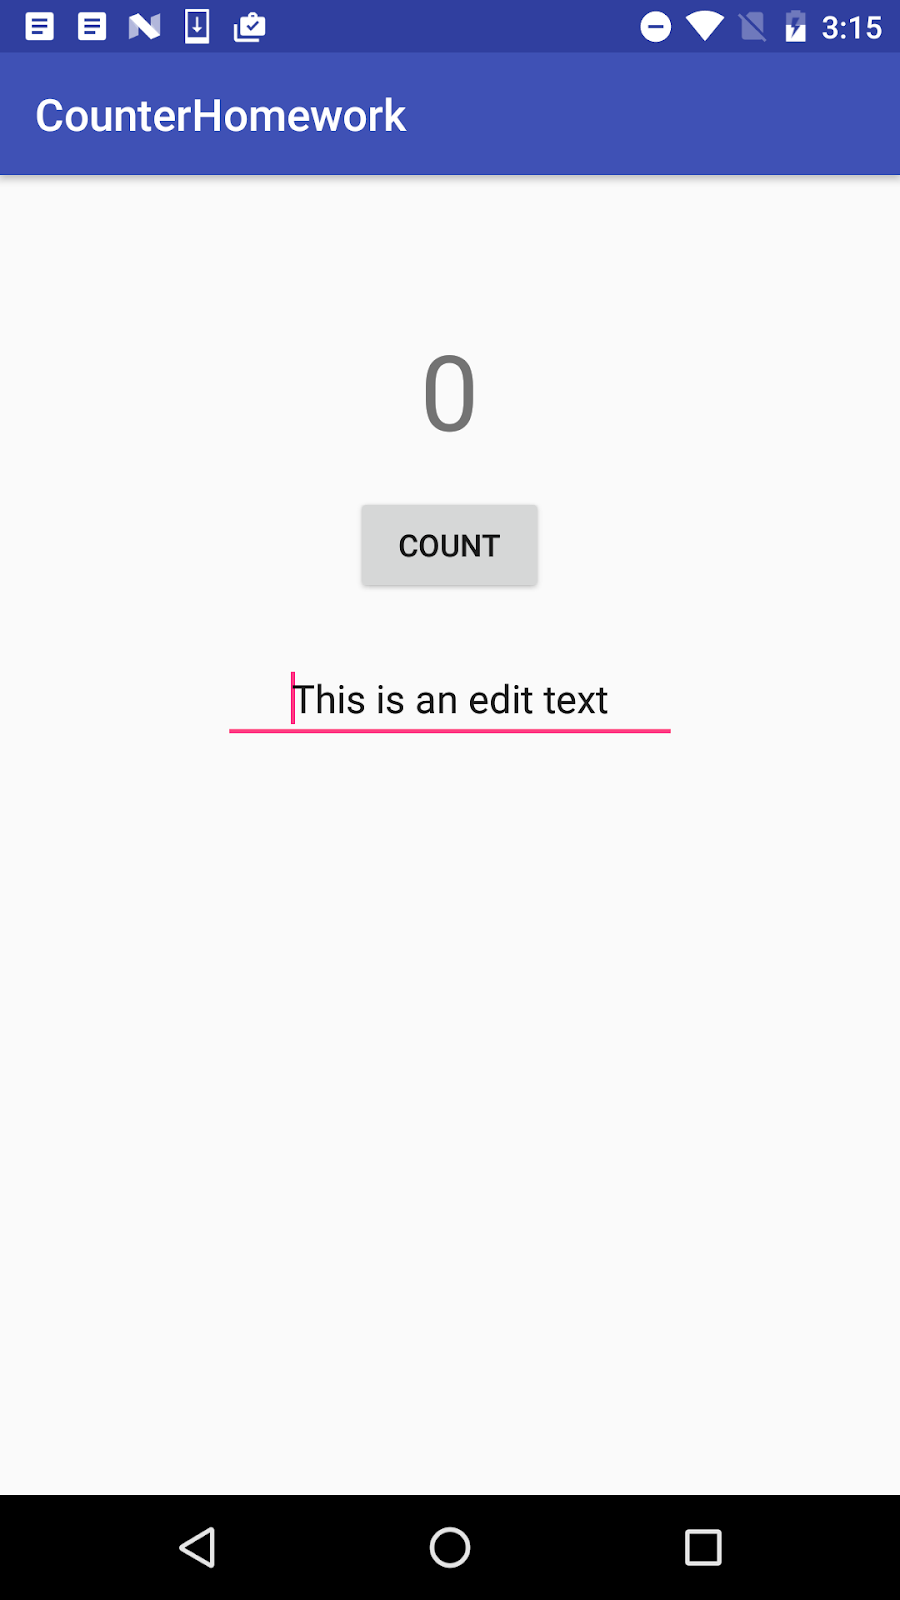
- Create an app with a layout that holds a counter
TextView, aButtonto increment the counter, and anEditText. See the screenshot below as an example. You don't have to precisely duplicate the layout. - Add a click handler for the
Buttonthat increments the counter. - Run the app and increment the counter. Enter some text into the
EditText. - Rotate the device. Note that the counter is reset, but the
EditTextis not. - Implement
onSaveInstanceState()to save the current state of the app. - Update
onCreate()to restore the state of the app. - Make sure that when you rotate the device, the app state is preserved.
Answer these questions
Question 1
If you run the homework app before implementing onSaveInstanceState(), what happens if you rotate the device? Choose one:
- The
EditTextno longer contains the text you entered, but the counter is preserved. - The counter is reset to 0, and the
EditTextno longer contains the text you entered. - The counter is reset to 0, but the contents of the
EditTextis preserved. - The counter and the contents of the
EditTextare preserved.
Question 2
What Activity lifecycle methods are called when a device-configuration change (such as rotation) occurs? Choose one:
- Android immediately shuts down your
Activityby callingonStop(). Your code must restart theActivity. - Android shuts down your
Activityby callingonPause(),onStop(), andonDestroy(). Your code must restart theActivity. - Android shuts down your
Activityby callingonPause(),onStop(), andonDestroy(), and then starts it over again, callingonCreate(),onStart(), andonResume(). - Android immediately calls
onResume().
Question 3
When in the Activity lifecycle is onSaveInstanceState() called? Choose one:
onSaveInstanceState()is called before theonStop()method.onSaveInstanceState()is called before theonResume()method.onSaveInstanceState()is called before theonCreate()method.onSaveInstanceState()is called before theonDestroy()method.
Question 4
Which Activity lifecycle methods are best to use for saving data before the Activity is finished or destroyed? Choose one:
onPause()oronStop()onResume()oronCreate()onDestroy()onStart()oronRestart()
Submit your app for grading
Guidance for graders
Check that the app has the following features:
- It displays a counter, a
Buttonto increment that counter, and anEditText. - Clicking the
Buttonincrements the counter by 1. - When the device is rotated, both the counter and
EditTextstates are retained. - The implementation of
MainActivity.javauses theonSaveInstanceState()method to store the counter value. - The implementation of
onCreate()tests for the existence of theoutStateBundle. If thatBundleexists, the counter value is restored and saved to theTextView.
10. Next codelab
To find the next practical codelab in the Android Developer Fundamentals (V2) course, see Codelabs for Android Developer Fundamentals (V2).
For an overview of the course, including links to the concept chapters, apps, and slides, see Android Developer Fundamentals (Version 2).