1. Welcome
Introduction
This third testing codelab is a survey of additional testing topics, including:
- Coroutines, including view model scoped coroutines
- Room
- Databinding
- End-to-End tests
What you should already know
You should be familiar with:
- Testing concepts covered in the 5.1 Testing Basics and 5.2 Dependency Injection and Test Doubles codelabs: Writing and running unit tests on Android, using JUnit, Hamcrest, AndroidX test, Robolectric, Testing LiveData, manual Dependency Injection, Test Doubles (mocks and fakes), Service Locators, testing the Navigation Component, and Espresso.
- The following core Android Jetpack libraries:
view model,LiveData, Data Binding, and the Navigation Component - Application architecture, following the pattern from the Guide to app architecture and Android Fundamentals codelabs.
- The basics of coroutines (including
ViewModelScope) on Android.
What you'll learn
- How to test coroutines, including view model scoped coroutines.
- How to test simple error edge cases.
- How to test Room.
- How to test data binding with Espresso.
- How to write end-to-end tests.
- How to test global app navigation.
You will use:
runBlockingandrunBlockingTestTestCoroutineDispatcherpauseDispatcherandresumeDispatcherinMemoryDatabaseBuilderIdlingResource
What you'll do
- Write
ViewModelintegration tests that test code usingviewModelScope. - Pause and resume coroutine execution for testing.
- Modify a fake repository to support error testing.
- Write DAO unit tests.
- Write local data source integration tests.
- Write end-to-end tests that include coroutine and data binding code.
- Write global app navigation tests.
2. App overview
In this series of codelabs, you'll be working with the TO-DO Notes app. The app allows you to write down tasks to complete and displays them in a list. You can then mark them as completed or not, filter them, or delete them.

This app is written in Kotlin, has a few screens, uses Jetpack components, and follows the architecture from a Guide to app architecture. Learning how to test this app will enable you to test apps that use the same libraries and architecture.
Download the Code
To get started, download the code:
Alternatively, you can clone the Github repository for the code:
$ git clone https://github.com/google-developer-training/advanced-android-testing.git
$ cd android-testing
$ git checkout end_codelab_2
Take a moment to familiarize yourself with the code, following the instructions below.
Step 1: Run the sample app
Once you've downloaded the TO-DO app, open it in Android Studio and run it. It should compile. Explore the app by doing the following:
- Create a new task with the plus floating action button. Enter a title first, then enter additional information about the task. Save it with the green check FAB.
- In the list of tasks, click on the title of the task you just completed and look at the detail screen for that task to see the rest of the description.
- In the list or on the detail screen, check the checkbox of that task to set its status to Completed.
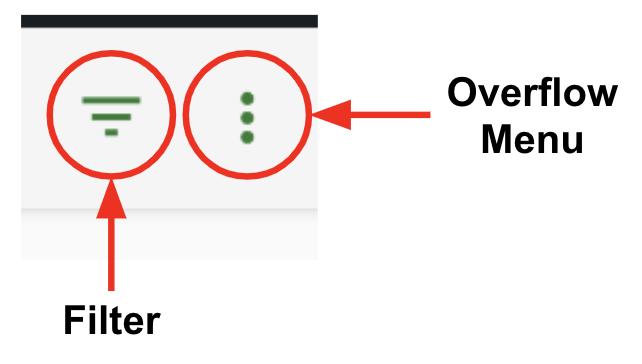
- Go back to the tasks screen, open the filter menu, and filter the tasks by Active and Completed status.
- Open the navigation drawer and click Statistics.
- Got back to the overview screen, and from the navigation drawer menu, select Clear completed to delete all tasks with the Completed status
Step 2: Explore the sample app code
The TO-DO app is based off of the Architecture Blueprints testing and architecture sample. The app follows the architecture from a Guide to app architecture. It uses ViewModels with Fragments, a repository, and Room. If you're familiar with any of the below examples, this app has a similar architecture:
- Android Kotlin Fundamentals training codelabs
- Advanced Android training codelabs
- Room with a View Codelab
- Android Sunflower Sample
- Developing Android Apps with Kotlin Udacity training course
It is more important that you understand the general architecture of the app than have a deep understanding of the logic at any one layer.
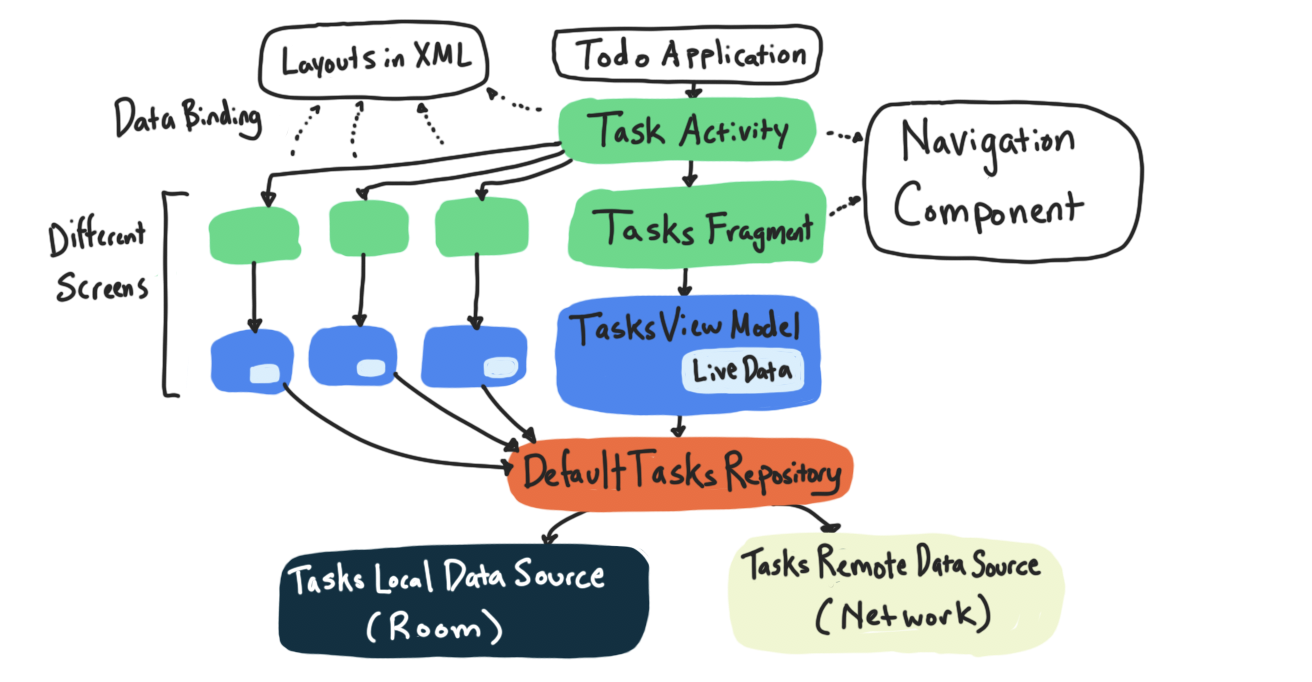
Here's the summary of packages you'll find:
Package: | ||
| The add or edit a task screen: UI layer code for adding or editing a task. | |
| The data layer: This deals with the data layer of the tasks. It contains the database, network, and repository code. | |
| The statistics screen: UI layer code for the statistics screen. | |
| The task detail screen: UI layer code for a single task. | |
| The tasks screen: UI layer code for the list of all tasks. | |
| Utility classes: Shared classes used in various parts of the app, e.g. for the swipe refresh layout used on multiple screens. | |
Data layer (.data)
This app includes a simulated networking layer, in the remote package, and a database layer, in the local package. For simplicity, in this project the networking layer is simulated with just a HashMap with a delay, rather than making real network requests.
The DefaultTasksRepository coordinates or mediates between the networking layer and the database layer and is what returns data to the UI layer.
UI layer ( .addedittask, .statistics, .taskdetail, .tasks)
Each of the UI layer packages contains a fragment and a view model, along with any other classes that are required for the UI (such as an adapter for the task list). The TaskActivity is the activity that contains all of the fragments.
Navigation
Navigation for the app is controlled by the Navigation component. It is defined in the nav_graph.xml file. Navigation is triggered in the view models using the Event class; the view models also determine what arguments to pass. The fragments observe the Events and do the actual navigation between screens.
3. Task: Introduction to and review of testing coroutines
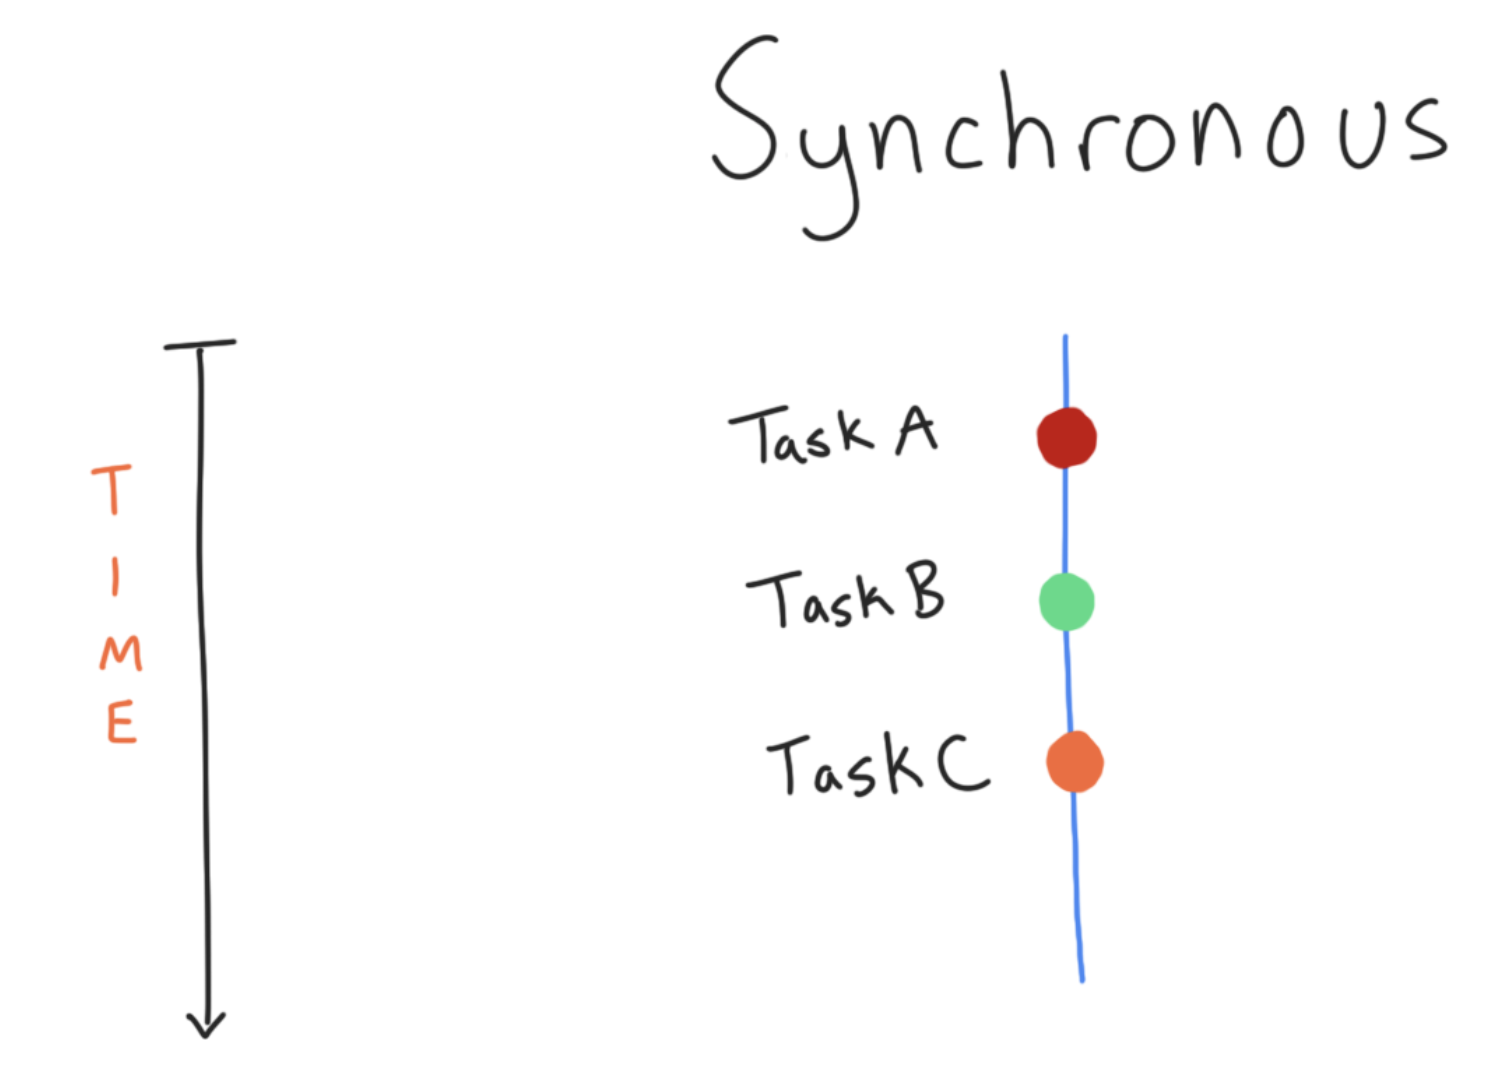
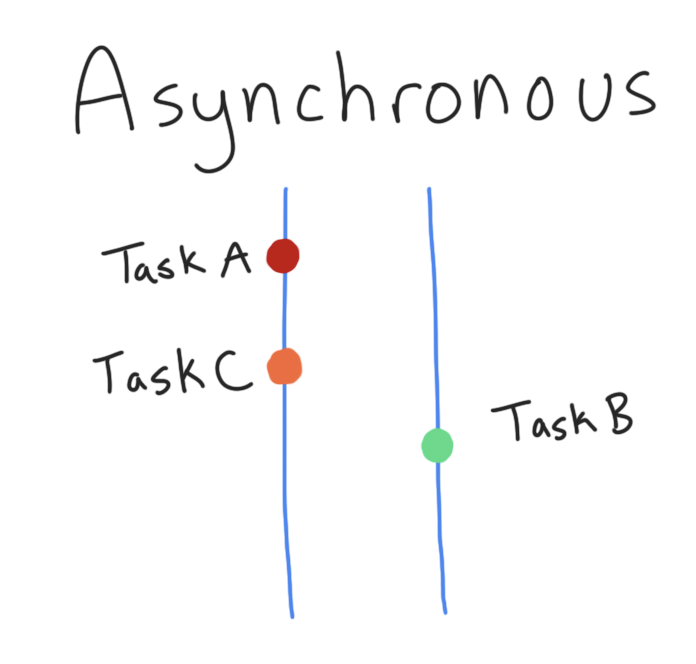
Code executes either synchronously or asynchronously.
- When code is running synchronously, a task completely finishes before execution moves to the next task.
- When code is running asynchronously, tasks run in parallel.
|
|
Asynchronous code is almost always used for long-running tasks, such as network or database calls. It can also be difficult to test. There are two common reasons for this:
- Asynchronous code tends to be non-deterministic. What this means is that if a test runs operations A and B in parallel, multiple times, sometimes A will finish first, and sometimes B. This can cause flaky tests (tests with inconsistent results).
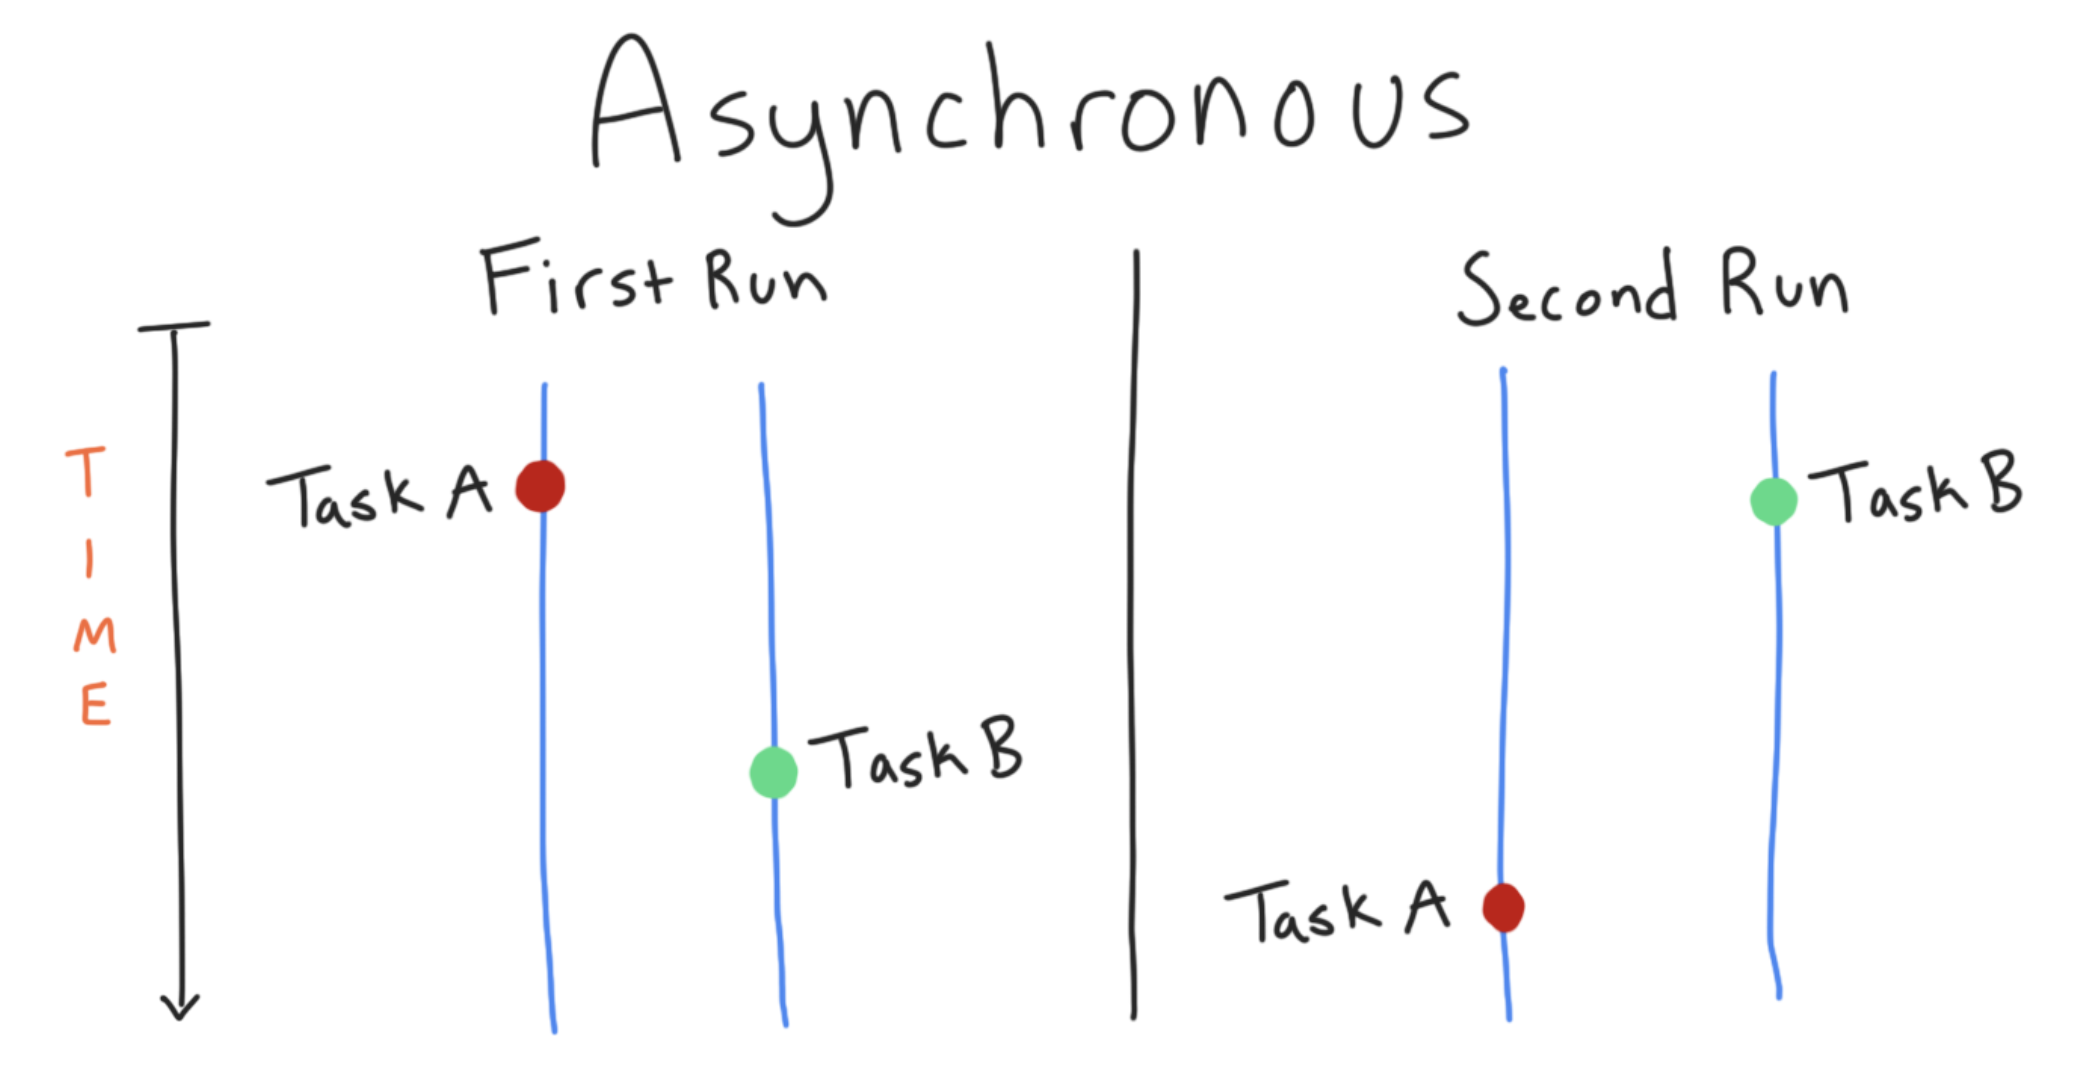
- When testing, you often need to ensure some sort of synchronization mechanism for asynchronous code. Tests run on a testing thread. As your test runs code on different threads, or makes new coroutines, this work is started asynchronously, seperate from the test thread. Meanwhile the test coroutine will keep executing instructions in parallel. The test might finish before either of the fired-off tasks finish.
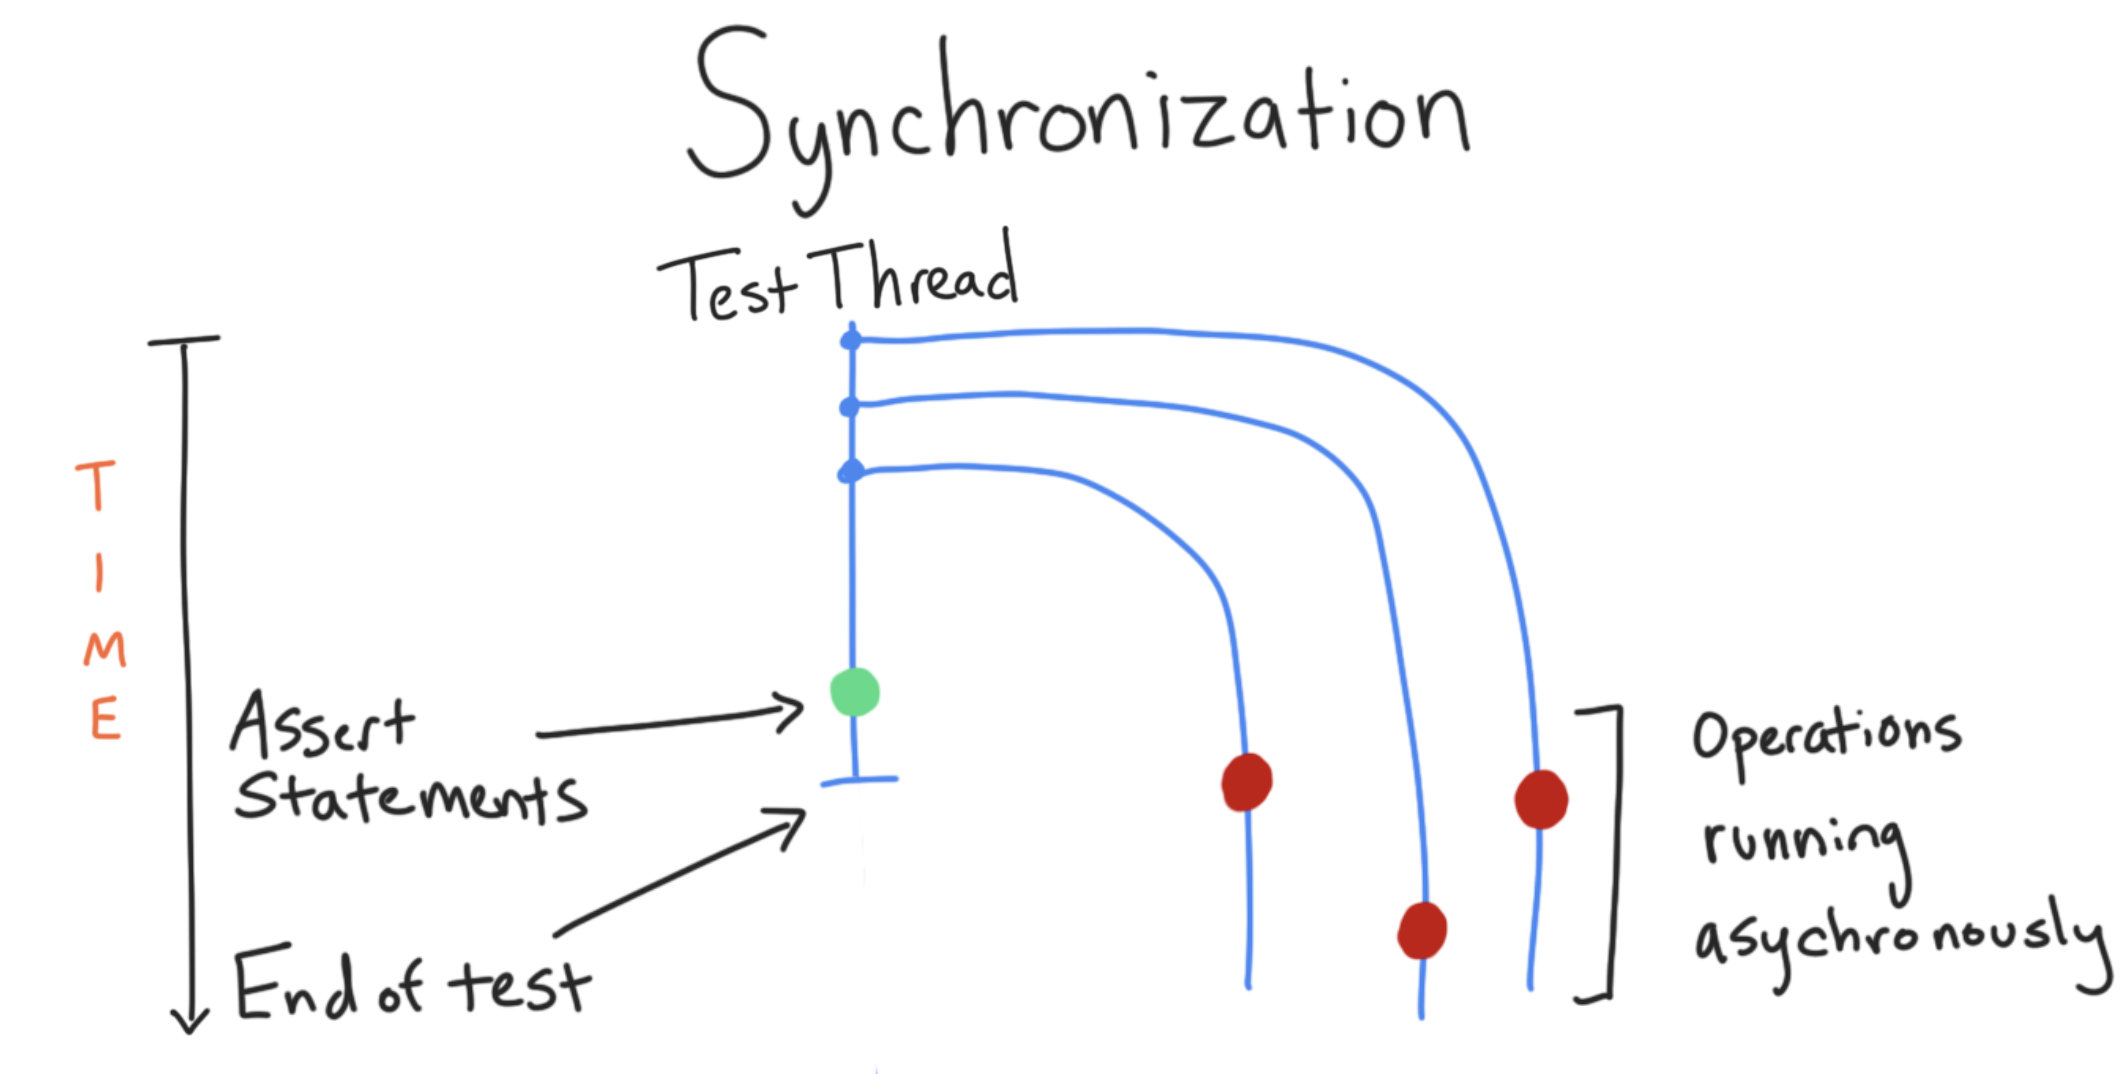 Synchronization mechanisms are ways to tell the test execution to "wait" until the asynchronous work finishes.
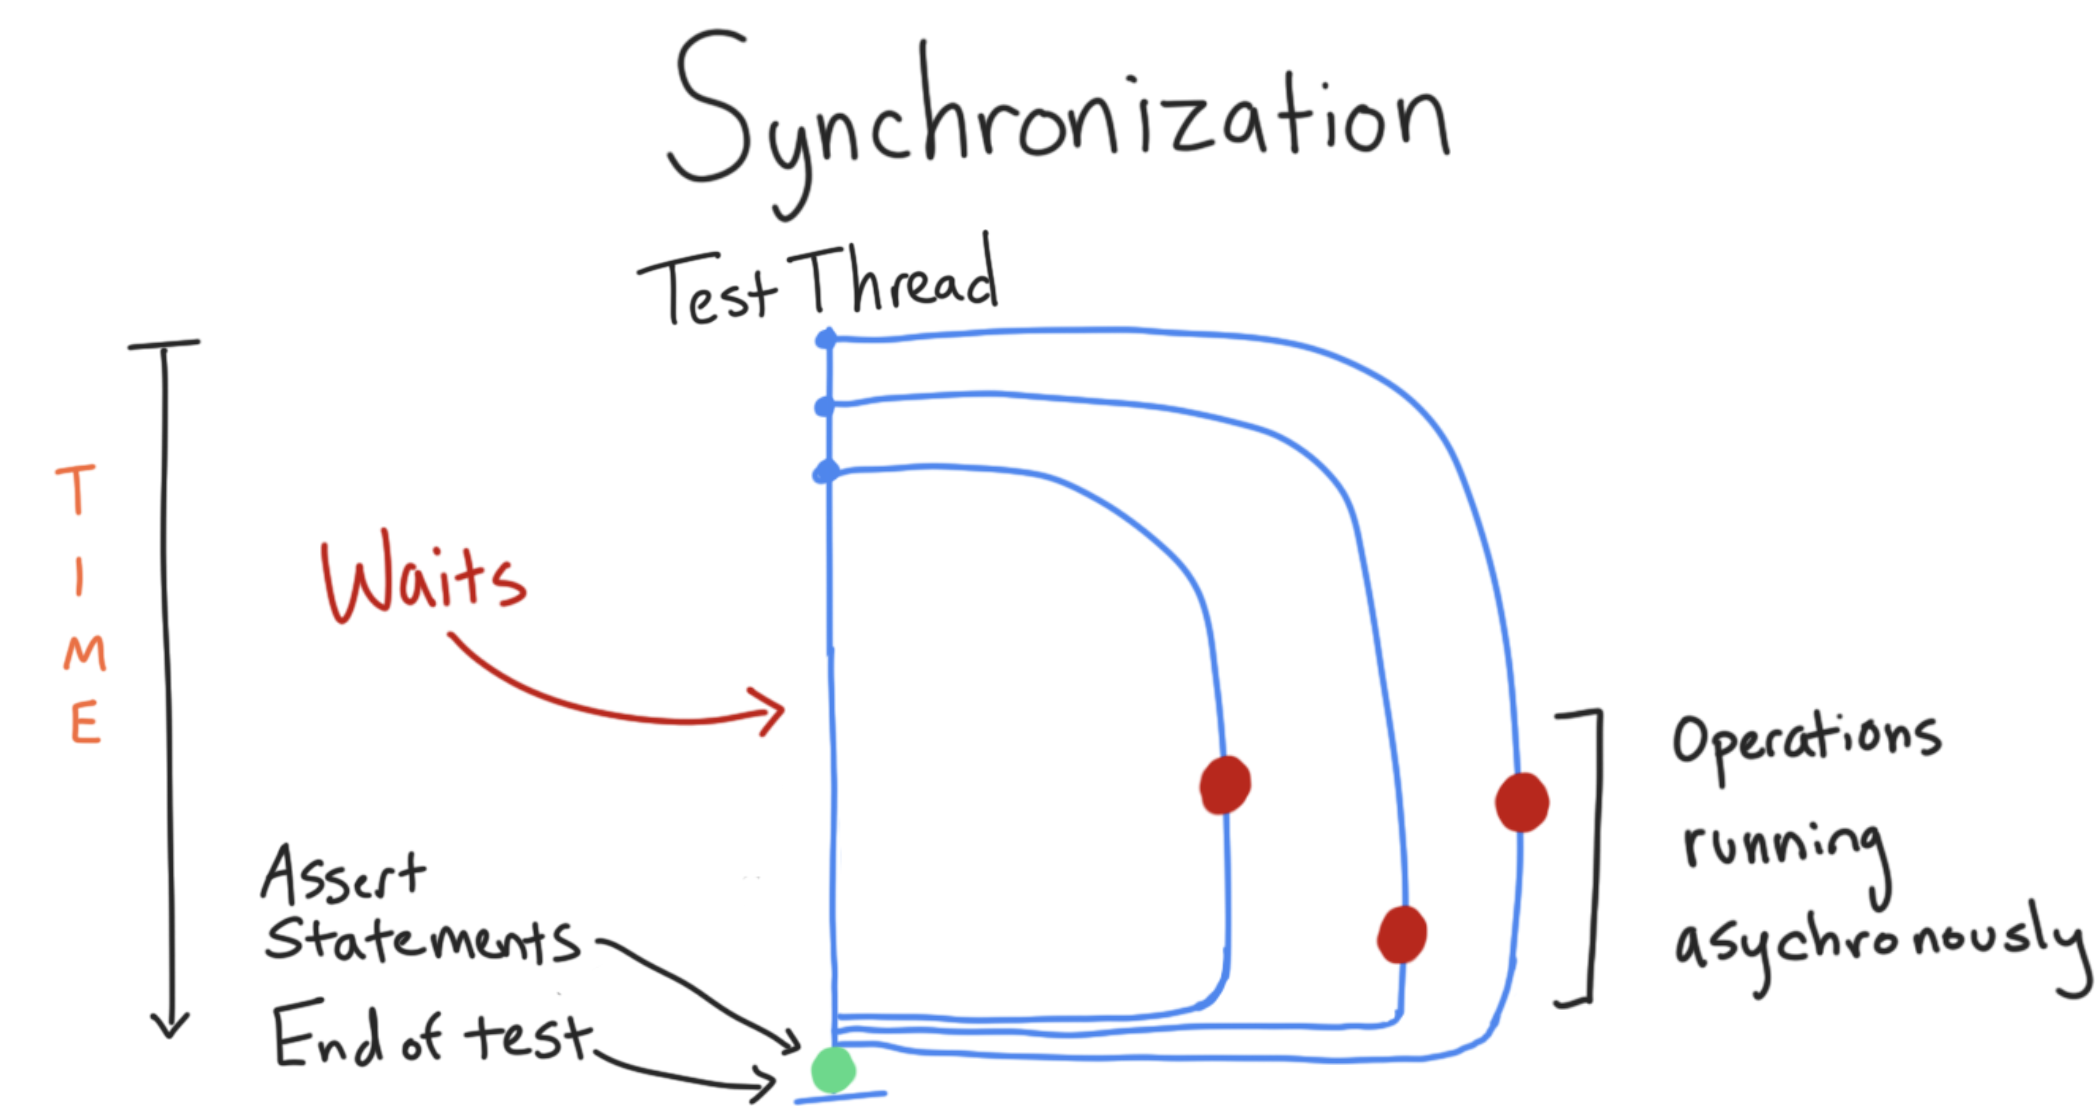
In Kotlin, a common mechanism for running code asynchronously is coroutines. When testing asynchronous code, you need to make your code deterministic and provide synchronization mechanisms. The following classes and methodologies help with that:
- Using
runBlockingTestorrunBlocking. - Using
TestCoroutineDispatcherfor local tests. - Pausing coroutine execution to test the state of the code at an exact place in time.
You will start by exploring the difference between runBlockingTest and runBlocking.
Step 1: Observe how to run basic coroutines in tests
To test code that includes suspend functions, you need to do the following:
- Add the
kotlinx-coroutines-testtest dependency to your app's build.gradle file. - Annotate the test class or test function with
@ExperimentalCoroutinesApi. - Surround the code with
runBlockingTest, so that your test waits for the coroutine to finish.
Let's look at an example.
- Open your app's
build.gradlefile. - Find the
kotlinx-coroutines-testdependency (this is provided for you):
app/build.gradle
    // Dependencies for Android instrumented unit tests
    androidTestImplementation "org.jetbrains.kotlinx:kotlinx-coroutines-test:$coroutinesVersion"
kotlinx-coroutines-test is an experimental library for testing coroutines. It includes utilities for testing coroutines, including runBlockingTest.
You must use runBlockingTest whenever you want to run a coroutine from a test. Usually, this is when you need to call a suspend function from a test.
- Take a look at this example from TaskDetailFragmentTest.kt. Pay attention to the lines that say
//LOOK HERE:
TaskDetailFragmentTest.kt
@MediumTest
@RunWith(AndroidJUnit4::class)
@ExperimentalCoroutinesApi // LOOK HERE
class TaskDetailFragmentTest {

    //... Setup and teardown

    @Test
    fun activeTaskDetails_DisplayedInUi() = runBlockingTest{ // LOOK HERE
        // GIVEN - Add active (incomplete) task to the DB.
        val activeTask = Task("Active Task", "AndroidX Rocks", false)
        repository.saveTask(activeTask) // LOOK HERE Example of calling a suspend function

        // WHEN - Details fragment launched to display task.
        val bundle = TaskDetailFragmentArgs(activeTask.id).toBundle()
        launchFragmentInContainer<TaskDetailFragment>(bundle, R.style.AppTheme)

        // THEN - Task details are displayed on the screen.
        // Make sure that the title/description are both shown and correct.
        // Lots of Espresso code...
    }

    // More tests...
}
To use runBlockingTest you:
- Annotate the function or class with
@ExperimentalCoroutinesApi. - Wrap the code calling the suspend function with
runBlockingTest.
When you use any functions from kotlinx-coroutines-test, annotate the class or function with @ExperimentalCoroutinesApi since kotlinx-coroutines-test is still experimental and the API might change. If you don't do this, you'll get a lint warning.
runBlockingTest is used in the above code because you are calling repository.saveTask(activeTask), which is a suspend function.
runBlockingTest handles both running the code deterministically and providing a synchronization mechanism. runBlockingTest takes in a block of code and blocks the test thread until all of the coroutines it starts are finished. It also runs the code in the coroutines immediately (skipping any calls to delay) and in the order they are called–-in short, it runs them in a deterministic order.
runBlockingTest essentially makes your coroutines run like non-coroutines by giving you a coroutine context specifically for test code.
You do this in your tests because it's important that the code runs in the same way every single time (synchronous and deterministic).
Step 2: Observe runBlocking in Test Doubles
There is another function, runBlocking, which is used when you need to use coroutines in your test doubles as opposed to your test classes. Using runBlocking looks very similar to runBlockingTest, as you wrap it around a code block to use it.
- Take a look at this example from FakeTestRepository.kt. Note that since
runBlockingis not part of thekotlinx-coroutines-testlibrary, you do not need to use theExperimentalCoroutinesApiannotation.
FakeTestRepository.kt
class FakeTestRepository : TasksRepository {

    var tasksServiceData: LinkedHashMap<String, Task> = LinkedHashMap()

    private val observableTasks = MutableLiveData<Result<List<Task>>>()


    // More code...

    override fun observeTasks(): LiveData<Result<List<Task>>> {
        runBlocking { refreshTasks() } // LOOK HERE
        return observableTasks
    }

    override suspend fun refreshTasks() {
        observableTasks.value = getTasks()
    }

    // More code...
}
Similar to runBlockingTest, runBlocking is used here because refreshTasks is a suspend function.
runBlocking vs. runBlockingTest
Both runBlocking and runBlockingTest block the current thread and wait until any associated coroutines launched in the lambda complete.
In addition, runBlockingTest has the following behaviors meant for testing:
- It skips
delay, so your tests run faster. - It adds testing related assertions to the end of the coroutine. These assertions fail if you launch a coroutine and it continues running after the end of the
runBlockinglambda (which is a possible coroutine leak) or if you have an uncaught exception. - It gives you timing control over the coroutine execution.
So why use runBlocking in your test doubles, like FakeTestRepository? Sometimes you will need a coroutine for a test double, in which case you do need to block the current thread. This is, so that when your test doubles are used in a test case, the thread blocks and allows the coroutine to finish before the test does. Test doubles, though, aren't actually defining a test case, so they don't need and shouldn't use all of the test specific features of runBlockingTest.
In summary:
- Tests require deterministic behavior so they aren't flaky.
- "Normal" coroutines are non-deterministic because they run code asynchronously.
kotlinx-coroutines-testis the gradle dependency forrunBlockingTest.- Writing test classes, meaning classes with
@Testfunctions, userunBlockingTestto get deterministic behavior. - Writing test doubles, use
runBlocking.
4. Task: Coroutines and ViewModels
In this step you'll learn how to test view models that use coroutines.
All coroutines require a CoroutineScope. Coroutine scopes control the lifetimes of coroutines. When you cancel a scope (or technically, the coroutine's Job, which you can learn more about here), all of the coroutines running in the scope are cancelled.
Since you might start long running work from a view model, you'll often find yourself creating and running coroutines inside view models. Normally, you'd need to create and configure a new CoroutineScope manually for each view model to run any coroutines. This is a lot of boilerplate code. To avoid this, lifecycle-viewmodel-ktx provides an extension property called viewModelScope.
viewModelScope is a CoroutineScope associated with each view model. viewModelScope is configured for use in that particular ViewModel. What this means specifically is that:
- The
viewModelScopeis tied to the view model such that when the view model is cleaned up (i.e.onClearedis called), the scope is cancelled. This ensures that when your view model goes away, so does all the coroutine work associated with it. This avoids wasted work and memory leaks. - The
viewModelScopeuses theDispatchers.Maincoroutine dispatcher. ACoroutineDispatchercontrols how a coroutine runs, including what thread the coroutine code runs on.Dispatcher.Mainputs the coroutine on the UI or main thread. This makes sense as a default forViewModelcoroutines, because often, view models manipulate the UI.
This works well in production code. But for local tests (tests that run on your local machine in the test source set), the usage of Dispatcher.Main causes an issue: Dispatchers.Main uses Android's Looper.getMainLooper(). The main looper is the execution loop for a real application. The main looper is not available (by default) in local tests, because you're not running the full application.
To address this, use the method setMain() (from kotlinx.coroutines.test) to modify Dispatchers.Main to use TestCoroutineDispatcher. TestCoroutineDispatcher is a dispatcher specifically meant for testing.
Next, you will write tests for view model code that uses viewModelScope.
Step 1: Observe Dispatcher.Main causing an error
Add a test which checks that when a task is completed, the snackbar shows the correct completion message.
- Open test > tasks > TasksViewModelTest.

- Add this new test method:
TasksViewModelTest.kt
@Test
fun completeTask_dataAndSnackbarUpdated() {
    // Create an active task and add it to the repository.
    val task = Task("Title", "Description")
    tasksRepository.addTasks(task)

    // Mark the task as complete task.
    tasksViewModel.completeTask(task, true)

    // Verify the task is completed.
   assertThat(tasksRepository.tasksServiceData[task.id]?.isCompleted, `is`(true))

    // Assert that the snackbar has been updated with the correct text.
    val snackbarText: Event<Int> =  tasksViewModel.snackbarText.getOrAwaitValue()
    assertThat(snackbarText.getContentIfNotHandled(), `is`(R.string.task_marked_complete))
}
- Run this test. Observe that it fails with the following error:
"Exception in thread "main" java.lang.IllegalStateException: Module with the Main dispatcher had failed to initialize. For tests Dispatchers.setMain from kotlinx-coroutines-test module can be used."
This error states that the Dispatcher.Main has failed to initialize. The underlying reason (not explained in the error) is the lack of Android's Looper.getMainLooper(). The error message does tell you to use Dispatcher.setMain from kotlinx-coroutines-test. Go ahead and do just that!
Step 2: Replace Dispatcher.Main with TestCoroutineDispatcher
TestCoroutineDispatcher is a coroutine dispatcher meant for testing. It executes tasks immediately and gives you control over the timing of coroutine execution in tests, such as allowing you to pause and restart coroutine execution.
- In TasksViewModelTest, create a
TestCoroutineDispatcheras avalcalledtestDispatcher.
Use testDispatcher instead of the default Main dispatcher.
- Create a
@Beforemethod that callsDispatchers.setMain(testDispatcher)before every test. - Create an
@Aftermethod that cleans everything up after running each test by callingDispatchers.resetMain()and thentestDispatcher.cleanupTestCoroutines().
Here's what this code looks like:
TasksViewModelTest.kt
@ExperimentalCoroutinesApi
val testDispatcher: TestCoroutineDispatcher = TestCoroutineDispatcher()

@ExperimentalCoroutinesApi
@Before
fun setupDispatcher() {
    Dispatchers.setMain(testDispatcher)
}

@ExperimentalCoroutinesApi
@After
fun tearDownDispatcher() {
    Dispatchers.resetMain()
    testDispatcher.cleanupTestCoroutines()
}
- Run your test again. It now passes!
Step 3: Add MainCoroutineRule
If you're using coroutines in your app, any local test that involves calling code in a view model is highly likely to call code which uses viewModelScope. Instead of copying and pasting the code to set up and tear down the TestCoroutineDispatcher into each test class, you can make a custom JUnit rule to avoid this boilerplate code.
JUnit rules are classes where you can define generic testing code that can execute before, after, or during a test–-it's a way to take your code that would have been in @Before and @After, and put it in a class where it can be reused.
Make a JUnit rule now.
- Create a new class called MainCoroutineRule.kt in the root folder of the test source set:
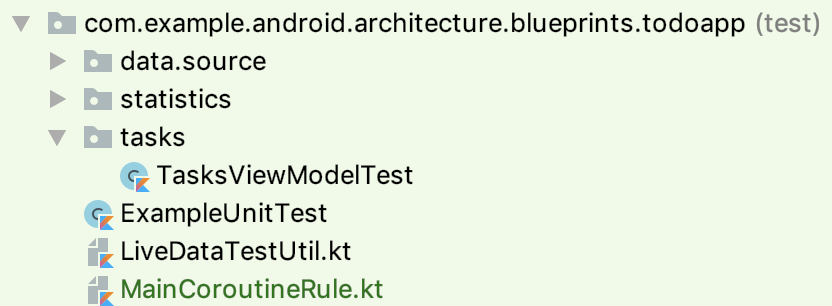
- Copy the following code to
MainCoroutineRule.kt:
MainCoroutineRule.kt
@ExperimentalCoroutinesApi
class MainCoroutineRule(val dispatcher: TestCoroutineDispatcher = TestCoroutineDispatcher()):
   TestWatcher(),
   TestCoroutineScope by TestCoroutineScope(dispatcher) {
   override fun starting(description: Description?) {
       super.starting(description)
       Dispatchers.setMain(dispatcher)
   }

   override fun finished(description: Description?) {
       super.finished(description)
       cleanupTestCoroutines()
       Dispatchers.resetMain()
   }
}
Some things to notice:
MainCoroutineRuleextendsTestWatcher, which implements theTestRuleinterface. This is what makesMainCoroutineRulea JUnit rule.- The
startingandfinishedmethods match what you wrote in your@Beforeand@Afterfunctions. They also run before and after each test. MainCoroutineRulealso implementsTestCoroutineScope, to which you pass in theTestCoroutineDispatcher. This givesMainCoroutineRulethe ability to control coroutine timing (using theTestCoroutineDispatcheryou pass in). You'll see an example of this in the next step.
Step 4: Use your new Junit rule in a test
- Open TasksViewModelTest.
- Replace
testDispatcherand your@Beforeand@Aftercode with the newMainCoroutineRuleJUnit rule:
TasksViewModelTest.kt
// REPLACE@ExperimentalCoroutinesApi
val testDispatcher: TestCoroutineDispatcher = TestCoroutineDispatcher()

@ExperimentalCoroutinesApi
@Before
fun setupDispatcher() {
    Dispatchers.setMain(testDispatcher)
}

@ExperimentalCoroutinesApi
@After
fun tearDownDispatcher() {
    Dispatchers.resetMain()
    testDispatcher.cleanupTestCoroutines()
}
// WITH
@ExperimentalCoroutinesApi
@get:Rule
var mainCoroutineRule = MainCoroutineRule()
Notice: To use the JUnit rule, you instantiate the rule and annotate it with @get:Rule.
- Run
completeTask_dataAndSnackbarUpdated, and it should work exactly the same!
Step 5: Use MainCoroutineRule for repository testing
In the previous codelab, you learned about dependency injection. This allows you to replace the production versions of classes with test versions of classes in your tests. Specifically, you used constructor dependency injection. Here's an example from DefaultTasksRepository:
DefaultTasksRepository.kt
class DefaultTasksRepository(
    private val tasksRemoteDataSource: TasksDataSource,
    private val tasksLocalDataSource: TasksDataSource,
    private val ioDispatcher: CoroutineDispatcher = Dispatchers.IO) : TasksRepository { ... }
The above code injects a local and remote data source, as well as a CoroutineDispatcher. Because the dispatcher is injected, you can use TestCoroutineDispatcher in your tests. Injecting the CoroutineDispatcher, as opposed to hard coding the dispatcher, is a good habit when using coroutines.
Let's use the injected TestCoroutineDispatcher in your tests.
- Open test > data > source > DefaultTasksRepositoryTest.kt

- Add the
MainCoroutineRuleinside theDefaultTasksRepositoryTestclass:
DefaultTasksRepositoryTest.kt
// Set the main coroutines dispatcher for unit testing.
@ExperimentalCoroutinesApi
@get:Rule
var mainCoroutineRule = MainCoroutineRule()
- Use
Dispatcher.Main, instead ofDispatcher.Unconfinedwhen defining your repository under test. Similar toTestCoroutineDispatcher,Dispatchers.Unconfinedexecutes tasks immediately. But, it doesn't include all of the other testing benefits ofTestCoroutineDispatcher, such as being able to pause execution:
DefaultTasksRepositoryTest.kt
@Before
fun createRepository() {
    tasksRemoteDataSource = FakeDataSource(remoteTasks.toMutableList())
    tasksLocalDataSource = FakeDataSource(localTasks.toMutableList())
    // Get a reference to the class under test.
    tasksRepository = DefaultTasksRepository(
    // HERE Swap Dispatcher.Unconfined
        tasksRemoteDataSource, tasksLocalDataSource, Dispatchers.Main
    )
}
In the above code, remember that MainCoroutineRule swaps the Dispatcher.Main for a TestCoroutineDispatcher.
Generally, only create one TestCoroutineDispatcher to run a test. Whenever you call runBlockingTest, it will create a new TestCoroutineDispatcher if you don't specify one. MainCoroutineRule includes a TestCoroutineDispatcher. So, to ensure that you don't accidentally create multiple instances of TestCoroutineDispatcher, use the mainCoroutineRule.runBlockingTest instead of just runBlockingTest.
- Replace
runBlockingTestwithmainCoroutineRule.runBlockingTest:
DefaultTasksRepositoryTest.kt
// REPLACE
fun getTasks_requestsAllTasksFromRemoteDataSource() = runBlockingTest {

// WITH
fun getTasks_requestsAllTasksFromRemoteDataSource() = mainCoroutineRule.runBlockingTest {
- Run your
DefaultTasksRepositoryTestclass and confirm everything works as before!
Awesome job! Now you're using TestCoroutineDispatcher in your code, which is a preferable dispatcher for testing. Next, you'll see how to use an additional feature of the TestCoroutineDispatcher, controlling coroutine execution timing.
5. Task: Testing Coroutine Timing
In this step, you'll control how a coroutine executes in a test using TestCouroutineDispatcher's pauseDispatcher and resumeDispatcher methods. Using these methods, you'll write a test for the loading indicator of your StatisticsViewModel.
As a reminder, the StatisticViewModel holds all the data and does all of the calculations for the Statistics screen:
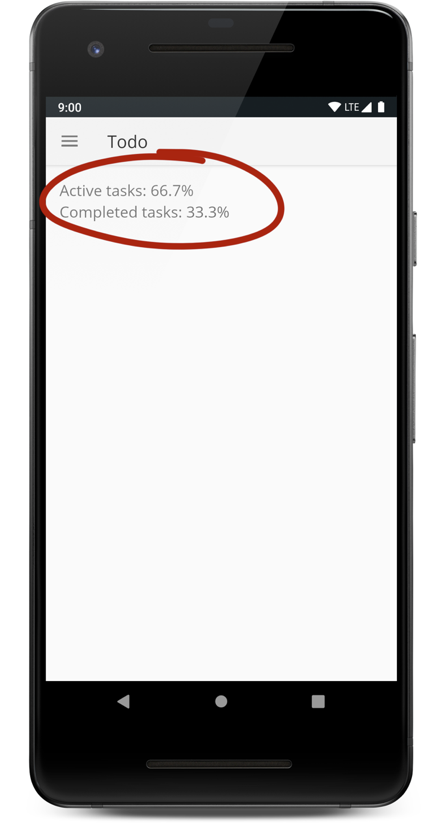
Step 1: Prepare StatisticsViewModel for testing
First, you need to make sure you can inject your fake repository into your view model, following the process described in the previous codelab. As this is review and unrelated to coroutine timing, feel free to copy/paste:
- Open
StatisticsViewModel. - Change the constructor of
StatisticsViewModelto take inTasksRepositoryinstead of constructing it inside the class, so that you can inject a fake repository for testing:
StatisticsViewModel.kt
// REPLACE
class StatisticsViewModel(application: Application) : AndroidViewModel(application) {

    private val tasksRepository = (application as TodoApplication).taskRepository

    // Rest of class
}

// WITH

class StatisticsViewModel(
    private val tasksRepository: TasksRepository
) : ViewModel() {
    // Rest of class
}
- At the bottom of the
StatisticsViewModelfile, outside the class, add aTasksViewModelFactorythat takes in a plainTasksRepository:
StatisticsViewModel.kt
@Suppress("UNCHECKED_CAST")
class StatisticsViewModelFactory (
    private val tasksRepository: TasksRepository
) : ViewModelProvider.NewInstanceFactory() {
    override fun <T : ViewModel> create(modelClass: Class<T>) =
        (StatisticsViewModel(tasksRepository) as T)
}
- Update
StatisticsFragmentto use the factory.
StatisticsFragment.kt
// REPLACE
private val viewModel by viewModels<TasksViewModel>()

// WITH

private val viewModel by viewModels<StatisticsViewModel> {
    StatisticsViewModelFactory(
        (requireContext().applicationContext as TodoApplication).taskRepository
    )
}
- Run your application code and navigate to the StatisticsFragment to make sure your statistics screen works just like before.
Step 2: Create StatisticsViewModelTest
Now you are ready to create a test that pauses in the middle of coroutine execution for StatisticsViewModelTest.kt.
- Open
StatisticsViewModel.kt. - Right-click on the
StatisticsViewModelclass name and select Generate, then Test. - Follow the prompts to create
StatisticsViewModelTestin the test source set.
Follow the steps below to set up your StatisticsViewModel test as described in the previous lessons. This is a good review of what goes into a view model test:
- Add the
InstantTaskExecutorRule. This will swap the background executor used by Architecture Components (which ViewModels are part of) for an executor which will execute each task synchronously. This ensures your tests are deterministic. - Add the
MainCoroutineRulesince you are testing coroutines and view models. - Create fields for the subject under test (
StatisticsViewModel) and test doubles for its dependencies (FakeTestRepository). - Create a
@Beforemethod that sets up the subject under test and dependencies.
Your test should look like this:
StatisticsViewModelTest.kt
@ExperimentalCoroutinesApi
class StatisticsViewModelTest {

    // Executes each task synchronously using Architecture Components.
    @get:Rule
    var instantExecutorRule = InstantTaskExecutorRule()

    // Set the main coroutines dispatcher for unit testing.
    @ExperimentalCoroutinesApi
    @get:Rule
    var mainCoroutineRule = MainCoroutineRule()

    // Subject under test
    private lateinit var statisticsViewModel: StatisticsViewModel

    // Use a fake repository to be injected into the view model.
    private lateinit var tasksRepository: FakeTestRepository

    @Before
    fun setupStatisticsViewModel() {
        // Initialise the repository with no tasks.
        tasksRepository = FakeTestRepository()

        statisticsViewModel = StatisticsViewModel(tasksRepository)
    }
}
Step 3: Create a loading indicator test
When the task statistics load, the app displays a loading indicator that disappears as soon as the data is loaded and the statistics calculations are done. You will write a test that makes sure the loading indicator is shown while the statistics are loading, and then disappears once the statistics are loaded.
The refresh() method in StatisticsViewModel controls when the loading indicator is shown and disappears:
StatisticsViewModel.kt
fun refresh() {
   _dataLoading.value = true
       viewModelScope.launch {
           tasksRepository.refreshTasks()
           _dataLoading.value = false
       }
}
Notice how _dataLoading is set to true, and then later to false once the coroutine finishes refreshing the tasks. You need to check that this code properly updates the loading indicator.
A first attempt to write a test might look like this:
StatisticsViewModelTest.kt
@Test
fun loadTasks_loading() {

    // Load the task in the view model.
    statisticsViewModel.refresh()

    // Then progress indicator is shown.
    assertThat(statisticsViewModel.dataLoading.getOrAwaitValue(), `is`(true))

    // Then progress indicator is hidden.
    assertThat(statisticsViewModel.dataLoading.getOrAwaitValue(), `is`(false))
}
- Copy the code above
- Add:
importorg.hamcrest.CoreMatchers.is`` - Run the test. This test fails.
The test above doesn't really make sense because it's testing that dataLoading is both true and false at the same time.
Looking at the error messages, the test fails because of the first assert statement.
The TestCoroutineDispatcher executes tasks immediately and completely, which means that before the assert statements are executed, the statisticsViewModel.refresh() method has completely finished.
Often, you do want this immediate execution, so that your tests run fast. But in this case, you're trying to check the state of the loading indicator in the middle of when refresh is executing, as shown in the annotated code below:
StatisticsViewModel.kt
fun refresh() {
   _dataLoading.value = true
   // YOU WANT TO CHECK HERE...
   viewModelScope.launch {
       tasksRepository.refreshTasks()
       _dataLoading.value = false
       // ...AND CHECK HERE.
   }
}
In situations like these you can use TestCouroutineDispatcher's pauseDispatcher and resumeDispatcher. The mainCoroutineRule. pauseDispatcher() is shorthand for pausing the TestCoroutineDispatcher. When the dispatcher is paused any new coroutines are added to a queue rather than being executed immediately. This means that code execution inside refresh will be paused just before the coroutine is launched:
StatisticsViewModel.kt
fun refresh() {
   _dataLoading.value = true
   // PAUSES EXECUTION HERE
   viewModelScope.launch {
       tasksRepository.refreshTasks()
       _dataLoading.value = false
   }
}
When you call mainCoroutineRule.resumeDispatcher(), then all the code in the coroutine will be executed.
- Update the test to use
pauseDispatcherandresumeDispatcher, so that you pause before executing the coroutine, check that the loading indicator is shown, then resume and check that the loading indicator is hidden:
StatisticsViewModelTest.kt
@Test
fun loadTasks_loading() {
    // Pause dispatcher so you can verify initial values.
    mainCoroutineRule.pauseDispatcher()

    // Load the task in the view model.
    statisticsViewModel.refresh()

    // Then assert that the progress indicator is shown.
    assertThat(statisticsViewModel.dataLoading.getOrAwaitValue(), `is`(true))

    // Execute pending coroutines actions.
    mainCoroutineRule.resumeDispatcher()

    // Then assert that the progress indicator is hidden.
    assertThat(statisticsViewModel.dataLoading.getOrAwaitValue(), `is`(false))
}
- Run the test and see that it passes now.
Excellent–-you've learned how to write coroutine tests that use the TestCoroutineDispatcher's ability to pause and resume coroutine execution. This gives you more control when writing tests that require precise timing.
6. Task: Testing Error Handling
In testing, it's important to test both when code executes as expected (sometimes called the happy path), and also what your app does when it encounters errors and edge cases. In this step, you'll add a test to your StatisticsViewModelTest that confirms the correct behavior when the list of tasks can't be loaded (for example, if the network is down).
Step 1: Add an error flag to test double
First, you need to artificially cause the error situation. One way to do this is to update your test doubles so that you can "set" them to an error state, using a flag. If the flag is false, the test double functions as normal. But if the flag is set to true, then the test double returns a realistic error; for example, it might return a failure to load data error. Update FakeTestRepository to include an error flag, which, when set to true, causes the code to return a realistic error.
- Open test > data > source > FakeTestRepository.
- Add a boolean flag called
shouldReturnErrorand set it initially tofalse, which means that by default, an error is not returned.
FakeTestRepository.kt
private var shouldReturnError = false
- Create a
setReturnErrormethod that changes whether or not the repository should return errors:
FakeTestRepository.kt
fun setReturnError(value: Boolean) {
    shouldReturnError = value
}
- Wrap
getTaskandgetTasksinifstatements, so that ifshouldReturnErroristrue, the method returnsResult.Error:
FakeTestRepository.kt
// Avoid import conflicts:
import com.example.android.architecture.blueprints.todoapp.data.Result
import com.example.android.architecture.blueprints.todoapp.data.Result.Error
import com.example.android.architecture.blueprints.todoapp.data.Result.Success


...

override suspend fun getTask(taskId: String, forceUpdate: Boolean): Result<Task> {
    if (shouldReturnError) {
        return Result.Error(Exception("Test exception"))
    }
    tasksServiceData[taskId]?.let {
        return Success(it)
    }
    return Error(Exception("Could not find task"))
}

override suspend fun getTasks(forceUpdate: Boolean): Result<List<Task>> {
    if (shouldReturnError) {
        return Error(Exception("Test exception"))
    }
    return Success(tasksServiceData.values.toList())
}
Step 2: Write a test for a returned Error
Now you're ready to write a test for what happens in your StatisticsViewModel when the repository returns an error.
In StatisticsViewModel, there are two LiveData booleans (error and empty):
StatisticsViewModel.kt
class StatisticsViewModel(
    private val tasksRepository: TasksRepository
) : ViewModel() {

    private val tasks: LiveData<Result<List<Task>>> = tasksRepository.observeTasks()

    // Other variables...

    val error: LiveData<Boolean> = tasks.map { it is Error }
    val empty: LiveData<Boolean> = tasks.map { (it as? Success)?.data.isNullOrEmpty() }

    // Rest of the code...
}
These represent whether or not tasks loaded properly. If there is an error, error and empty should both be true.
- Open StatisticsViewModelTest.
- Create a new test called
loadStatisticsWhenTasksAreUnavailable_callErrorToDisplay - Call
setReturnError()ontasksRepository, setting it totrue. - Check that
statisticsViewModel.emptyandstatisticsViewModel.errorare both true.
The full code for this test is below:
StatisticsViewModelTest.kt
@Test
fun loadStatisticsWhenTasksAreUnavailable_callErrorToDisplay() {
    // Make the repository return errors.
    tasksRepository.setReturnError(true)
    statisticsViewModel.refresh()

    // Then empty and error are true (which triggers an error message to be shown).
    assertThat(statisticsViewModel.empty.getOrAwaitValue(), `is`(true))
    assertThat(statisticsViewModel.error.getOrAwaitValue(), `is`(true))
}
In summary, the general strategy to test error handling is to modify your test doubles, so that you can "set" them to an error state (or various error states if you have multiple). Then you can write tests for these error states. Good work!
7. Task: Testing Room
In this step, you'll learn how to write tests for your Room database. You'll first write tests for your Room DAO (database access object) and then for the local data source class.
Step 1: Add the architecture component testing library to gradle
- Add the architecture component testing library to your instrumented tests, using
androidTestImplementation:
app/build.gradle
androidTestImplementation "androidx.arch.core:core-testing:$archTestingVersion"
Step 2: Create the TasksDaoTest class
Room DAOs are actually interfaces that Room turns into classes via the magic of annotation processing. It usually doesn't make sense to generate a test class for an interface, so there is no keyboard shortcut and you'll need to create the test class manually.
Create a TasksDaoTest class:
- In your project pane, navigate to androidTest > data > source.
- Right-click on the source package and a create a new package called local.
- In local, create a Kotlin file and class called TasksDaoTest.kt.

Step 3: Set up the TasksDaoTest class
- Copy the following code to start your
TasksDaoTestclass:
TasksDaoTest.kt
@ExperimentalCoroutinesApi
@RunWith(AndroidJUnit4::class)
@SmallTest
class TasksDaoTest {

    // Executes each task synchronously using Architecture Components.
    @get:Rule
    var instantExecutorRule = InstantTaskExecutorRule()

}
Notice the three annotations:
@ExperimentalCoroutinesApi—you'll be usingrunBlockingTest, which is part ofkotlinx-coroutines-test, thus you need this annotation.@SmallTest— Marks the test as a "small run-time" integration test (versus@MediumTestintegration tests and@LargeTestend-to-end tests). This helps you group and choose which size test to run. DAO tests are considered unit tests since you are only testing the DAO, thus you can call them small tests.@RunWith(AndroidJUnit4::class)—Used in any class using AndroidX Test. This was covered in the first codelab.
To get access to an instance of your DAO, you need to build an instance of your database. To do that in your tests, do the following:
- In
TasksDaoTest, create alateinitfield for your database:
TasksDaoTest.kt
private lateinit var database: ToDoDatabase
- Make a
@Beforemethod for initializing your database.
Specifically, when initializing a database for testing:
- Create an in-memory database using
Room.inMemoryDatabaseBuilder. Normal databases are meant to persist. By comparison, an in-memory database will be completely deleted once the process that created it is killed, since it's never actually stored on disk. Always use and in-memory database for your tests. - Use the AndroidX Test libraries'
ApplicationProvider.getApplicationContext()method to get the application context.
TasksDaoTest.kt
@Before
fun initDb() {
    // Using an in-memory database so that the information stored here disappears when the
    // process is killed.
    database = Room.inMemoryDatabaseBuilder(
        getApplicationContext(),
        ToDoDatabase::class.java
    ).build()
}
- Make an
@Aftermethod for cleaning up your database usingdatabase.close().
TasksDaoTest.kt
@After
fun closeDb() = database.close()
Once done, your code should look like:
TasksDaoTest.kt
@ExperimentalCoroutinesApi
@RunWith(AndroidJUnit4::class)
@SmallTest
class TasksDaoTest {

    // Executes each task synchronously using Architecture Components.
    @get:Rule
    var instantExecutorRule = InstantTaskExecutorRule()


    private lateinit var database: ToDoDatabase

    @Before
    fun initDb() {
        // Using an in-memory database so that the information stored here disappears when the
        // process is killed.
        database = Room.inMemoryDatabaseBuilder(
            getApplicationContext(),
            ToDoDatabase::class.java
        ).allowMainThreadQueries().build()
    }

    @After
    fun closeDb() = database.close()

}
Step 4: Write your first DAO test
Your first DAO test will insert a task, and then get the task by its id.
- Still in TasksDaoTest, copy the following test:
TasksDaoTest.kt
@Test
fun insertTaskAndGetById() = runBlockingTest {
    // GIVEN - Insert a task.
    val task = Task("title", "description")
    database.taskDao().insertTask(task)

    // WHEN - Get the task by id from the database.
    val loaded = database.taskDao().getTaskById(task.id)

    // THEN - The loaded data contains the expected values.
    assertThat<Task>(loaded as Task, notNullValue())
    assertThat(loaded.id, `is`(task.id))
    assertThat(loaded.title, `is`(task.title))
    assertThat(loaded.description, `is`(task.description))
    assertThat(loaded.isCompleted, `is`(task.isCompleted))
}
This test does the following:
- Creates a task and inserts it into the database.
- Retrieves the task using its id.
- Asserts that that task was retrieved, and that all its properties match the inserted task.
Notice:
- You run the test using
runBlockingTestbecause bothinsertTaskandgetTaskByIdare suspend functions. - You use the DAO as normal, accessing it from your database instance.
If needed, here are the imports.
TasksDaoTest.kt
import androidx.arch.core.executor.testing.InstantTaskExecutorRule
import androidx.room.Room
import androidx.test.core.app.ApplicationProvider.getApplicationContext
import androidx.test.ext.junit.runners.AndroidJUnit4
import androidx.test.filters.SmallTest
import com.example.android.architecture.blueprints.todoapp.data.Task
import kotlinx.coroutines.ExperimentalCoroutinesApi
import kotlinx.coroutines.test.runBlockingTest
import org.hamcrest.CoreMatchers.`is`
import org.hamcrest.CoreMatchers.notNullValue
import org.hamcrest.MatcherAssert.assertThat
import org.junit.After
import org.junit.Before
import org.junit.Rule
import org.junit.Test
import org.junit.runner.RunWith
- Run your test and confirm that it passes.
Step 5: Try it yourself!
Now, try writing a DAO test yourself. Write a test that inserts a task, updates it, and then checks that it has the updated values. Below is starter code for updateTaskAndGetById.
- Copy this test starter code:
TasksDaoTest.kt
@Test
fun updateTaskAndGetById() {
    // 1. Insert a task into the DAO.

    // 2. Update the task by creating a new task with the same ID but different attributes.

    // 3. Check that when you get the task by its ID, it has the updated values.
}
- Finish the code, referring to the
insertTaskAndGetByIdtest you just added. - Run your test and confirm it passes!
The completed test is in the end_codelab_3 branch of the repository here, so that you can compare.
Step 6: Create an integration test for TasksLocalDataSource
You just created unit tests for your TasksDao. Next, you will create integration tests for your TasksLocalDataSource. TasksLocalDatasource is a class that takes the information returned by the DAO and converts it to a format that is expected by your repository class (for example, it wraps returned values with Success or Error states). You'll be writing an integration test, because you'll test both the real TasksLocalDatasource code and the real DAO code.
The steps for creating tests for your TasksLocalDataSourceTest are very similar to creating the DAO tests.
- Open your app's
TasksLocalDataSourceclass. - Right-click on the
TasksLocalDataSourceclass name and select Generate, then Test. - Follow the prompts to create
TasksLocalDataSourceTestin the androidTest source set. - Copy the following code:
TasksLocalDataSourceTest.kt
@ExperimentalCoroutinesApi
@RunWith(AndroidJUnit4::class)
@MediumTest
class TasksLocalDataSourceTest {

    // Executes each task synchronously using Architecture Components.
    @get:Rule
    var instantExecutorRule = InstantTaskExecutorRule()

}
Notice that the only real difference between this and the DAO testing code is that the TasksLocalDataSource can be considered a medium "integration" test (as seen by the @MediumTest annotation), because the TasksLocalDataSourceTest will test both the code in TasksLocalDataSource and how it integrates with the DAO code.
- In
TasksLocalDataSourceTest, create alateinitfield for the two components you're testing–-TasksLocalDataSourceand yourdatabase:
TasksLocalDataSourceTest.kt
private lateinit var localDataSource: TasksLocalDataSource
private lateinit var database: ToDoDatabase
- Make a
@Beforemethod for initializing your database and datasource. - Create your database in the same way you did for your DAO test, using the
inMemoryDatabaseBuilder, and theApplicationProvider.getApplicationContext()method. - Add
allowMainThreadQueries. Normally, Room doesn't allow database queries to be run on the main thread. CallingallowMainThreadQueriesturns off this check. Don't do this in production code! - Instantiate the
TasksLocalDataSource, using your database andDispatchers.Main. This will run your queries on the main thread (this is allowed because ofallowMainThreadQueries).
TasksLocalDataSourceTest.kt
@Before
fun setup() {
    // Using an in-memory database for testing, because it doesn't survive killing the process.
    database = Room.inMemoryDatabaseBuilder(
        ApplicationProvider.getApplicationContext(),
        ToDoDatabase::class.java
    )
        .allowMainThreadQueries()
        .build()

    localDataSource =
        TasksLocalDataSource(
            database.taskDao(),
            Dispatchers.Main
        )
}
- Make an
@Aftermethod for cleaning up your database usingdatabase.close.
The complete code should look like this:
TasksLocalDataSourceTest.kt
@ExperimentalCoroutinesApi
@RunWith(AndroidJUnit4::class)
@MediumTest
class TasksLocalDataSourceTest {

    private lateinit var localDataSource: TasksLocalDataSource
    private lateinit var database: ToDoDatabase


    // Executes each task synchronously using Architecture Components.
    @get:Rule
    var instantExecutorRule = InstantTaskExecutorRule()

    @Before
    fun setup() {
        // Using an in-memory database for testing, because it doesn't survive killing the process.
        database = Room.inMemoryDatabaseBuilder(
            ApplicationProvider.getApplicationContext(),
            ToDoDatabase::class.java
        )
            .allowMainThreadQueries()
            .build()

        localDataSource =
            TasksLocalDataSource(
                database.taskDao(),
                Dispatchers.Main
            )
    }

    @After
    fun cleanUp() {
        database.close()
    }

}
Step 7: Write your first TasksLocalDataSourceTest
Just like with the DAO tests, copy and run an example test first.
- Copy these import statements:
import com.example.android.architecture.blueprints.todoapp.data.source.TasksDataSource
import com.example.android.architecture.blueprints.todoapp.data.Result.Success
import com.example.android.architecture.blueprints.todoapp.data.Task
import com.example.android.architecture.blueprints.todoapp.data.succeeded
import kotlinx.coroutines.runBlocking
import org.hamcrest.CoreMatchers.`is`
import org.junit.Assert.assertThat
import org.junit.Test
- Copy this test:
TasksLocalDataSourceTest.kt
// runBlocking is used here because of https://github.com/Kotlin/kotlinx.coroutines/issues/1204
// TODO: Replace with runBlockingTest once issue is resolved
@Test
fun saveTask_retrievesTask() = runBlocking {
    // GIVEN - A new task saved in the database.
    val newTask = Task("title", "description", false)
    localDataSource.saveTask(newTask)

    // WHEN  - Task retrieved by ID.
    val result = localDataSource.getTask(newTask.id)

    // THEN - Same task is returned.
    assertThat(result.succeeded, `is`(true))
    result as Success
    assertThat(result.data.title, `is`("title"))
    assertThat(result.data.description, `is`("description"))
    assertThat(result.data.isCompleted, `is`(false))
}
This is very similar to your DAO test. Like the DAO test, this test:
- Creates a task and inserts it into the database.
- Retrieves the task using its id.
- Asserts that that task was retrieved, and that all its properties match the inserted task.
The only real difference from the analogous DAO test is that the local data source returns an instance of the sealed Result class, which is the format the repository expects. For example, this line here casts the result as a Success:
TasksLocalDataSourceTest.kt
assertThat(result.succeeded, `is`(true))
result as Success
- Run your tests!
Step 8: Write your own local data source test
Now it's your turn.
- Copy the following code:
TasksLocalDataSourceTest.kt
@Test
fun completeTask_retrievedTaskIsComplete(){
    // 1. Save a new active task in the local data source.

    // 2. Mark it as complete.

    // 3. Check that the task can be retrieved from the local data source and is complete.

}
- Finish the code, referring to the
saveTask_retrievesTasktest you added previously, as needed. - Run your test and confirm it passes!
The completed test is in the end_codelab_3 branch of the repository here, so that you can compare.
8. Task: End-to-End Testing with Data Binding
Up until now in this series of codelabs, you've written unit tests and integration tests. Integration tests like TaskDetailFragmentTest focus solely on testing the functionality of a single fragment, without moving to any other fragments or even creating the activity. Similarly the TaskLocalDataSourceTest tests a few classes working together in the data layer, but doesn't actually check the UI.
End-to-end tests (E2E) test a combination of features working together. They test large portions of the app and simulate real usage. By and large, these tests are instrumented tests (in the androidTest source set).
Here are a few differences between end-to-end tests and integration tests relating to the Todo app. E2E tests:
- Start the app from the first screen.
- Create an actual activity and repository.
- Test multiple fragments working together.
Writing end-to-end tests gets complicated real fast, and so there are a lot of tools and libraries to make it easier. Espresso is an Android UI testing library commonly used to write end-to-end tests. You learned the basics of using Espresso in the previous codelab.
In this step, you'll be writing a true end-to-end test. You'll use Espresso idling resources to properly handle writing E2E tests that involve both long running operations and the data binding library.
You will first add a test that edits a saved task.
Step 1: Turn off animations
For Espresso UI testing, it's a best practice to turn animations off before implementing anything else.
- On your testing device (physical or emulated), go to Settings > Developer options.
- Disable these three settings: Window animation scale, Transition animation scale, and Animator duration scale.
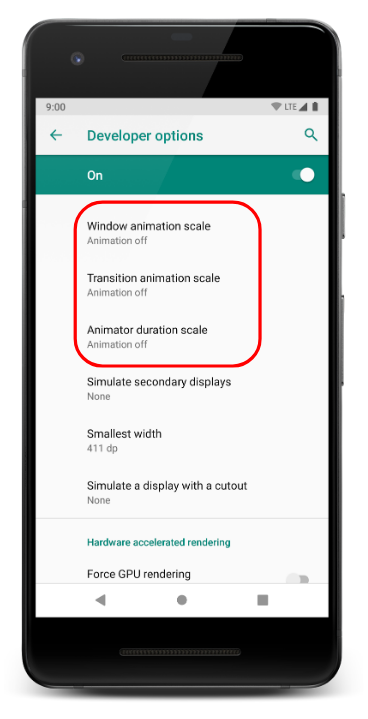
Step 2: Create TasksActivityTest
- Create a file and class called TasksActivityTest.kt in
androidTest:

- Annotate the class with
@RunWith(AndroidJUnit4::class)because you're using AndroidX test code. - Annotate the class with
@LargeTest, which signifies these are end-to-end tests, testing a large portion of the code.
End to end tests mimic how the complete app runs and simulate real usage. Therefore you'll let the ServiceLocator create the repository, as opposed to instantiating a repository or repository test double yourself:
- Create a property called repository which is a
TasksRepository. - Create a
@Beforemethod and initialize the repository using theServiceLocator'sprovideTasksRepositorymethod; usegetApplicationContextto get the application context. - In the
@Beforemethod, delete all the tasks in the repository, to ensure it's completely cleared out before each and every test run. - Create an
@Aftermethod that calls theServiceLocator'sresetRepository()method.
When you're done, your code should look like:
TasksActivityTest.kt
@RunWith(AndroidJUnit4::class)
@LargeTest
class TasksActivityTest {

    private lateinit var repository: TasksRepository

    @Before
    fun init() {
        repository = ServiceLocator.provideTasksRepository(getApplicationContext())
        runBlocking {
            repository.deleteAllTasks()
        }
    }

    @After
    fun reset() {
        ServiceLocator.resetRepository()
    }
}
Step 3: Write an End-to-End Espresso Test
Time to write an end-to-end test for editing a saved task.
- Open
TasksActivityTest. - Inside the class, add the following skeleton code:
TasksActivityTest.kt
@Test
fun editTask() = runBlocking {
    // Set initial state.
    repository.saveTask(Task("TITLE1", "DESCRIPTION"))

    // Start up Tasks screen.
    val activityScenario = ActivityScenario.launch(TasksActivity::class.java)


    // Espresso code will go here.


    // Make sure the activity is closed before resetting the db:
    activityScenario.close()
}
Notice:
runBlockingis used to wait for all suspend functions to finish before continuing with the execution in the block. Note that we're usingrunBlockinginstead of runBlockingTest because of a bug.ActivityScenariois an AndroidX Testing library class that wraps around an activity and gives you direct control over the activity's lifecycle for testing. It is similar toFragmentScenario.- When using
ActivityScenario, you start the activity usinglaunchand then at the end of the test callclose. - You must set the initial state of the data layer (such as adding tasks to the repository) before calling
ActivityScenario.launch(). - If you are using a database (which you are), you must close the database at the end of the test.
This is the basic setup for any test involving an Activity. Between when you launch the ActivityScenario and close the ActivityScenario you can now write your Espresso code.
- Add the Espresso code as seen below:
TasksActivityTest.kt
@Test
fun editTask() = runBlocking {

    // Set initial state.
    repository.saveTask(Task("TITLE1", "DESCRIPTION"))

    // Start up Tasks screen.
    val activityScenario = ActivityScenario.launch(TasksActivity::class.java)

    // Click on the task on the list and verify that all the data is correct.
    onView(withText("TITLE1")).perform(click())
    onView(withId(R.id.task_detail_title_text)).check(matches(withText("TITLE1")))
    onView(withId(R.id.task_detail_description_text)).check(matches(withText("DESCRIPTION")))
    onView(withId(R.id.task_detail_complete_checkbox)).check(matches(not(isChecked())))

    // Click on the edit button, edit, and save.
    onView(withId(R.id.edit_task_fab)).perform(click())
    onView(withId(R.id.add_task_title_edit_text)).perform(replaceText("NEW TITLE"))
    onView(withId(R.id.add_task_description_edit_text)).perform(replaceText("NEW DESCRIPTION"))
    onView(withId(R.id.save_task_fab)).perform(click())

    // Verify task is displayed on screen in the task list.
    onView(withText("NEW TITLE")).check(matches(isDisplayed()))
    // Verify previous task is not displayed.
    onView(withText("TITLE1")).check(doesNotExist())
    // Make sure the activity is closed before resetting the db.
    activityScenario.close()
}
Here are the imports if you need them:
TasksActivityTest.kt
import androidx.test.core.app.ActivityScenario
import androidx.test.core.app.ApplicationProvider.getApplicationContext
import androidx.test.espresso.Espresso.onView
import androidx.test.espresso.action.ViewActions.click
import androidx.test.espresso.action.ViewActions.replaceText
import androidx.test.espresso.assertion.ViewAssertions.doesNotExist
import androidx.test.espresso.assertion.ViewAssertions.matches
import androidx.test.espresso.matcher.ViewMatchers.*
import androidx.test.ext.junit.runners.AndroidJUnit4
import androidx.test.filters.LargeTest
import com.example.android.architecture.blueprints.todoapp.data.Task
import com.example.android.architecture.blueprints.todoapp.data.source.TasksRepository
import com.example.android.architecture.blueprints.todoapp.tasks.TasksActivity
import kotlinx.coroutines.runBlocking
import org.hamcrest.core.IsNot.not
import org.junit.After
import org.junit.Before
import org.junit.Test
import org.junit.runner.RunWith
- Run this test five times. Notice that the test is flaky, meaning sometimes it will pass, and sometimes it will fail:


The reason that the tests sometimes fail is a timing and test synchronization issue. Espresso synchronizes between UI actions and resulting changes in the UI. For example, let's say you tell Espresso to click a button on your behalf and then check whether certain views are visible:
onView(withId(R.id.next_screen_button)).perform(click()) // Step 1
onView(withId(R.id.screen_description)).check(matches(withText("The next screen"))) // Step 2
Espresso will wait for the new views to display after you perform the click in step 1, before checking whether there's the text "The next screen" in step 2.
There are some situations, though, where Espresso's built-in synchronization mechanism won't know to wait long enough for a view to update. For example, when you need to load some data for a view, Espresso doesn't know when that data load is finished. Espresso also doesn't know when the data binding library is still updating a view.
In situations where Espresso cannot tell whether the app is busy updating the UI or not, you can use the idling resource synchronization mechanism. This is a way to explicitly tell Espresso when the app is idle (meaning Espresso should continue interacting with and checking the app) or not (meaning Espresso should wait).
The general way you use idling resources is like this:
- Create an idling resource or subclass of one as a singleton in your application code.
- In your application code (not your test code), add the logic to track whether the app is idle or not, by changing the state of the
IdlingResourceto idle or not idle. - Call
IdlingRegistry.getInstance().registerbefore each test to register theIdlingResource. By registering theIdlingResource, Espresso will wait until it is idle before moving to the next Espresso statement. - Call
IdlingRegistry.getInstance().unregisterafter each test to unregister theIdlingResource.
Step 4: Add Idling Resource to your Gradle file
- Open your app's build.gradle file and add the Espresso idling resource library:
app/build.gradle
implementation "androidx.test.espresso:espresso-idling-resource:$espressoVersion"
- Also add the following option
returnDefaultValues = truetotestOptions.unitTests.
app/build.gradle
    testOptions.unitTests {
        includeAndroidResources = true
        returnDefaultValues = true
    }
The returnDefaultValues = true is required to keep your unit tests running as you add idling resource code to your application code.
Step 5: Create an Idling Resource Singleton
You will add two idling resources. One to deal with data binding synchronization for your views, and another to deal with the long running operation in your repository.
You'll start with the idling resource related to long running repository operations.
- Create a new file called
EspressoIdlingResource.ktin app > java > main > util:
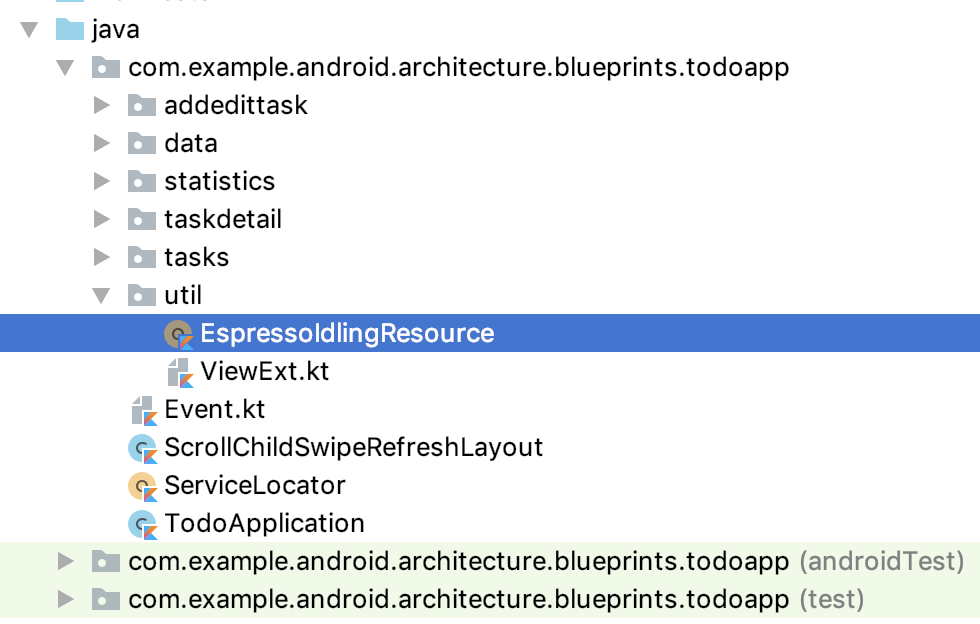
- Copy the following code:
EspressoIdlingResource.kt
object EspressoIdlingResource {

    private const val RESOURCE = "GLOBAL"

    @JvmField
    val countingIdlingResource = CountingIdlingResource(RESOURCE)

    fun increment() {
        countingIdlingResource.increment()
    }

    fun decrement() {
        if (!countingIdlingResource.isIdleNow) {
            countingIdlingResource.decrement()
        }
    }
}
This code creates a singleton idling resource (using Kotlin's object keyword) called countingIdlingResource.
You're using the CountingIdlingResource class here. CountingIdlingResource allows you to increment and decrement a counter such that:
- When the counter is greater than zero, the app is considered working.
- When the counter is zero, the app is considered idle.
Basically, whenever the app starts doing some work, increment the counter. When that work finishes, decrement the counter. Therefore, CountingIdlingResource will only have a "count" of zero if there is no work being done. This is a singleton so that you can access this idling resource anywhere in the app where long-running work might be done.
Step 6: Create wrapEspressoIdlingResource
Here's an example of how you'd use EspressoIdlingResource:
EspressoIdlingResource.increment()
try {
     doSomethingThatTakesALongTime()
} finally {
    EspressoIdlingResource.decrement()
}
You can simplify this by creating an inline function called wrapEspressoIdlingResource.
- In the EspressoIdlingResource file, below the singleton you just created, add the following code for
wrapEspressoIdlingResource:
EspressoIdlingResource.kt
inline fun <T> wrapEspressoIdlingResource(function: () -> T): T {
    // Espresso does not work well with coroutines yet. See
    // https://github.com/Kotlin/kotlinx.coroutines/issues/982
    EspressoIdlingResource.increment() // Set app as busy.
    return try {
        function()
    } finally {
        EspressoIdlingResource.decrement() // Set app as idle.
    }
}
wrapEspressoIdlingResource starts by incrementing the count, run whatever code it's wrapped around, then decrement the count. Here's an example of how you'd use wrapEspressoIdlingResource:
wrapEspressoIdlingResource {
    doWorkThatTakesALongTime()
}
Step 7: Use wrapEspressoIdlingResource in DefaultTasksRepository
Next, wrap your long running operations with wrapEspressoIdlingResource. The majority of these are in your DefaultTasksRepository.
- In your application code, open data > source > DefaultTasksRepository.
- Wrap all methods in
DefaultTasksRepositorywithwrapEspressoIdlingResource.
Here's an example that wraps the getTasks method:
DefaultTasksRepository.kt
    override suspend fun getTasks(forceUpdate: Boolean): Result<List<Task>> {
        wrapEspressoIdlingResource {
            if (forceUpdate) {
                try {
                    updateTasksFromRemoteDataSource()
                } catch (ex: Exception) {
                    return Result.Error(ex)
                }
            }
            return tasksLocalDataSource.getTasks()
        }
    }
The full code for DefaultTasksRepository with all the methods wrapped can be found here.
Step 8: Write DataBindingIdlingResource
You've written an idling resource, so that Espresso waits for data to be loaded. Next, you'll create a custom idling resource for data binding.
You need to do this because Espresso doesn't automatically work with the data binding library. This is because data binding uses a different mechanism (the Choreographer class) to synchronize its view updates. Thus Espresso cannot tell when a view updated via data binding has finished updating.
Because this data binding idling resource code is complicated, the code is provided and explained.
- Make a new util package in the androidTest source set.
- Make a new class DataBindingIdlingResource.kt in androidTest > util:

- Copy the following code into your new class:
DataBindingIdlingResource.kt
class DataBindingIdlingResource : IdlingResource {
    // List of registered callbacks
    private val idlingCallbacks = mutableListOf<IdlingResource.ResourceCallback>()
    // Give it a unique id to work around an Espresso bug where you cannot register/unregister
    // an idling resource with the same name.
    private val id = UUID.randomUUID().toString()
    // Holds whether isIdle was called and the result was false. We track this to avoid calling
    // onTransitionToIdle callbacks if Espresso never thought we were idle in the first place.
    private var wasNotIdle = false

    lateinit var activity: FragmentActivity

    override fun getName() = "DataBinding $id"

    override fun isIdleNow(): Boolean {
        val idle = !getBindings().any { it.hasPendingBindings() }
        @Suppress("LiftReturnOrAssignment")
        if (idle) {
            if (wasNotIdle) {
                // Notify observers to avoid Espresso race detector.
                idlingCallbacks.forEach { it.onTransitionToIdle() }
            }
            wasNotIdle = false
        } else {
            wasNotIdle = true
            // Check next frame.
            activity.findViewById<View>(android.R.id.content).postDelayed({
                isIdleNow
            }, 16)
        }
        return idle
    }

    override fun registerIdleTransitionCallback(callback: IdlingResource.ResourceCallback) {
        idlingCallbacks.add(callback)
    }

    /**
     * Find all binding classes in all currently available fragments.
     */
    private fun getBindings(): List<ViewDataBinding> {
        val fragments = (activity as? FragmentActivity)
            ?.supportFragmentManager
            ?.fragments

        val bindings =
            fragments?.mapNotNull {
                it.view?.getBinding()
            } ?: emptyList()
        val childrenBindings = fragments?.flatMap { it.childFragmentManager.fragments }
            ?.mapNotNull { it.view?.getBinding() } ?: emptyList()

        return bindings + childrenBindings
    }
}

private fun View.getBinding(): ViewDataBinding? = DataBindingUtil.getBinding(this)

/**
 * Sets the activity from an [ActivityScenario] to be used from [DataBindingIdlingResource].
 */
fun DataBindingIdlingResource.monitorActivity(
    activityScenario: ActivityScenario<out FragmentActivity>
) {
    activityScenario.onActivity {
        this.activity = it
    }
}

/**
 * Sets the fragment from a [FragmentScenario] to be used from [DataBindingIdlingResource].
 */
fun DataBindingIdlingResource.monitorFragment(fragmentScenario: FragmentScenario<out Fragment>) {
    fragmentScenario.onFragment {
        this.activity = it.requireActivity()
    }
}
There's a lot going on here, but the general idea is that ViewDataBindings are generated whenever you're using data binding layouts. The ViewDataBinding's hasPendingBindings method reports back whether the data binding library needs to update the UI to reflect a change in data.
This idling resource is considered idle only if there are no pending bindings for any of the ViewDataBindings.
Finally, the extension functions DataBindingIdlingResource.monitorFragment and DataBindingIdlingResource.monitorActivity take in FragmentScenario and ActivityScenario, respectively. They then find the underlying activity and associate it with DataBindingIdlingResource, so you can track the layout state. You must call one of these two methods from your tests, otherwise the DataBindingIdlingResource won't know anything about your layout.
Step 9: Use Idling Resources in tests
You've created two idling resources and ensured that they are properly set as busy or idle. Espresso only waits for idling resources when they are registered. So now your tests need to register and unregister your idling resources. You will do so in TasksActivityTest.
- Open TasksActivityTest.kt.
- Instantiate a
private DataBindingIdlingResource.
TasksActivityTest.kt
    // An idling resource that waits for Data Binding to have no pending bindings.
    private val dataBindingIdlingResource = DataBindingIdlingResource()
- Create
@Beforeand@Aftermethods that register and unregister theEspressoIdlingResource.countingIdlingResourceanddataBindingIdlingResource:
TasksActivityTest.kt
    /**
     * Idling resources tell Espresso that the app is idle or busy. This is needed when operations
     * are not scheduled in the main Looper (for example when executed on a different thread).
     */
    @Before
    fun registerIdlingResource() {
        IdlingRegistry.getInstance().register(EspressoIdlingResource.countingIdlingResource)
        IdlingRegistry.getInstance().register(dataBindingIdlingResource)
    }

    /**
     * Unregister your Idling Resource so it can be garbage collected and does not leak any memory.
     */
    @After
    fun unregisterIdlingResource() {
        IdlingRegistry.getInstance().unregister(EspressoIdlingResource.countingIdlingResource)
        IdlingRegistry.getInstance().unregister(dataBindingIdlingResource)
    }
Remember that both countingIdlingResource and dataBindingIdlingResource are monitoring your app code, watching whether or not it is idle. By registering these resources in your tests, when either resource is busy, Espresso will wait until they are idle before moving to the next command. What this means is that if your countingIdlingResource has a count greater than zero, or if there are pending data binding layouts, Espresso will wait.
- Update the
editTask()test so that after you launch the activity scenario, you usemonitorActivityto associate the activity with thedataBindingIdlingResource.
TasksActivityTest.kt
  @Test
    fun editTask() = runBlocking {
        repository.saveTask(Task("TITLE1", "DESCRIPTION"))

        // Start up Tasks screen.
        val activityScenario = ActivityScenario.launch(TasksActivity::class.java)
        dataBindingIdlingResource.monitorActivity(activityScenario) // LOOK HERE

        // Rest of test...
    }
- Run your test five times. You should find that the test is no longer flaky.
The entire TasksActivityTest should look like this:
TasksActivityTest.kt
@RunWith(AndroidJUnit4::class)
@LargeTest
class TasksActivityTest {

    private lateinit var repository: TasksRepository

    // An idling resource that waits for Data Binding to have no pending bindings.
    private val dataBindingIdlingResource = DataBindingIdlingResource()

    @Before
    fun init() {
        repository =
            ServiceLocator.provideTasksRepository(
                getApplicationContext()
            )
        runBlocking {
            repository.deleteAllTasks()
        }
    }

    @After
    fun reset() {
        ServiceLocator.resetRepository()
    }

    /**
     * Idling resources tell Espresso that the app is idle or busy. This is needed when operations
     * are not scheduled in the main Looper (for example when executed on a different thread).
     */
    @Before
    fun registerIdlingResource() {
        IdlingRegistry.getInstance().register(EspressoIdlingResource.countingIdlingResource)
        IdlingRegistry.getInstance().register(dataBindingIdlingResource)
    }

    /**
     * Unregister your Idling Resource so it can be garbage collected and does not leak any memory.
     */
    @After
    fun unregisterIdlingResource() {
        IdlingRegistry.getInstance().unregister(EspressoIdlingResource.countingIdlingResource)
        IdlingRegistry.getInstance().unregister(dataBindingIdlingResource)
    }

        @Test
        fun editTask() = runBlocking {

            // Set initial state.
            repository.saveTask(Task("TITLE1", "DESCRIPTION"))

            // Start up Tasks screen.
            val activityScenario = ActivityScenario.launch(TasksActivity::class.java)
            dataBindingIdlingResource.monitorActivity(activityScenario)
            // Click on the task on the list and verify that all the data is correct.
            onView(withText("TITLE1")).perform(click())
            onView(withId(R.id.task_detail_title_text)).check(matches(withText("TITLE1")))
            onView(withId(R.id.task_detail_description_text)).check(matches(withText("DESCRIPTION")))
            onView(withId(R.id.task_detail_complete_checkbox)).check(matches(not(isChecked())))

            // Click on the edit button, edit, and save.
            onView(withId(R.id.edit_task_fab)).perform(click())
            onView(withId(R.id.add_task_title_edit_text)).perform(replaceText("NEW TITLE"))
            onView(withId(R.id.add_task_description_edit_text)).perform(replaceText("NEW DESCRIPTION"))
            onView(withId(R.id.save_task_fab)).perform(click())

            // Verify task is displayed on screen in the task list.
            onView(withText("NEW TITLE")).check(matches(isDisplayed()))
            // Verify previous task is not displayed.
            onView(withText("TITLE1")).check(doesNotExist())
            // Make sure the activity is closed before resetting the db.
            activityScenario.close()
        }

}
Step 10: Write your own test with idling resources
Now it's your turn.
- Copy over the following code:
TasksActivityTest.kt
 @Test
    fun createOneTask_deleteTask() {

        // 1. Start TasksActivity.

        // 2. Add an active task by clicking on the FAB and saving a new task.

        // 3. Open the new task in a details view.

        // 4. Click delete task in menu.

        // 5. Verify it was deleted.

        // 6. Make sure the activity is closed.

    }
- Finish the code, referring to the
editTasktest you added previously. - Run your test and confirm it passes!
The completed test is here so you can compare.
9. Task: End-to-End App Navigation Testing
One final test you can do is to test the app-level navigation. For example testing:
- The navigation drawer
- The app toolbar
- The Up button
- The Back button
Let's do that now!
Step 1: Create AppNavigationTest
- Create a file and class called AppNavigationTest.kt in
androidTest:

Set up your test similarly to how you set up TasksActivityTest.
- Add the appropriate annotations for a class that uses AndroidX Test libraries and is an end-to-end test.
- Set up your
taskRepository. - Register and unregister the correct idling resources.
When done, AppNavigationTest should look like this:
AppNavigationTest.kt
@RunWith(AndroidJUnit4::class)
@LargeTest
class AppNavigationTest {

    private lateinit var tasksRepository: TasksRepository

    // An Idling Resource that waits for Data Binding to have no pending bindings.
    private val dataBindingIdlingResource = DataBindingIdlingResource()

    @Before
    fun init() {
        tasksRepository = ServiceLocator.provideTasksRepository(getApplicationContext())
    }

    @After
    fun reset() {
        ServiceLocator.resetRepository()
    }

    /**
     * Idling resources tell Espresso that the app is idle or busy. This is needed when operations
     * are not scheduled in the main Looper (for example when executed on a different thread).
     */
    @Before
    fun registerIdlingResource() {
        IdlingRegistry.getInstance().register(EspressoIdlingResource.countingIdlingResource)
        IdlingRegistry.getInstance().register(dataBindingIdlingResource)
    }

    /**
     * Unregister your idling resource so it can be garbage collected and does not leak any memory.
     */
    @After
    fun unregisterIdlingResource() {
        IdlingRegistry.getInstance().unregister(EspressoIdlingResource.countingIdlingResource)
        IdlingRegistry.getInstance().unregister(dataBindingIdlingResource)
    }

}
Step 2: Set up your Navigation tests
The starter code below outlines three tests and describes what they should do. Each test is set up so that it
- configures the repository for the test.
- creates an
ActivityScenario. - properly sets up your
DataBindingIdingResource.
Add the code now.
- Copy this code into the
AppNavigationTestclass.
AppNavigationTest.kt
@Test
fun tasksScreen_clickOnDrawerIcon_OpensNavigation() {
    // Start the Tasks screen.
    val activityScenario = ActivityScenario.launch(TasksActivity::class.java)
    dataBindingIdlingResource.monitorActivity(activityScenario)

    // 1. Check that left drawer is closed at startup.

    // 2. Open drawer by clicking drawer icon.

    // 3. Check if drawer is open.

    // When using ActivityScenario.launch(), always call close()
    activityScenario.close()
}

@Test
fun taskDetailScreen_doubleUpButton() = runBlocking {
    val task = Task("Up button", "Description")
    tasksRepository.saveTask(task)

    // Start the Tasks screen.
    val activityScenario = ActivityScenario.launch(TasksActivity::class.java)
    dataBindingIdlingResource.monitorActivity(activityScenario)

    // 1. Click on the task on the list.

    // 2. Click on the edit task button.

    // 3. Confirm that if we click Up button once, we end up back at the task details page.

    // 4. Confirm that if we click Up button a second time, we end up back at the home screen.

    // When using ActivityScenario.launch(), always call close().
    activityScenario.close()
}


@Test
fun taskDetailScreen_doubleBackButton() = runBlocking {
    val task = Task("Back button", "Description")
    tasksRepository.saveTask(task)

    // Start Tasks screen.
    val activityScenario = ActivityScenario.launch(TasksActivity::class.java)
    dataBindingIdlingResource.monitorActivity(activityScenario)

    // 1. Click on the task on the list.

    // 2. Click on the Edit task button.

    // 3. Confirm that if we click Back once, we end up back at the task details page.

    // 4. Confirm that if we click Back a second time, we end up back at the home screen.

    // When using ActivityScenario.launch(), always call close()
    activityScenario.close()
}
Step 3: Write your Navigation Tests
To be able to finish the tests you added, you'll need to access, click, and write Espresso assertions for global navigation views.
One part of global navigation you'll need to access is the navigation button which is displayed at the start of the toolbar. In the Todo app, this is either the navigation drawer icon or the Up button:

The following extension function uses the toolbar's getNavigationContentDescription to get the content description for this icon.
- Copy the
getToolbarNavigationContentDescriptionextension function and add it to the end of AppNavigationTest.kt (outside of the class):
AppNavigationTest.kt
fun <T : Activity> ActivityScenario<T>.getToolbarNavigationContentDescription()
        : String {
    var description = ""
    onActivity {
        description =
            it.findViewById<Toolbar>(R.id.toolbar).navigationContentDescription as String
    }
    return description
}
The snippets of code below should help you complete the tests.
Here's an example of using the getToolbarNavigationContentDescription extension function to click on the navigation button:
Clicking the toolbar navigation button
onView(
    withContentDescription(
        activityScenario
            .getToolbarNavigationContentDescription()
    )
).perform(click())
This code checks whether the navigation drawer itself is either open or closed:
Checking that the navigation drawer is open
onView(withId(R.id.drawer_layout))
    .check(matches(isOpen(Gravity.START))) // Left drawer is open.
onView(withId(R.id.drawer_layout))
    .check(matches(isClosed(Gravity.START))) // Left Drawer is closed.
And here's an example of clicking the system back button:
Clicking the system Back button
pressBack()

// You'll need to import androidx.test.espresso.Espresso.pressBack.
- Using the examples above and your knowledge of Espresso, finish
tasksScreen_clickOnAndroidHomeIcon_OpensNavigation, taskDetailScreen_doubleUpButton(), andtaskDetailScreen_doubleBackButton. - Run your tests, and confirm everything works!
Congratulations on writing end-to-end tests and finishing this codelab! The solution code for the three tests you just wrote is here.
10. Solution code
The final code for the entire three codelabs is here.
This is a simplified version of the tests found in the Architecture Blueprints sample. If you want to see more tests, or check out more advanced testing techniques (such as using a sharedTest folder), take a look at that sample.
11. Summary
This codelab covered:
- A review of testing coroutines from previous lessons, including covering the usage of
runBlockingversusrunBlockingTest. - How to test coroutines that use
viewModelScopeby usingTestCoroutineDispatcher TestCoroutineDispatcher's ability topauseDispatcherandresumeDispatcherto control coroutine execution- Testing error handling by updating a fake
- Testing your data layer, including your DAO and local data source
- Using
IdlingResource(and theCountingIldingResourcesubclass) to write end to end tests that both include long running code and work with the data binding library. - Testing global app navigation in an end to end test.
12. Learn more
Samples:
- Official Testing Sample - This is the official testing sample, which is based off of the same TO-DO Notes app used here. Concepts in this sample go beyond what is covered in the three testing codelabs.
- Sunflower demo - This is the main Android Jetpack sample which also makes use of the Android testing libraries
- Espresso testing samples
Udacity course:
Android developer documentation:
- Test your activities
- Espresso
- Dependency Injection on Android
- Test Navigation
- Testing your workers –- Guide to testing WorkManager
Videos:
- Build Testable Apps for Android (Google I/O'19)
- Testing Coroutines on Android (Android Dev Summit ‘19)
- Fragments: Past, Present, and Future (Android Dev Summit ‘19) –- Testing and Fragments section
- An Opinionated Guide to Dependency Injection on Android (Android Dev Summit ‘19)
Other:
- Easy Coroutines in Android: viewModelScope
- Testing two consecutive LiveData emissions in Coroutines
- Android testing with Espresso's Idling Resources and testing fidelity
- Test Room migrations
- Using Dagger in your Android App Codelab Tutorial
- Dependency Injection Guidance on Android — ADS 2019
- Dagger in Kotlin: Gotchas and Optimizations
- Dagger.dev
13. Next codelab
For links to other codelabs in this course, see the Advanced Android in Kotlin codelabs landing page.

