


每個文字欄位都預期會收到特定類型的文字輸入內容,例如電子郵件地址、電話號碼或純文字。您必須為應用程式中的每個文字欄位指定輸入類型,系統才會顯示適當的螢幕輸入法,例如螢幕小鍵盤。
除了輸入法提供的按鈕類型,您還可以指定行為,例如輸入法是否提供拼字建議、將新句子大寫,以及將換行鍵替換為「完成」或「下一步」等動作按鈕。本頁面說明如何指定這些特徵。
指定鍵盤類型
請務必在 <EditText> 元素中加入 android:inputType 屬性,為文字欄位宣告輸入法。
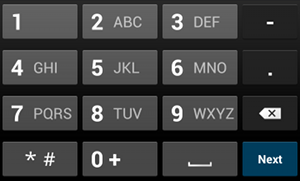
phone 輸入類型。舉例來說,如要使用輸入法輸入電話號碼,請使用 "phone" 值:
<EditText
    android:id="@+id/phone"
    android:layout_width="fill_parent"
    android:layout_height="wrap_content"
    android:hint="@string/phone_hint"
    android:inputType="phone" />
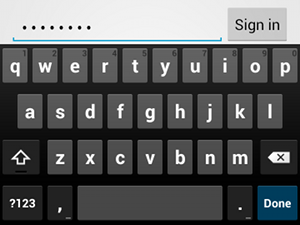
textPassword 輸入類型。如果文字欄位用於輸入密碼,請使用 "textPassword" 值,讓文字欄位隱藏使用者輸入的內容:
<EditText
    android:id="@+id/password"
    android:hint="@string/password_hint"
    android:inputType="textPassword"
    ... />
android:inputType 屬性文件中列出多個可能的值,您可以組合部分值,指定輸入法外觀和額外行為。
啟用拼字建議和其他行為
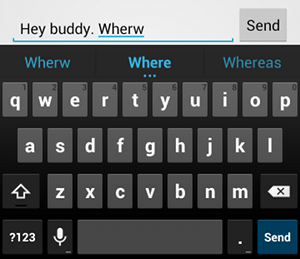
textAutoCorrect 可自動更正錯別字。android:inputType 屬性可讓您指定輸入法的各種行為。最重要的是,如果文字欄位用於基本文字輸入 (例如文字訊息),請使用 "textAutoCorrect" 值啟用自動拼字校正功能。
您可以使用 android:inputType 屬性,合併不同的行為和輸入法樣式。舉例來說,以下說明如何建立文字欄位,將句子的第一個字大寫,並自動修正錯別字:
<EditText
    android:id="@+id/message"
    android:layout_width="wrap_content"
    android:layout_height="wrap_content"
    android:inputType=
        "textCapSentences|textAutoCorrect"
    ... />
指定輸入法動作
大多數軟體輸入法會在底角提供適合目前文字欄位的使用者動作按鈕。除非文字欄位支援多行文字 (例如使用 android:inputType="textMultiLine"),否則系統預設會將這個按鈕用於「下一步」或「完成」動作,在支援多行文字的情況下,動作按鈕會是換行符。不過,您可以指定其他更適合文字欄位的動作,例如「傳送」或「前往」。
如要指定鍵盤動作按鈕,請使用 android:imeOptions 屬性,並提供 "actionSend" 或 "actionSearch" 等動作值。例如:

android:imeOptions="actionSend" 時,系統會顯示「傳送」按鈕。<EditText android:id="@+id/search" android:layout_width="fill_parent" android:layout_height="wrap_content" android:hint="@string/search_hint" android:inputType="text" android:imeOptions="actionSend" />
接著,您可以定義 EditText 元素,監聽動作按鈕的按壓事件。TextView.OnEditorActionListener在接聽程式中,回應 EditorInfo 類別中定義的適當 IME 動作 ID,例如 IME_ACTION_SEND,如下列範例所示:
Kotlin
findViewById<EditText>(R.id.search).setOnEditorActionListener { v, actionId, event ->
    return@setOnEditorActionListener when (actionId) {
        EditorInfo.IME_ACTION_SEND -> {
            sendMessage()
            true
        }
        else -> false
    }
}
Java
EditText editText = (EditText) findViewById(R.id.search);
editText.setOnEditorActionListener(new OnEditorActionListener() {
    @Override
    public boolean onEditorAction(TextView v, int actionId, KeyEvent event) {
        boolean handled = false;
        if (actionId == EditorInfo.IME_ACTION_SEND) {
            sendMessage();
            handled = true;
        }
        return handled;
    }
});
提供自動完成建議
如要在使用者輸入內容時提供建議,可以使用名為 AutoCompleteTextView 的 EditText 子類別。如要實作自動完成功能,您必須指定提供文字建議的 Adapter。視資料來源而定,有多種轉換器可供使用,例如來自資料庫或陣列的轉換器。
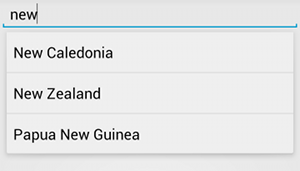
AutoCompleteTextView 搭配文字建議的範例。以下程序說明如何設定 AutoCompleteTextView,使用 ArrayAdapter 從陣列提供建議:
- 將
AutoCompleteTextView新增至版面配置。以下是只有文字欄位的版面配置:<?xml version="1.0" encoding="utf-8"?> <AutoCompleteTextView xmlns:android="http://schemas.android.com/apk/res/android" android:id="@+id/autocomplete_country" android:layout_width="fill_parent" android:layout_height="wrap_content" />
- 定義包含所有文字建議的陣列。舉例來說,以下是國家/地區名稱的陣列:
<?xml version="1.0" encoding="utf-8"?>
<resources>
    <string-array name="countries_array">
        <item>Afghanistan</item>
        <item>Albania</item>
        <item>Algeria</item>
        <item>American Samoa</item>
        <item>Andorra</item>
        <item>Angola</item>
        <item>Anguilla</item>
        <item>Antarctica</item>
        ...
    </string-array>
</resources>
- 在
Activity或Fragment中,使用下列程式碼指定提供建議的介面卡:Kotlin
// Get a reference to the AutoCompleteTextView in the layout.
val textView = findViewById(R.id.autocomplete_country) as AutoCompleteTextView
// Get the string array.
val countries: Array<out String> = resources.getStringArray(R.array.countries_array)
// Create the adapter and set it to the AutoCompleteTextView.
ArrayAdapter<String>(this, android.R.layout.simple_list_item_1, countries).also { adapter ->
    textView.setAdapter(adapter)
}
Java
// Get a reference to the AutoCompleteTextView in the layout.
AutoCompleteTextView textView = (AutoCompleteTextView) findViewById(R.id.autocomplete_country);
// Get the string array.
String[] countries = getResources().getStringArray(R.array.countries_array);
// Create the adapter and set it to the AutoCompleteTextView.
ArrayAdapter<String> adapter =
        new ArrayAdapter<String>(this, android.R.layout.simple_list_item_1, countries);
textView.setAdapter(adapter);
在上述範例中,系統會初始化新的
ArrayAdapter,將countries_array字串陣列中的每個項目繫結至simple_list_item_1版面配置中存在的TextView。這是 Android 提供的版面配置,可為清單中的文字提供標準外觀。 -
呼叫
setAdapter(),將轉接程式指派給AutoCompleteTextView。