
모든 텍스트 필드에는 이메일 주소, 전화번호 또는 일반 텍스트와 같은 특정 유형의 텍스트를 입력해야 합니다. 시스템에서 적절한 소프트 입력 방법(예: 터치 키보드)이 표시되도록 앱의 텍스트 필드별로 입력 유형을 지정해야 합니다.
입력 방법에 사용할 수 있는 버튼의 유형 이외에, 입력 방법이 맞춤법 제안을 제공하고 새 문장을 대문자로 시작하고 캐리지 리턴 버튼을 완료 또는 다음 과 같은 작업 버튼으로 바꿀지 여부와 같이 동작을 지정할 수 있습니다. 이 페이지에서는 이러한 특성을 지정하는 방법을 보여줍니다.
키보드 유형 지정
항상 텍스트 필드의 입력 방법을 선언하려면
android:inputType
속성을
<EditText> 요소에 추가합니다.
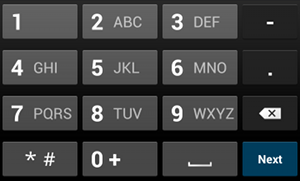
phone 입력 유형예를 들어 전화번호 입력에 사용할 입력 방법을 지정하려면 다음과 같이 "phone" 값을 사용합니다.
<EditText
    android:id="@+id/phone"
    android:layout_width="fill_parent"
    android:layout_height="wrap_content"
    android:hint="@string/phone_hint"
    android:inputType="phone" />
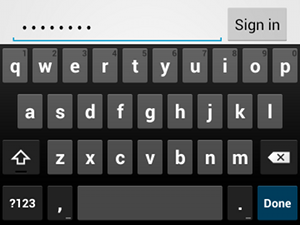
textPassword 입력 유형비밀번호를 입력하는 텍스트 필드의 경우 텍스트 필드에서 사용자의 입력이 숨겨지도록 "textPassword" 값을 사용합니다.
<EditText
    android:id="@+id/password"
    android:hint="@string/password_hint"
    android:inputType="textPassword"
    ... />
android:inputType 속성과 함께 기록되는 값은 몇 가지가 있으며, 일부 값을 결합하여 입력 방법의 표현 모양 및 추가 동작을 지정할 수 있습니다.
맞춤법 제안 및 기타 동작 사용 설정
textAutoCorrect를 추가하여
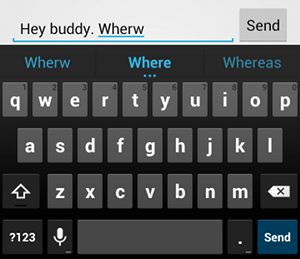
맞춤법 오류 시 자동 수정을 제공합니다.android:inputType 속성을 사용하면 입력 방법의 다양한 동작을 지정할 수 있습니다. 무엇보다도 텍스트 필드가 기본 텍스트 입력(예: 문자 메시지)을 위한 것이라면 "textAutoCorrect" 값을 사용하여 맞춤법 자동 수정을 사용 설정해야 합니다.
android:inputType 속성을 사용하여 서로 다른 동작과 입력 방법 스타일을 결합할 수 있습니다. 예를 들어 다음은 문장의 첫 단어를 대문자로 시작하고 맞춤법 오류를 자동으로 수정하는 텍스트 필드를 만드는 방법입니다.
<EditText
    android:id="@+id/message"
    android:layout_width="wrap_content"
    android:layout_height="wrap_content"
    android:inputType=
        "textCapSentences|textAutoCorrect"
    ... />
입력 방법 작업 지정하기
대부분의 소프트 입력 방법에서는 현재 텍스트 필드에 적합한 사용자 작업 버튼을 하단 모서리에 제공합니다. 기본적으로 시스템은 이 버튼을 다음 작업 또는 완료 작업에 사용합니다. 단, 텍스트 필드에서 여러 줄 텍스트(예: android:inputType="textMultiLine")를 지원하는 경우는 예외이며, 이럴 때에는 작업 버튼은 캐리지 리턴입니다. 하지만 텍스트 필드에 더 적합할 수 있는 추가 작업(예: 보내기 또는 이동)을 지정할 수 있습니다.
키보드 작업 버튼을 지정하려면
android:imeOptions
속성을 "actionSend" 또는 "actionSearch" 같은 작업 값과 함께 사용합니다. 예:

android:imeOptions="actionSend"를 선언하면 보내기 버튼이 표시됩니다.<EditText android:id="@+id/search" android:layout_width="fill_parent" android:layout_height="wrap_content" android:hint="@string/search_hint" android:inputType="text" android:imeOptions="actionSend" />
그런 다음, EditText 요소의 TextView.OnEditorActionListener를 정의하면 작업 버튼 누르기를 수신 대기할 수 있습니다. 리스너에서는 다음 예와 같이 IME_ACTION_SEND와 같은 EditorInfo 클래스에 정의된 적절한 IME 작업 ID에 응답합니다.
Kotlin
findViewById<EditText>(R.id.search).setOnEditorActionListener { v, actionId, event ->
    return@setOnEditorActionListener when (actionId) {
        EditorInfo.IME_ACTION_SEND -> {
            sendMessage()
            true
        }
        else -> false
    }
}
자바
EditText editText = (EditText) findViewById(R.id.search);
editText.setOnEditorActionListener(new OnEditorActionListener() {
    @Override
    public boolean onEditorAction(TextView v, int actionId, KeyEvent event) {
        boolean handled = false;
        if (actionId == EditorInfo.IME_ACTION_SEND) {
            sendMessage();
            handled = true;
        }
        return handled;
    }
});
자동 완성 제안 제공
사용자가 입력할 때 제안 단어를 제공하려면 EditText의 서브클래스인 AutoCompleteTextView를 사용하면 됩니다.
자동 완성을 구현하려면 텍스트 제안을 제공하는 Adapter를 지정해야 합니다. 데이터베이스나 배열과 같은 데이터 출처에 따라 여러 어댑터를 사용할 수 있습니다.
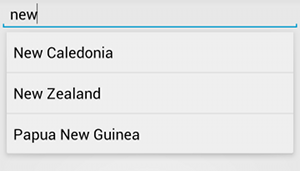
AutoCompleteTextView를 사용한 텍스트
제안의 예다음 절차는 ArrayAdapter를 사용하여 배열에서 제안을 제공하는 AutoCompleteTextView를 설정하는 방법을 설명합니다.
- 레이아웃에
AutoCompleteTextView를 추가합니다. 다음은 텍스트 필드만 있는 레이아웃입니다.<?xml version="1.0" encoding="utf-8"?> <AutoCompleteTextView xmlns:android="http://schemas.android.com/apk/res/android" android:id="@+id/autocomplete_country" android:layout_width="fill_parent" android:layout_height="wrap_content" />
- 모든 텍스트 제안을 포함하는 배열을 정의합니다. 예를 들어 다음은
국가 이름 배열입니다.
<?xml version="1.0" encoding="utf-8"?>
<resources>
    <string-array name="countries_array">
        <item>Afghanistan</item>
        <item>Albania</item>
        <item>Algeria</item>
        <item>American Samoa</item>
        <item>Andorra</item>
        <item>Angola</item>
        <item>Anguilla</item>
        <item>Antarctica</item>
        ...
    </string-array>
</resources>
Activity또는Fragment에서 다음 코드를 사용하여 제안을 제공하는 어댑터를 지정합니다.Kotlin
// Get a reference to the AutoCompleteTextView in the layout.
val textView = findViewById(R.id.autocomplete_country) as AutoCompleteTextView
// Get the string array.
val countries: Array<out String> = resources.getStringArray(R.array.countries_array)
// Create the adapter and set it to the AutoCompleteTextView.
ArrayAdapter<String>(this, android.R.layout.simple_list_item_1, countries).also { adapter ->
    textView.setAdapter(adapter)
}
자바
// Get a reference to the AutoCompleteTextView in the layout.
AutoCompleteTextView textView = (AutoCompleteTextView) findViewById(R.id.autocomplete_country);
// Get the string array.
String[] countries = getResources().getStringArray(R.array.countries_array);
// Create the adapter and set it to the AutoCompleteTextView.
ArrayAdapter<String> adapter =
        new ArrayAdapter<String>(this, android.R.layout.simple_list_item_1, countries);
textView.setAdapter(adapter);
이전 예에서는 새
ArrayAdapter가 초기화되어countries_array문자열 배열의 각 항목을simple_list_item_1레이아웃에 있는TextView에 결합합니다. 이 레이아웃은 Android에서 제공되는 레이아웃으로, 목록에 있는 텍스트의 표준 모양을 제공합니다.-
setAdapter()를 호출하여AutoCompleteTextView에 어댑터를 할당합니다.