


لیستها به کاربران اجازه میدهند تا در دستگاههای Wear OS به راحتی یک مورد را از مجموعهای از گزینهها انتخاب کنند.
کتابخانه رابط کاربری Wearable شامل کلاس WearableRecyclerView است که یک پیادهسازی RecyclerView برای ایجاد لیستهای بهینه شده برای دستگاههای پوشیدنی است. میتوانید با ایجاد یک کانتینر جدید WearableRecyclerView از این رابط در برنامه پوشیدنی خود استفاده کنید.
از WearableRecyclerView برای فهرستی طولانی از آیتمهای ساده، مانند یک اجراکنندهی برنامه یا فهرستی از مخاطبین، استفاده کنید. هر آیتم میتواند یک رشتهی کوتاه و یک آیکون مرتبط داشته باشد. همچنین، هر آیتم میتواند فقط یک رشته یا یک آیکون داشته باشد.
نکته: از طرحبندیهای پیچیده اجتناب کنید. کاربران فقط باید با یک نگاه اجمالی به یک آیتم، آن را بفهمند، مخصوصاً با توجه به اندازه صفحه نمایش محدود گجتهای پوشیدنی.
با بسط دادن کلاس RecyclerView موجود، APIهای WearableRecyclerView به طور پیشفرض لیستی از آیتمها را که به صورت عمودی قابل اسکرول هستند، در یک لیست مستقیم نمایش میدهند. همچنین میتوانید از APIهای WearableRecyclerView برای انتخاب طرحبندی منحنی و ژست اسکرول دایرهای در برنامههای پوشیدنی خود استفاده کنید.
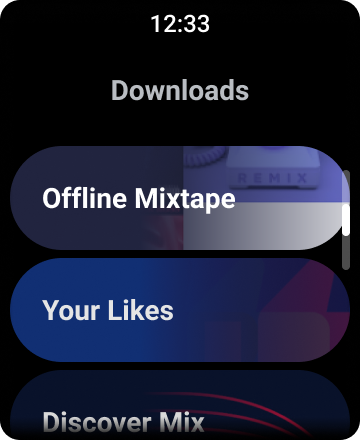
شکل ۱. نمای پیشفرض فهرست در Wear OS.
این راهنما به شما نشان میدهد که چگونه از کلاس WearableRecyclerView برای ایجاد لیست در برنامههای Wear OS خود استفاده کنید، چگونه طرحبندی منحنی را برای موارد قابل پیمایش خود انتخاب کنید و چگونه ظاهر عناصر فرعی را هنگام پیمایش سفارشی کنید.
اضافه کردن WearableRecyclerView به یک اکتیویتی با استفاده از XML
طرحبندی زیر یک WearableRecyclerView را به یک فعالیت اضافه میکند:
<androidx.wear.widget.WearableRecyclerView
    xmlns:android="http://schemas.android.com/apk/res/android"
    xmlns:tools="http://schemas.android.com/tools"
    android:id="@+id/recycler_launcher_view"
    android:layout_width="match_parent"
    android:layout_height="match_parent"
    android:scrollbars="vertical" />
مثال زیر WearableRecyclerView اعمال شده به یک اکتیویتی را نشان میدهد:
کاتلین
class MainActivity : Activity() {

    override fun onCreate(savedInstanceState: Bundle?) {
        super.onCreate(savedInstanceState)
        setContentView(R.layout.activity_main)
    }
    ...
}
جاوا
public class MainActivity extends Activity {
    @Override
    public void onCreate(Bundle savedInstanceState) {
        super.onCreate(savedInstanceState);
        setContentView(R.layout.activity_main);
    }
    ...
}
ایجاد طرح منحنی
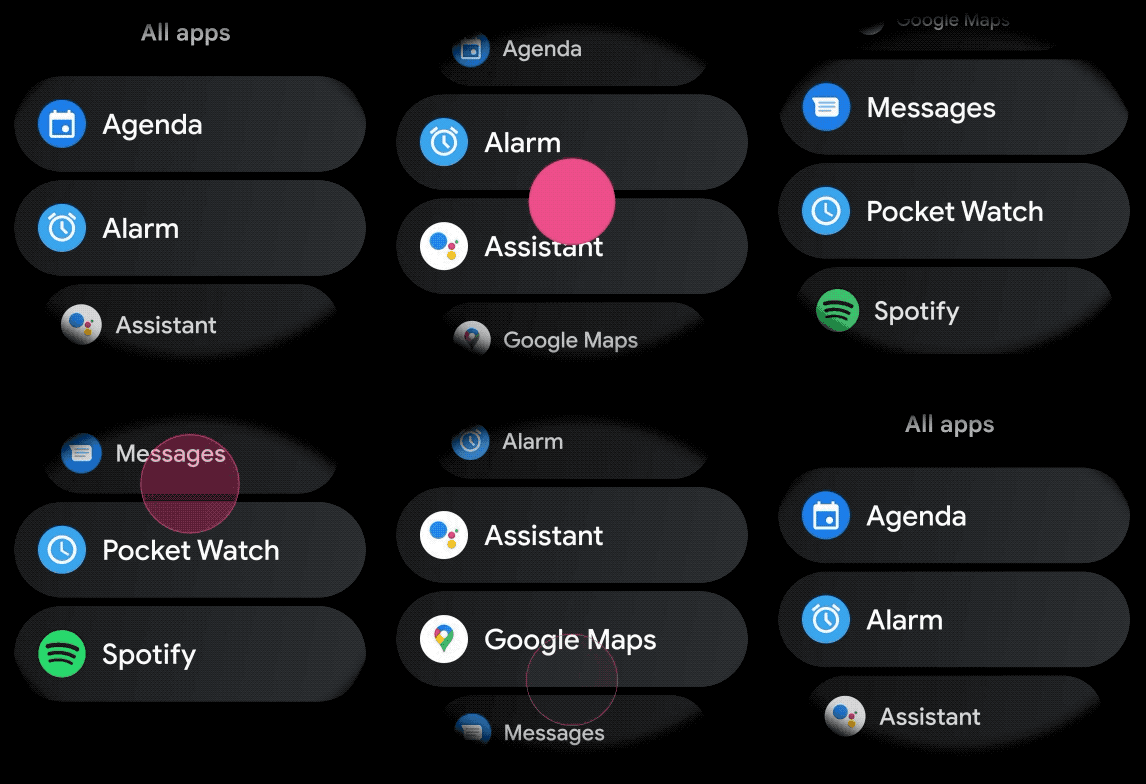
برای ایجاد یک طرحبندی منحنی برای موارد قابل پیمایش در برنامه پوشیدنی خود، موارد زیر را انجام دهید:
-
WearableRecyclerViewبه عنوان ظرف اصلی خود در طرح XML مربوطه استفاده کنید. - متد
setEdgeItemsCenteringEnabled(boolean)رویtrueتنظیم کنید. این کار باعث میشود اولین و آخرین آیتمهای لیست به صورت عمودی در مرکز صفحه قرار بگیرند. - از متد
WearableRecyclerView.setLayoutManager()برای تنظیم چیدمان آیتمها روی صفحه استفاده کنید.
کاتلین
wearableRecyclerView.apply {
    // To align the edge children (first and last) with the center of the screen.
    isEdgeItemsCenteringEnabled = true
    ...
    layoutManager = WearableLinearLayoutManager(this@MainActivity)
}
جاوا
// To align the edge children (first and last) with the center of the screen.
wearableRecyclerView.setEdgeItemsCenteringEnabled(true);
...
wearableRecyclerView.setLayoutManager(
                new WearableLinearLayoutManager(this));
اگر برنامه شما الزامات خاصی برای سفارشیسازی ظاهر عناصر فرزند هنگام اسکرول کردن دارد - برای مثال، تغییر مقیاس آیکونها و متن هنگام اسکرول کردن آیتمها از مرکز - کلاس WearableLinearLayoutManager.LayoutCallback را بسط داده و متد onLayoutFinished را بازنویسی کنید.
قطعه کد زیر مثالی از سفارشیسازی پیمایش آیتمها برای افزایش مقیاس از مرکز را با استفاده از کلاس WearableLinearLayoutManager.LayoutCallback نشان میدهد:
کاتلین
/** How much icons should scale, at most.  */
private const val MAX_ICON_PROGRESS = 0.65f

class CustomScrollingLayoutCallback : WearableLinearLayoutManager.LayoutCallback() {

    private var progressToCenter: Float = 0f

    override fun onLayoutFinished(child: View, parent: RecyclerView) {
        child.apply {
            // Figure out % progress from top to bottom.
            val centerOffset = height.toFloat() / 2.0f / parent.height.toFloat()
            val yRelativeToCenterOffset = y / parent.height + centerOffset

            // Normalize for center.
            progressToCenter = Math.abs(0.5f - yRelativeToCenterOffset)
            // Adjust to the maximum scale.
            progressToCenter = Math.min(progressToCenter, MAX_ICON_PROGRESS)

            scaleX = 1 - progressToCenter
            scaleY = 1 - progressToCenter
        }
    }
}
جاوا
public class CustomScrollingLayoutCallback extends WearableLinearLayoutManager.LayoutCallback {
    /** How much icons should scale, at most. */
    private static final float MAX_ICON_PROGRESS = 0.65f;

    private float progressToCenter;

    @Override
    public void onLayoutFinished(View child, RecyclerView parent) {

        // Figure out % progress from top to bottom.
        float centerOffset = ((float) child.getHeight() / 2.0f) / (float) parent.getHeight();
        float yRelativeToCenterOffset = (child.getY() / parent.getHeight()) + centerOffset;

        // Normalize for center.
        progressToCenter = Math.abs(0.5f - yRelativeToCenterOffset);
        // Adjust to the maximum scale.
        progressToCenter = Math.min(progressToCenter, MAX_ICON_PROGRESS);

        child.setScaleX(1 - progressToCenter);
        child.setScaleY(1 - progressToCenter);
    }
}
کاتلین
wearableRecyclerView.layoutManager =
        WearableLinearLayoutManager(this, CustomScrollingLayoutCallback())
جاوا
CustomScrollingLayoutCallback customScrollingLayoutCallback =
                new CustomScrollingLayoutCallback();
wearableRecyclerView.setLayoutManager(
                new WearableLinearLayoutManager(this, customScrollingLayoutCallback));