Wear OS에서 실행되는 앱은 다른 Android 기기와 동일한 레이아웃 기법을 사용하지만 시계별 제약 조건으로 디자인해야 합니다.
참고: 모바일 앱의 기능과 UI를 똑같이 Wear OS로 포팅하면 우수한 사용자 환경을 기대하기 어렵습니다.
직사각형 휴대기기에 맞게 앱을 디자인하면 원형 시계에서 화면 모서리 근처의 콘텐츠가 잘릴 수 있습니다. 스크롤 가능한 세로 목록을 사용하는 경우에는 크게 문제가 되지 않습니다. 사용자가 콘텐츠를 가운데로 스크롤할 수 있기 때문입니다. 하지만 단일 화면의 경우 사용자 환경이 저하될 수 있습니다.
다음 레이아웃 설정을 사용하면 텍스트가 원형 화면 기기에서 올바르게 표시되지 않습니다.
<androidx.constraintlayout.widget.ConstraintLayout
    xmlns:android="http://schemas.android.com/apk/res/android"
    xmlns:app="http://schemas.android.com/apk/res-auto"
    xmlns:tools="http://schemas.android.com/tools"
    android:layout_width="match_parent"
    android:layout_height="match_parent">

    <TextView
        android:id="@+id/text"
        android:layout_width="0dp"
        android:layout_height="0dp"
        android:text="@string/very_long_hello_world"
        app:layout_constraintBottom_toBottomOf="parent"
        app:layout_constraintEnd_toEndOf="parent"
        app:layout_constraintStart_toStartOf="parent"
        app:layout_constraintTop_toTopOf="parent" />

</androidx.constraintlayout.widget.ConstraintLayout>
이 문제를 해결하려면 원형 기기를 지원하는 Wear OS UI 라이브러리의 레이아웃을 사용합니다.
BoxInsetLayout을 사용하면 원형 화면 가장자리 근처에서 뷰가 잘리지 않도록 할 수 있습니다.- 원형 화면에 최적화된 항목의 세로 목록을 표시하고 조작하려는 경우
WearableRecyclerView를 사용하여 곡선형 레이아웃을 만들 수 있습니다.
앱 디자인에 관한 자세한 내용은 Wear OS 디자인 가이드라인을 참고하세요.
BoxInsetLayout 사용

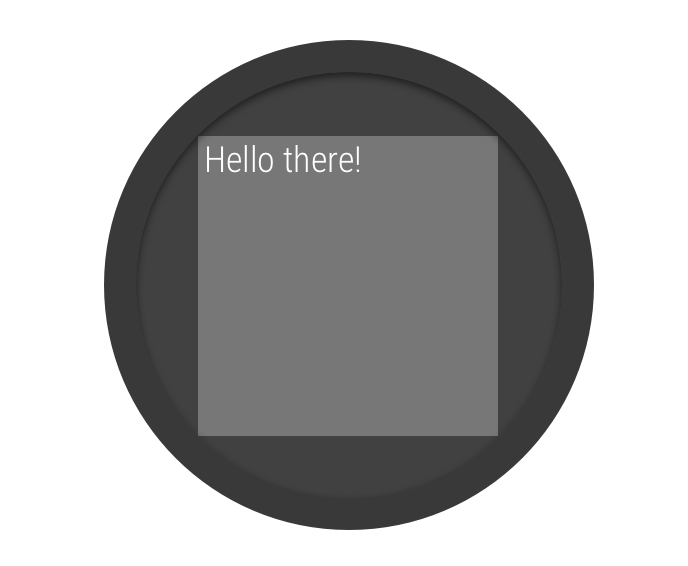
그림 2. 원형 화면의 창 인셋
Wear OS UI 라이브러리의
BoxInsetLayout 클래스를 사용하면 원형 화면에서 작동하는 레이아웃을 정의할 수 있습니다. 이 클래스를 사용하면 화면의 중앙이나 가장자리 근처에 뷰를 쉽게 정렬할 수 있습니다.
그림 2의 회색 정사각형은 필수 창 인셋을 적용한 후 BoxInsetLayout이 원형 화면에 하위 뷰를 자동으로 배치할 수 있는 영역을 나타냅니다. 이 영역 내에 표시되도록 하위 뷰는 다음 값으로 layout_boxedEdges 속성을 지정합니다.
top,bottom,left,right를 조합하여 사용합니다. 예를 들어"left|top"값은 하위 뷰의 왼쪽 및 상단 가장자리를 그림 2의 회색 정사각형 내부에 배치합니다."all"값은 모든 하위 뷰의 콘텐츠를 그림 2의 회색 정사각형 내부에 배치합니다. 이는ConstraintLayout이 내부에 있는 가장 일반적인 접근 방식입니다.
그림 2의 레이아웃은 <BoxInsetLayout> 요소를 사용하며 원형 화면에서 작동합니다.
<androidx.wear.widget.BoxInsetLayout
    xmlns:android="http://schemas.android.com/apk/res/android"
    xmlns:app="http://schemas.android.com/apk/res-auto"
    android:layout_height="match_parent"
    android:layout_width="match_parent"
    android:padding="15dp">

    <androidx.constraintlayout.widget.ConstraintLayout
        android:layout_width="match_parent"
        android:layout_height="match_parent"
        android:padding="5dp"
        app:layout_boxedEdges="all">

        <TextView
            android:layout_height="wrap_content"
            android:layout_width="match_parent"
            android:text="@string/sometext"
            android:textAlignment="center"
            app:layout_constraintEnd_toEndOf="parent"
            app:layout_constraintStart_toStartOf="parent"
            app:layout_constraintTop_toTopOf="parent" />

        <ImageButton
            android:background="@android:color/transparent"
            android:layout_height="50dp"
            android:layout_width="50dp"
            app:layout_constraintBottom_toBottomOf="parent"
            app:layout_constraintStart_toStartOf="parent"
            android:src="@drawable/cancel" />

        <ImageButton
            android:background="@android:color/transparent"
            android:layout_height="50dp"
            android:layout_width="50dp"
            app:layout_constraintBottom_toBottomOf="parent"
            app:layout_constraintEnd_toEndOf="parent"
            android:src="@drawable/ok" />

    </androidx.constraintlayout.widget.ConstraintLayout>

</androidx.wear.widget.BoxInsetLayout>
굵게 표시된 레이아웃 부분을 확인하세요.
-
android:padding="15dp"이 줄은
<BoxInsetLayout>요소에 패딩을 할당합니다. -
android:padding="5dp"이 줄은 내부
ConstraintLayout요소에 패딩을 할당합니다. -
app:layout_boxedEdges="all"이 줄은
ConstraintLayout요소 및 하위 요소가 원형 화면의 창 인셋에 의해 정의된 영역 내부에서 상자로 표시되도록 합니다.
곡선형 레이아웃 사용
Wear OS UI 라이브러리의
WearableRecyclerView 클래스를 사용하면 원형 화면에 최적화된 곡선형 레이아웃을 선택할 수 있습니다.
앱에서 스크롤 가능한 목록에 곡선형 레이아웃을 사용 설정하려면
Wear OS에서 목록 만들기를 참고하세요.

