
1. 事前準備
在先前的程式碼研究室中,您學會了如何使用 Room 持續性程式庫儲存應用程式資料,這個程式庫是位於 SQLite 資料庫頂端的抽象層。在本程式碼研究室中,您要為商品目錄應用程式新增更多功能,並學習如何使用 Room 讀取、顯示、更新及刪除 SQLite 資料庫中的資料。您將使用 LazyColumn 顯示資料庫中的資料,並根據資料庫內的基礎資料異動情況,自動進行更新。
必要條件
- 能夠使用 Room 程式庫建立 SQLite 資料庫並與之互動。
- 能夠建立實體、資料存取物件 (DAO) 和資料庫類別。
- 能夠使用 DAO 將 Kotlin 函式對應至 SQL 查詢。
- 能夠在
LazyColumn中顯示清單項目。 - 完成本單元中先前的程式碼研究室:使用 Room 保存資料。
課程內容
- 如何讀取及顯示 SQLite 資料庫中的實體。
- 如何使用 Room 程式庫更新和刪除 SQLite 資料庫中的實體。
建構項目
- 您建構的商品目錄應用程式會顯示庫存商品清單,並可透過 Room 更新、編輯與刪除應用程式資料庫中的商品。
軟硬體需求
- 搭載 Android Studio 的電腦
2. 範例應用程式總覽
本程式碼研究室採用先前程式碼研究室 (使用 Room 保存資料) 的商品目錄應用程式解決方案程式碼,做為範例程式碼。此範例應用程式已使用 Room 持續性程式庫儲存資料。使用者可以在「Add Item」畫面上,將資料加入應用程式資料庫。
|
|
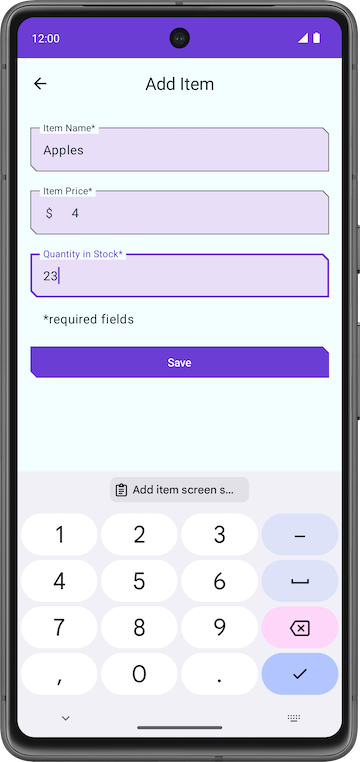
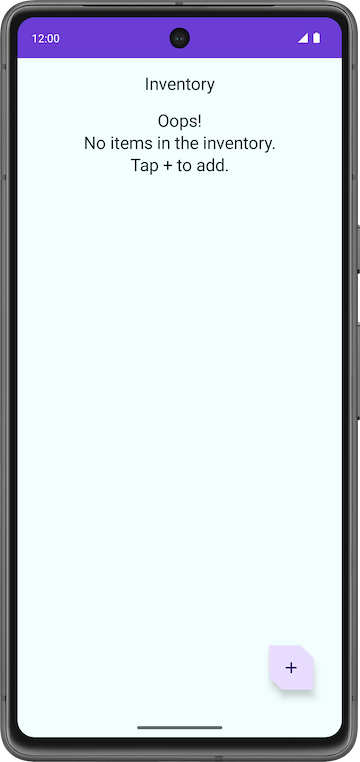
在本程式碼研究室中,您要擴充應用程式,以便使用 Room 程式庫讀取與顯示資料,以及更新與刪除資料庫中的實體。
下載本程式碼研究室的範例程式碼
首先請下載範例程式碼:
$ git clone https://github.com/google-developer-training/basic-android-kotlin-compose-training-inventory-app.git
$ cd basic-android-kotlin-compose-training-inventory-app
$ git checkout room
另外,您也能以 ZIP 檔案格式下載存放區,再將檔案解壓縮,然後在 Android Studio 中開啟。
如要瀏覽本程式碼研究室的解決方案程式碼,請前往 GitHub 查看。
3. 更新使用者介面狀態
在這項工作中,您要將 LazyColumn 加入應用程式,顯示資料庫內儲存的資料。
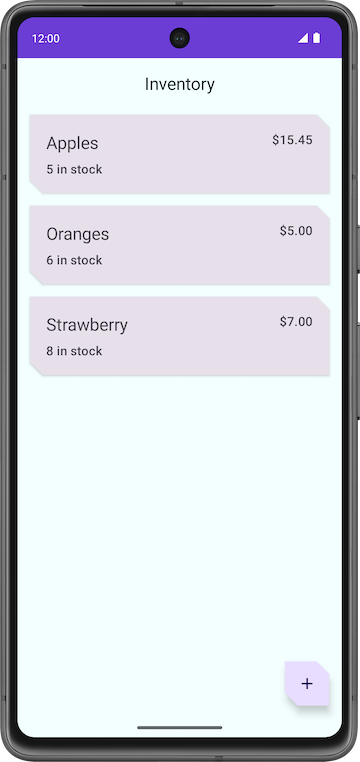
HomeScreen 可組合函式的逐步操作說明
- 開啟
ui/home/HomeScreen.kt檔案,然後查看HomeScreen()可組合項。
@Composable
fun HomeScreen(
    navigateToItemEntry: () -> Unit,
    navigateToItemUpdate: (Int) -> Unit,
    modifier: Modifier = Modifier,
) {
    val scrollBehavior = TopAppBarDefaults.enterAlwaysScrollBehavior()

    Scaffold(
        topBar = {
            // Top app with app title
        },
        floatingActionButton = {
            FloatingActionButton(
                // onClick details
            ) {
                Icon(
                    // Icon details
                )
            }
        },
    ) { innerPadding ->

       // Display List header and List of Items
        HomeBody(
            itemList = listOf(),  // Empty list is being passed in for itemList
            onItemClick = navigateToItemUpdate,
            modifier = modifier.padding(innerPadding)
                              .fillMaxSize()
        )
    }
這個可組合函式會顯示以下項目:
- 含有應用程式名稱的頂端應用程式列
- 懸浮動作按鈕 (FAB)
 ,用於將商品新增至商品目錄
 HomeBody()可組合函式
HomeBody() 可組合函式是根據傳入的清單,顯示庫存商品。在實作範例程式碼的過程中,會傳遞一份空白清單 (listOf()) 至 HomeBody() 可組合函式。如要傳遞商品目錄清單到這個可組合項,您必須從存放區擷取商品目錄資料,然後傳遞至 HomeViewModel 中。
在 HomeViewModel 中輸出使用者介面狀態
為了取得商品,您曾將 getItem() 和 getAllItems() 方法加入 ItemDao,當時已指定 Flow 做為傳回類型。提醒您,Flow 代表一般的資料串流。透過傳回 Flow,您只需在指定生命週期內明確呼叫 DAO 中的方法一次。Room 會以非同步的方式處理基礎資料的更新作業。
自資料流取得資料的做法稱為「從資料流收集」。在使用者介面層中執行這項操作時,請注意以下事項。
- 設定變更等生命週期事件 (例如旋轉裝置) 會導致重新建立活動,進而造成重組,以及重新從
Flow收集資料。 - 建議您將值快取為狀態,以免在生命週期事件之間遺失現有資料。
- 如果沒有剩餘的觀察器 (例如可組合項的生命週期結束後),就應該取消資料流。
如要從 ViewModel 公開 Flow,建議您使用 StateFlow。無論使用者介面生命週期處於哪個階段,您皆可透過 StateFlow 儲存及觀測資料。如要將 Flow 轉換為 StateFlow,請使用 stateIn 運算子。
stateIn 運算子有三個參數,說明如下:
scope:viewModelScope定義了StateFlow的生命週期。取消viewModelScope時,也會一併取消StateFlow。started:只有在顯示使用者介面時,才應啟用管道。SharingStarted.WhileSubscribed()可用於完成這項操作。如要設定最後一個訂閱者消失與共用協同程式停止之間的延遲時間 (以毫秒為單位),請將TIMEOUT_MILLIS傳入SharingStarted.WhileSubscribed()方法。initialValue:將狀態資料流的初始值設為HomeUiState()。
將 Flow 轉換為 StateFlow 後,您可以使用 collectAsState() 方法從資料流收集資料,並轉換成相同類型的 State。
在這個步驟中,您將擷取 Room 資料庫中的所有商品,做為使用者介面狀態的 StateFlow 可觀測 API。一旦 Room 商品目錄資料有所變更,使用者介面就會自動更新。
- 開啟
ui/home/HomeViewModel.kt檔案,當中含有TIMEOUT_MILLIS常數和HomeUiState資料類別,該類別包含一份商品清單做為建構函式參數。
// No need to copy over, this code is part of starter code

class HomeViewModel : ViewModel() {

    companion object {
        private const val TIMEOUT_MILLIS = 5_000L
    }
}

data class HomeUiState(val itemList: List<Item> = listOf())
- 在
HomeViewModel類別中,宣告類型為StateFlow<HomeUiState>的val,並命名為homeUiState。您很快就會修正初始化錯誤。
val homeUiState: StateFlow<HomeUiState>
- 對
itemsRepository呼叫getAllItemsStream(),並指派給剛才宣告的homeUiState。
val homeUiState: StateFlow<HomeUiState> =
    itemsRepository.getAllItemsStream()
現在會收到以下錯誤:Unresolved reference: itemsRepository。如要解決這項錯誤,您需要將 ItemsRepository 物件傳入 HomeViewModel。
- 將
ItemsRepository類型的建構函式參數加入HomeViewModel類別。
import com.example.inventory.data.ItemsRepository

class HomeViewModel(itemsRepository: ItemsRepository): ViewModel() {
- 在
ui/AppViewModelProvider.kt檔案的HomeViewModel初始化器中傳遞ItemsRepository物件,如下所示:
initializer {
    HomeViewModel(inventoryApplication().container.itemsRepository)
}
- 返回
HomeViewModel.kt檔案。請注意,系統會顯示類型不符的錯誤。如要解決這項錯誤,請新增轉換對應,如下所示:
val homeUiState: StateFlow<HomeUiState> =
    itemsRepository.getAllItemsStream().map { HomeUiState(it) }
Android Studio 仍會顯示類型不符的錯誤,這是因為 homeUiState 屬於 StateFlow 類型,而且 getAllItemsStream() 傳回 Flow。
- 使用
stateIn運算子,將Flow轉換為StateFlow。StateFlow是使用者介面狀態的可觀測 API,能夠讓使用者介面自行更新。
import androidx.lifecycle.viewModelScope
import kotlinx.coroutines.flow.SharingStarted
import kotlinx.coroutines.flow.map
import kotlinx.coroutines.flow.stateIn

val homeUiState: StateFlow<HomeUiState> =
    itemsRepository.getAllItemsStream().map { HomeUiState(it) }
        .stateIn(
            scope = viewModelScope,
            started = SharingStarted.WhileSubscribed(TIMEOUT_MILLIS),
            initialValue = HomeUiState()
        )
- 建構應用程式,確保程式碼中沒有任何錯誤。請注意,使用者介面不會發生任何變化。
4. 顯示商品目錄資料
在這項工作中,您要收集與更新 HomeScreen 內的使用者介面狀態。
- 在
HomeScreen.kt檔案的HomeScreen可組合函式中,新增HomeViewModel類型的函式參數,並將其初始化。
import androidx.lifecycle.viewmodel.compose.viewModel
import com.example.inventory.ui.AppViewModelProvider


@Composable
fun HomeScreen(
    navigateToItemEntry: () -> Unit,
    navigateToItemUpdate: (Int) -> Unit,
    modifier: Modifier = Modifier,
    viewModel: HomeViewModel = viewModel(factory = AppViewModelProvider.Factory)
)
- 在
HomeScreen可組合函式中新增名為homeUiState的val,收集HomeViewModel內的使用者介面狀態。請使用collectAsState(),這會收集此StateFlow中的值,並透過State呈現最新的值。
import androidx.compose.runtime.collectAsState
import androidx.compose.runtime.getValue

val homeUiState by viewModel.homeUiState.collectAsState()
- 更新
HomeBody()函式呼叫,並將homeUiState.itemList傳入itemList參數。
HomeBody(
    itemList = homeUiState.itemList,
    onItemClick = navigateToItemUpdate,
    modifier = modifier.padding(innerPadding)
)
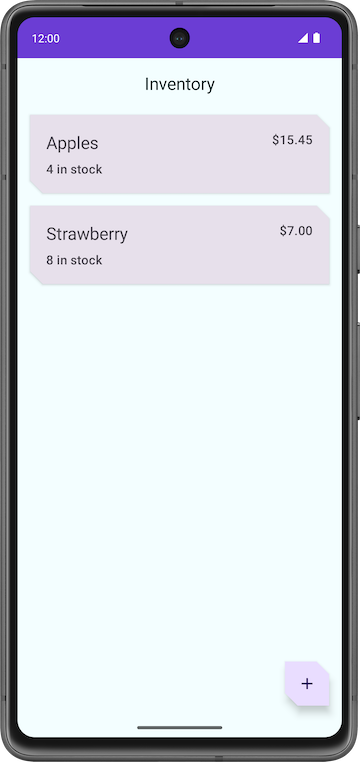
- 執行應用程式。請注意,如果您已在應用程式資料庫中儲存商品,系統會顯示商品目錄清單。若清單沒有任何內容,請在應用程式資料庫中新增庫存商品。
5. 測試資料庫
先前的程式碼研究室說明了測試程式碼的重要性。在這項工作中,您要新增單元測試來檢測 DAO 查詢,之後按照本程式碼研究室的步驟操作時,也將添加更多測試。
如要測試資料庫的實作方式,建議您編寫在 Android 裝置上執行的 JUnit 測試。由於這類測試不需建立活動,因此執行速度比 UI 測試更快。
- 在
build.gradle.kts (Module :app)檔案中,留意下列 Espresso 和 JUnit 依附元件。
// Testing
androidTestImplementation("androidx.test.espresso:espresso-core:3.5.1")
androidTestImplementation("androidx.test.ext:junit:1.1.5")
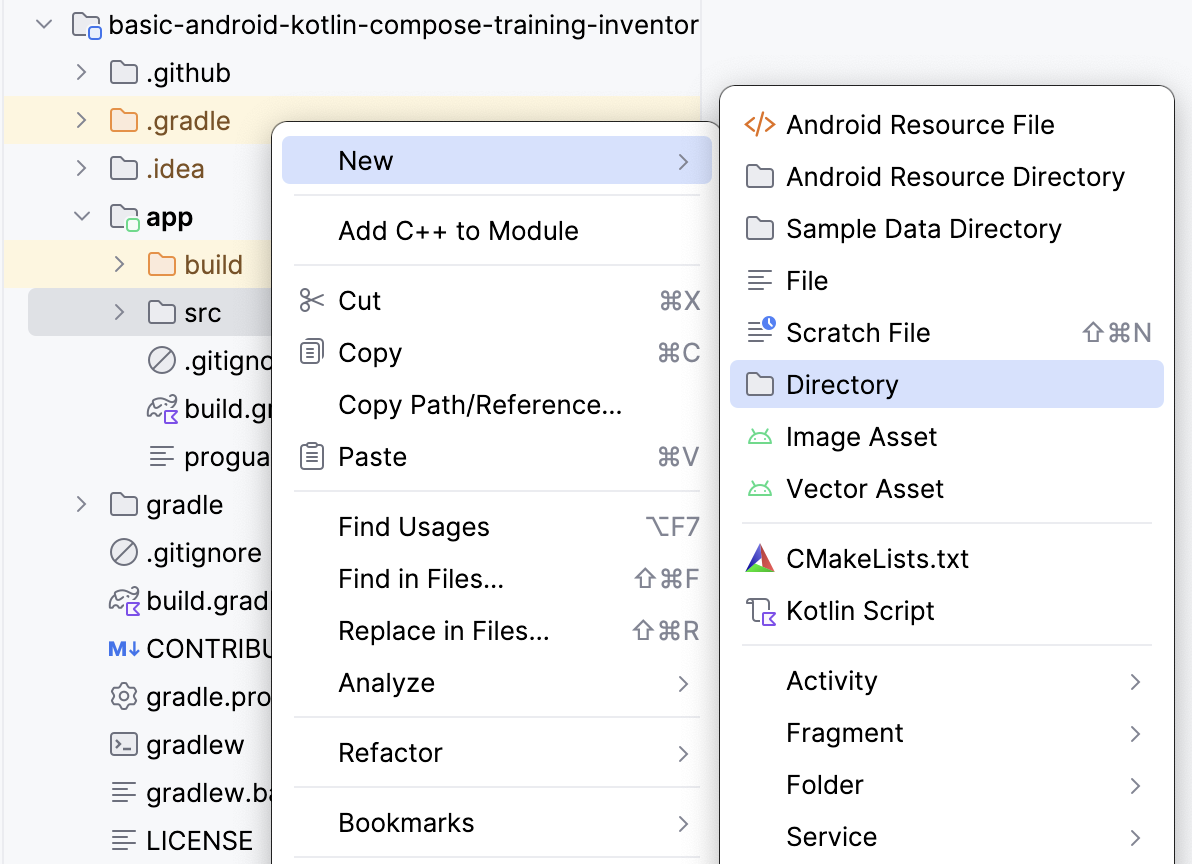
- 切換至「Project」檢視畫面,在「src」上按一下滑鼠右鍵,然後依序點選「New」>「Directory」,建立測試的來源集。
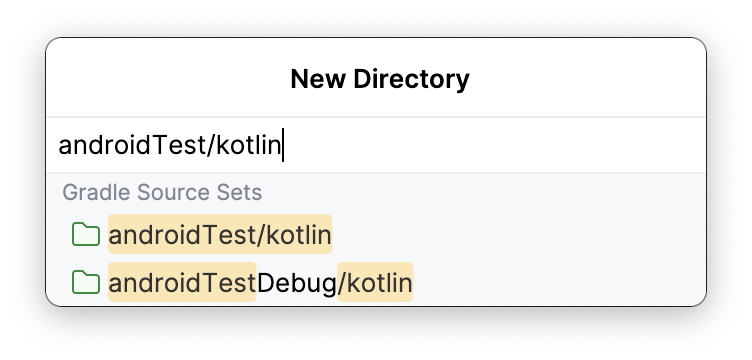
- 在「New Directory」彈出式視窗中選取「androidTest/kotlin」。
- 建立名為
ItemDaoTest.kt的 Kotlin 類別。 - 為
ItemDaoTest類別加上@RunWith(AndroidJUnit4::class)註解。您的類別現在會如以下範例程式碼所示:
package com.example.inventory

import androidx.test.ext.junit.runners.AndroidJUnit4
import org.junit.runner.RunWith

@RunWith(AndroidJUnit4::class)
class ItemDaoTest {
}
- 在該類別中,新增類型為
ItemDao和InventoryDatabase的私人var變數。
import com.example.inventory.data.InventoryDatabase
import com.example.inventory.data.ItemDao

private lateinit var itemDao: ItemDao
private lateinit var inventoryDatabase: InventoryDatabase
- 新增函式來建立資料庫,並加上
@Before註解,即可在每次測試前執行這個函式。 - 在該方法中將
itemDao初始化。
import android.content.Context
import androidx.room.Room
import androidx.test.core.app.ApplicationProvider
import org.junit.Before

@Before
fun createDb() {
    val context: Context = ApplicationProvider.getApplicationContext()
    // Using an in-memory database because the information stored here disappears when the
    // process is killed.
    inventoryDatabase = Room.inMemoryDatabaseBuilder(context, InventoryDatabase::class.java)
        // Allowing main thread queries, just for testing.
        .allowMainThreadQueries()
        .build()
    itemDao = inventoryDatabase.itemDao()
}
在這個函式中,您要使用記憶體內資料庫,但不將該資料庫保存在磁碟上。做法是使用 inMemoryDatabaseBuilder() 函式,這是因為相關資訊不必保存,而是要在程序終止時刪除。此外,您也會透過 .allowMainThreadQueries() 在主執行緒中執行 DAO 查詢,專門用於測試。
- 新增另一個函式,用於關閉資料庫。接著加上
@After註解,即可在每次測試後執行這個函式,並關閉資料庫。
import org.junit.After
import java.io.IOException

@After
@Throws(IOException::class)
fun closeDb() {
    inventoryDatabase.close()
}
- 宣告
ItemDaoTest類別中的項目供資料庫使用,如以下程式碼範例所示:
import com.example.inventory.data.Item

private var item1 = Item(1, "Apples", 10.0, 20)
private var item2 = Item(2, "Bananas", 15.0, 97)
- 新增公用函式,先在資料庫中加入一項商品,再添加兩項商品。您之後會在測試中使用這些函式。請將這些函式標示為
suspend,以便在協同程式中執行。
private suspend fun addOneItemToDb() {
    itemDao.insert(item1)
}

private suspend fun addTwoItemsToDb() {
    itemDao.insert(item1)
    itemDao.insert(item2)
}
- 為
insert()編寫測試,用於將單一商品插入資料庫。請將該測試命名為daoInsert_insertsItemIntoDB,並加上@Test註解。
import kotlinx.coroutines.flow.first
import kotlinx.coroutines.runBlocking
import org.junit.Assert.assertEquals
import org.junit.Test


@Test
@Throws(Exception::class)
fun daoInsert_insertsItemIntoDB() = runBlocking {
    addOneItemToDb()
    val allItems = itemDao.getAllItems().first()
    assertEquals(allItems[0], item1)
}
在這項測試中,您使用了公用函式 addOneItemToDb() 將一項商品加入資料庫,然後讀取資料庫內的第一項商品。透過 assertEquals(),您可以比較預期值與實際值。runBlocking{} 的用途是在新協同程式中執行測試,正因為這項設定,您才要將公用函式標示為 suspend。
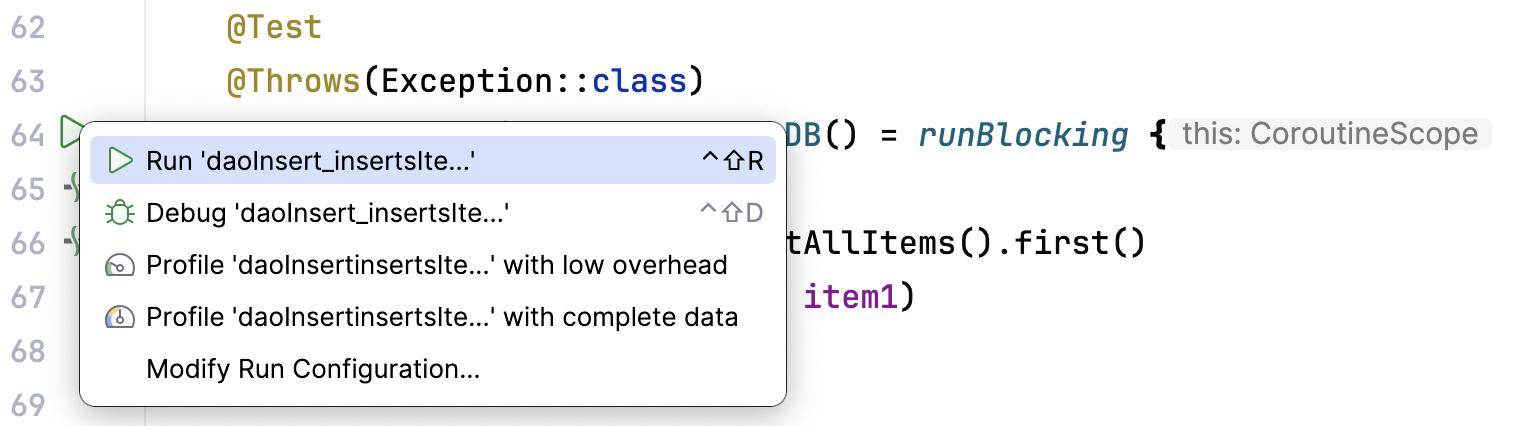
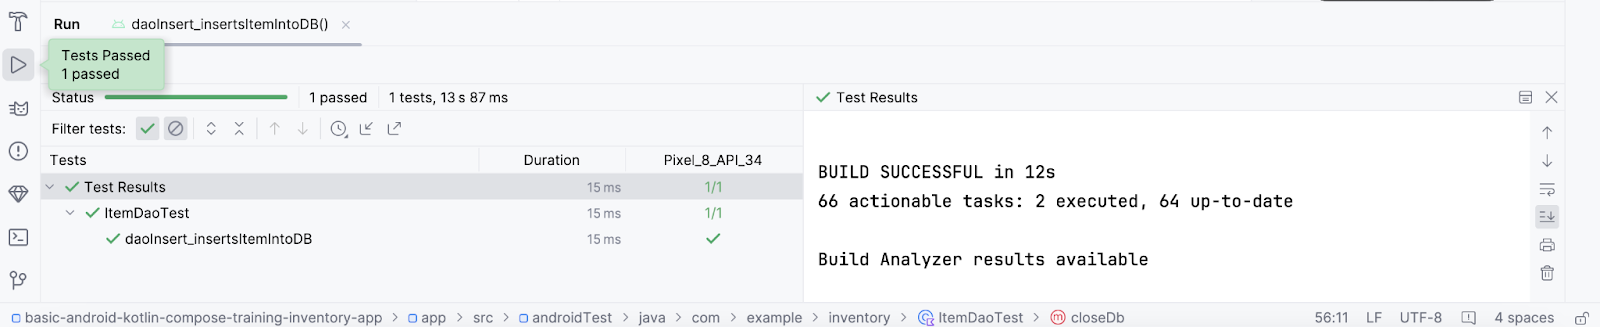
- 執行測試,並確認可通過測試。
- 為資料庫中的
getAllItems()編寫另一項測試。請將該測試命名為daoGetAllItems_returnsAllItemsFromDB。
@Test
@Throws(Exception::class)
fun daoGetAllItems_returnsAllItemsFromDB() = runBlocking {
    addTwoItemsToDb()
    val allItems = itemDao.getAllItems().first()
    assertEquals(allItems[0], item1)
    assertEquals(allItems[1], item2)
}
在上述測試中,您在協同程式內將兩項商品加入資料庫,然後讀取這些商品,並與預期值比較。
6. 顯示商品詳細資料
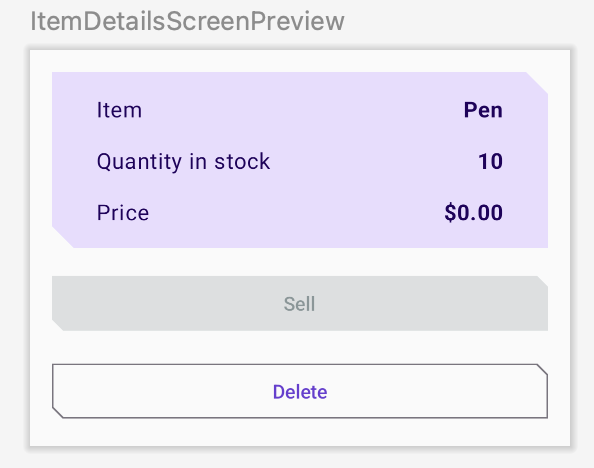
在這項工作中,您要在「Item Details」畫面上讀取並顯示實體詳細資料。請使用商品目錄應用程式資料庫中的名稱、價格和數量等商品使用者介面狀態,然後透過 ItemDetailsScreen 可組合項,在「Item Details」畫面上顯示這些資訊。ItemDetailsScreen 是為您預先編寫的可組合函式,包含三個顯示商品詳細資料的 Text 可組合函式。
ui/item/ItemDetailsScreen.kt
這個畫面是範例程式碼的一部分,會顯示商品詳細資料,您將在後續程式碼研究室中看到這些內容。在本程式碼研究室中,您不會處理這個畫面。ItemDetailsViewModel.kt 是與此畫面對應的 ViewModel。
- 留意
HomeScreen可組合函式中的HomeBody()函式呼叫。如以下程式碼所示,navigateToItemUpdate將傳遞至onItemClick參數;當您輕觸清單內的任何商品時,就會呼叫這個參數。
// No need to copy over
HomeBody(
    itemList = homeUiState.itemList,
    onItemClick = navigateToItemUpdate,
    modifier = modifier
        .padding(innerPadding)
        .fillMaxSize()
)
- 開啟
ui/navigation/InventoryNavGraph.kt,並留意HomeScreen可組合項中的navigateToItemUpdate參數。這個參數將導覽目的地指定為「Item Details」畫面。
// No need to copy over
HomeScreen(
    navigateToItemEntry = { navController.navigate(ItemEntryDestination.route) },
    navigateToItemUpdate = {
        navController.navigate("${ItemDetailsDestination.route}/${it}")
   }
系統已為您實作這個部分的 onItemClick 功能。您點選清單商品時,應用程式就會切換至「Item Details」畫面。
- 只要點選商品目錄清單中的任何商品,就會看到包含空白欄位的「Item Details」畫面。
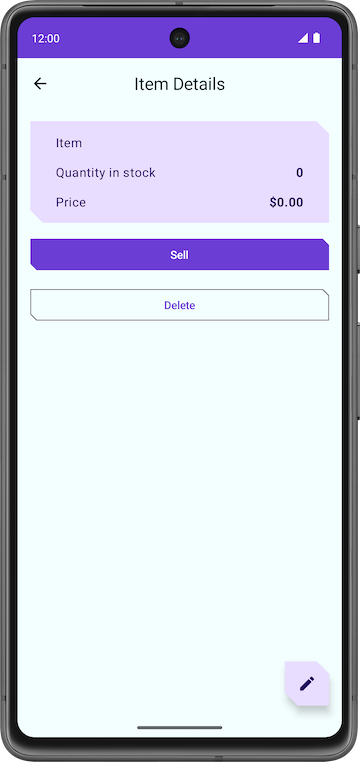
如要將商品詳細資料填入文字欄位,您需要在 ItemDetailsScreen() 中收集 UI 狀態。
- 在
UI/Item/ItemDetailsScreen.kt中,將新參數加入ItemDetailsViewModel類型的ItemDetailsScreen可組合項,然後使用工廠方法進行初始化。
import androidx.lifecycle.viewmodel.compose.viewModel
import com.example.inventory.ui.AppViewModelProvider

@Composable
fun ItemDetailsScreen(
    navigateToEditItem: (Int) -> Unit,
    navigateBack: () -> Unit,
    modifier: Modifier = Modifier,
    viewModel: ItemDetailsViewModel = viewModel(factory = AppViewModelProvider.Factory)
)
- 在
ItemDetailsScreen()可組合項中建立名為uiState的val,收集使用者介面狀態。請利用collectAsState()收集uiStateStateFlow,並透過State呈現最新的值。Android Studio 會顯示未解決的參照錯誤。
import androidx.compose.runtime.collectAsState

val uiState = viewModel.uiState.collectAsState()
- 如要解決錯誤,請在
ItemDetailsViewModel類別中建立名為uiState的StateFlow<ItemDetailsUiState>類型val。 - 從商品存放區中擷取資料,並使用擴充函式
toItemDetails()將資料對應至ItemDetailsUiState。在範例程式碼中,您可以找到已編寫完成的擴充函式Item.toItemDetails()。
import androidx.lifecycle.viewModelScope
import kotlinx.coroutines.flow.SharingStarted
import kotlinx.coroutines.flow.StateFlow
import kotlinx.coroutines.flow.filterNotNull
import kotlinx.coroutines.flow.map
import kotlinx.coroutines.flow.stateIn

val uiState: StateFlow<ItemDetailsUiState> =
         itemsRepository.getItemStream(itemId)
             .filterNotNull()
             .map {
                 ItemDetailsUiState(itemDetails = it.toItemDetails())
             }.stateIn(
                 scope = viewModelScope,
                 started = SharingStarted.WhileSubscribed(TIMEOUT_MILLIS),
                 initialValue = ItemDetailsUiState()
             )
- 將
ItemsRepository傳入ItemDetailsViewModel,解決Unresolved reference: itemsRepository錯誤。
class ItemDetailsViewModel(
    savedStateHandle: SavedStateHandle,
    private val itemsRepository: ItemsRepository
    ) : ViewModel() {
- 在
ui/AppViewModelProvider.kt中更新ItemDetailsViewModel的初始化器,如以下程式碼片段所示:
initializer {
    ItemDetailsViewModel(
        this.createSavedStateHandle(),
        inventoryApplication().container.itemsRepository
    )
}
- 返回
ItemDetailsScreen.kt後,就會發現ItemDetailsScreen()可組合項中的錯誤已解決。 - 在
ItemDetailsScreen()可組合項中,更新ItemDetailsBody()函式呼叫,並將uiState.value傳入itemUiState引數。
ItemDetailsBody(
    itemUiState = uiState.value,
    onSellItem = {  },
    onDelete = { },
    modifier = modifier.padding(innerPadding)
)
- 查看
ItemDetailsBody()和ItemInputForm()實作項目。您正在將目前選取的item從ItemDetailsBody()傳遞至ItemDetails()。
// No need to copy over

@Composable
private fun ItemDetailsBody(
    itemUiState: ItemUiState,
    onSellItem: () -> Unit,
    onDelete: () -> Unit,
    modifier: Modifier = Modifier
) {
    Column(
       //...
    ) {
        var deleteConfirmationRequired by rememberSaveable { mutableStateOf(false) }
        ItemDetails(
             item = itemDetailsUiState.itemDetails.toItem(), modifier = Modifier.fillMaxWidth()
         )

      //...
    }
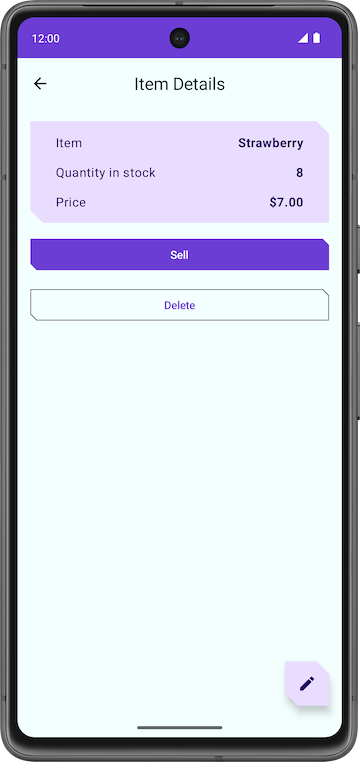
- 執行應用程式。您在「Inventory」畫面上點選任一清單元素時,就會看到「Item Details」畫面。
- 請注意,「Item Details」畫面的文字欄位已不再空白,而是顯示擷取自商品目錄資料庫的實體詳細資料。
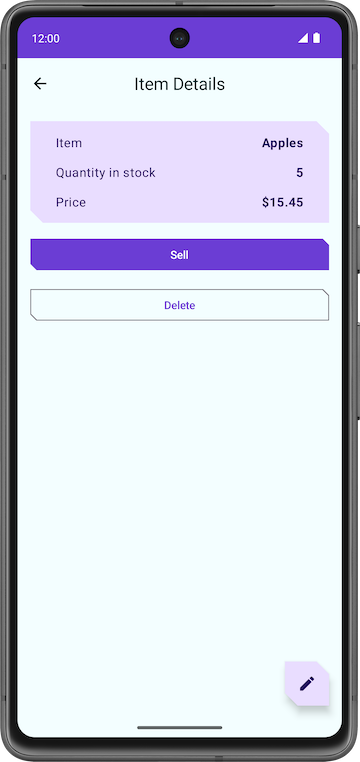
- 輕觸「Sell」按鈕,但這個按鈕沒有任何作用。
在後續部分中,您將實作「Sell」按鈕的功能。
7. 實作商品詳細資料畫面
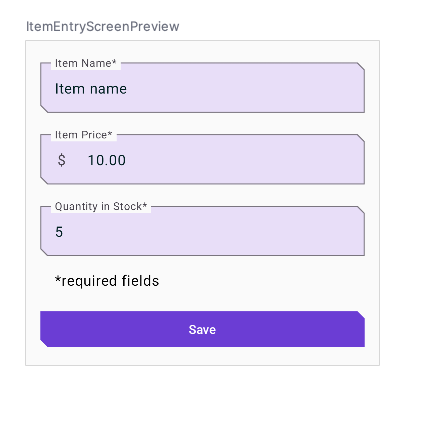
ui/item/ItemEditScreen.kt
範例程式碼中已提供商品編輯畫面。
這個版面配置包含文字欄位可組合函式,用於編輯新庫存商品的詳細資料。
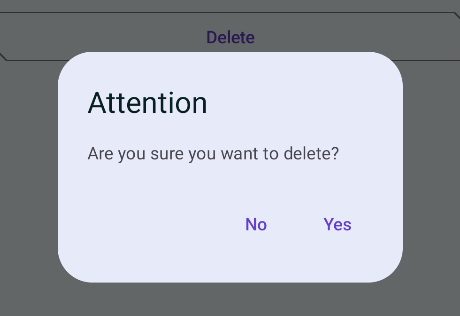
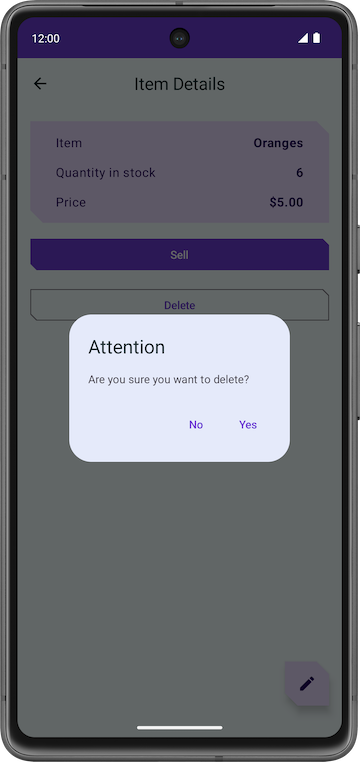
這個應用程式的程式碼還無法完全正常運作。舉例來說,如果輕觸「Item Details」畫面上的「Sell」按鈕,「Quantity in Stock」的值不會減少。當您輕觸「Delete」按鈕時,應用程式會顯示確認對話方塊,不過在您選取「Yes」按鈕後,應用程式並不會刪除商品。
最後,FAB 按鈕  會開啟內含空白欄位的「Edit Item」畫面。
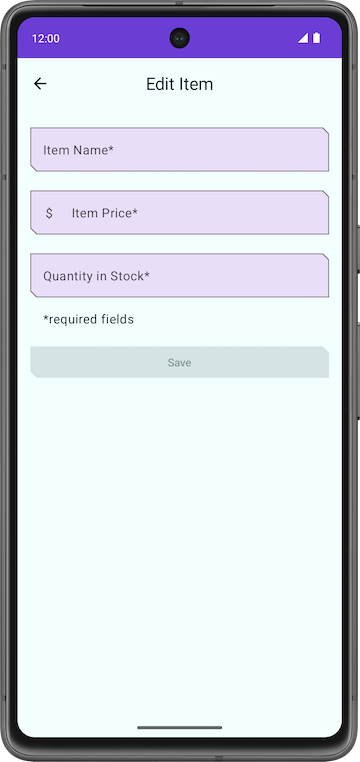
在下一個節中,您將實作「Sell」、「Delete」和 FAB 按鈕的功能。
8. 實作銷售商品的功能
在這個部分中,您要實作銷售功能來擴充應用程式。這項更新程序涵蓋以下工作:
- 新增測試,讓 DAO 函式更新實體。
- 在
ItemDetailsViewModel中新增函式,用於減少庫存數量及更新應用程式資料庫內的實體。 - 在庫存數量為零時停用「Sell」按鈕。
- 在
ItemDaoTest.kt中新增不含參數的daoUpdateItems_updatesItemsInDB()函式,並加上@Test和@Throws(Exception::class)註解。
@Test
@Throws(Exception::class)
fun daoUpdateItems_updatesItemsInDB()
- 定義函式並建立「
runBlocking」區塊,然後在該區塊中呼叫addTwoItemsToDb()。
fun daoUpdateItems_updatesItemsInDB() = runBlocking {
    addTwoItemsToDb()
}
- 呼叫
itemDao.update,使用不同的值更新兩個實體。
itemDao.update(Item(1, "Apples", 15.0, 25))
itemDao.update(Item(2, "Bananas", 5.0, 50))
- 使用
itemDao.getAllItems()擷取實體,並比較這些內容與更新後的實體及斷言。
val allItems = itemDao.getAllItems().first()
assertEquals(allItems[0], Item(1, "Apples", 15.0, 25))
assertEquals(allItems[1], Item(2, "Bananas", 5.0, 50))
- 確認完成的函式如下所示:
@Test
@Throws(Exception::class)
fun daoUpdateItems_updatesItemsInDB() = runBlocking {
    addTwoItemsToDb()
    itemDao.update(Item(1, "Apples", 15.0, 25))
    itemDao.update(Item(2, "Bananas", 5.0, 50))

    val allItems = itemDao.getAllItems().first()
    assertEquals(allItems[0], Item(1, "Apples", 15.0, 25))
    assertEquals(allItems[1], Item(2, "Bananas", 5.0, 50))
}
- 執行測試,並確認可通過測試。
在 ViewModel 中新增函式
- 在
ItemDetailsViewModel.kt的ItemDetailsViewModel類別中,新增不含參數的reduceQuantityByOne()函式。
fun reduceQuantityByOne() {
}
- 在函式中,使用
viewModelScope.launch{}啟動協同程式。
import kotlinx.coroutines.launch
import androidx.lifecycle.viewModelScope


viewModelScope.launch {
}
- 在
launch區塊中,建立名為currentItem的val,並設為「uiState.value.toItem()」。
val currentItem = uiState.value.toItem()
uiState.value 屬於 ItemUiState 類型。請使用擴充功能函式 toItem(),將 uiState.value 轉換為 Item 實體類型。
- 新增
if陳述式,檢查quality是否大於0。 - 對
itemsRepository呼叫updateItem(),然後傳入更新後的currentItem。使用copy()更新quantity值,讓函式呈現如下:
fun reduceQuantityByOne() {
    viewModelScope.launch {
        val currentItem = uiState.value.itemDetails.toItem()
        if (currentItem.quantity > 0) {
    itemsRepository.updateItem(currentItem.copy(quantity = currentItem.quantity - 1))
       }
    }
}
- 返回
ItemDetailsScreen.kt。 - 在
ItemDetailsScreen可組合項中,前往ItemDetailsBody()函式呼叫。 - 在
onSellItemlambda 中,呼叫viewModel.reduceQuantityByOne()。
ItemDetailsBody(
    itemUiState = uiState.value,
    onSellItem = { viewModel.reduceQuantityByOne() },
    onDelete = { },
    modifier = modifier.padding(innerPadding)
)
- 執行應用程式。
- 在「Inventory」畫面上點選清單元素。「Item Details」畫面出現後,請輕觸「Sell」,您會發現庫存數量值減少一。
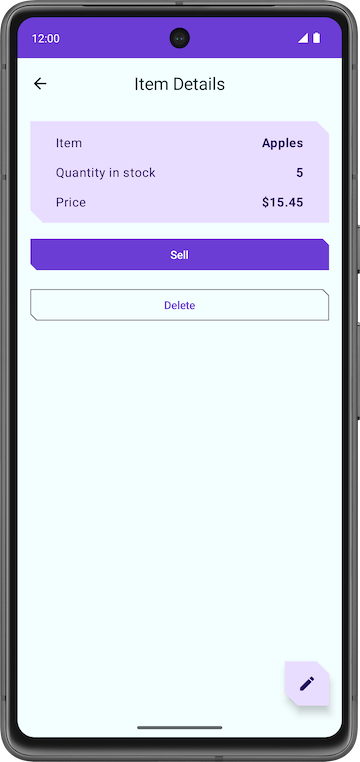
- 在「Item Details」畫面上繼續輕觸「Sell」按鈕,直到庫存數量變成零。
庫存數量變成零後,再次輕觸「Sell」。畫面上不會發生任何變化,因為 reduceQuantityByOne() 函式會先檢查庫存數量是否大於零,再更新數量。
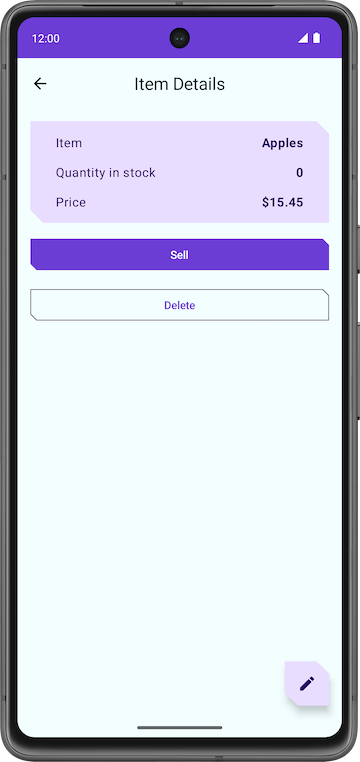
為了讓使用者更清楚得知能否銷售商品,建議您在商品沒有庫存時停用「Sell」按鈕。
- 在
ItemDetailsViewModel類別中,根據map轉換中的it.quantity設定outOfStock值。
val uiState: StateFlow<ItemDetailsUiState> =
    itemsRepository.getItemStream(itemId)
        .filterNotNull()
        .map {
            ItemDetailsUiState(outOfStock = it.quantity <= 0, itemDetails = it.toItemDetails())
        }.stateIn(
            //...
        )
- 執行應用程式。當庫存數量為零時,您會發現應用程式停用「Sell」按鈕。
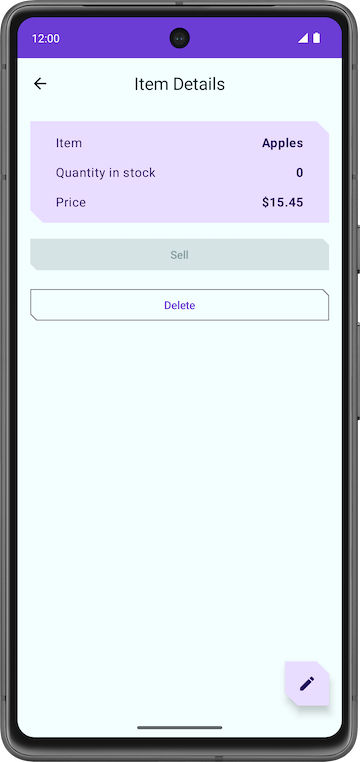
恭喜您在應用程式中實作了販售商品的功能!
刪除商品實體
與先前的工作相同,您也必須實作刪除功能,進一步擴充應用程式。相較於銷售功能,刪除功能的實作方式簡單許多。這項程序涵蓋以下工作:
- 新增測試,檢測用於刪除商品的 DAO 查詢。
- 在
ItemDetailsViewModel類別中新增函式,從資料庫刪除實體。 - 更新「
ItemDetailsBody」可組合項。
新增 DAO 測試
- 在
ItemDaoTest.kt中,新增名為daoDeleteItems_deletesAllItemsFromDB()的測試。
@Test
@Throws(Exception::class)
fun daoDeleteItems_deletesAllItemsFromDB()
- 使用「
runBlocking {}」啟動協同程式。
fun daoDeleteItems_deletesAllItemsFromDB() = runBlocking {
}
- 新增兩項商品到資料庫,並對這兩項商品呼叫
itemDao.delete(),從資料庫刪除這些商品。
addTwoItemsToDb()
itemDao.delete(item1)
itemDao.delete(item2)
- 從資料庫擷取實體,確認清單沒有任何內容。完成的測試如下所示:
import org.junit.Assert.assertTrue

@Test
@Throws(Exception::class)
fun daoDeleteItems_deletesAllItemsFromDB() = runBlocking {
    addTwoItemsToDb()
    itemDao.delete(item1)
    itemDao.delete(item2)
    val allItems = itemDao.getAllItems().first()
    assertTrue(allItems.isEmpty())
}
在 ItemDetailsViewModel 中新增刪除商品的函式
- 在
ItemDetailsViewModel中,新增名為deleteItem()的函式,這個函式不會採用任何參數,也不會傳回任何內容。 - 在
deleteItem()函式中,新增itemsRepository.deleteItem()函式呼叫,然後傳入uiState.value.toItem()。
suspend fun deleteItem() {
    itemsRepository.deleteItem(uiState.value.itemDetails.toItem())
}
在此函式中,您使用了擴充功能函式 toItem(),將 uiState 從 itemDetails 類型轉換為 Item 實體類型。
- 在
ui/item/ItemDetailsScreen可組合項中,新增名為coroutineScope的val,並設為rememberCoroutineScope()。這種做法會傳回協同程式範圍,此範圍是繫結至呼叫函式時所在的組合 (ItemDetailsScreen可組合項)。
import androidx.compose.runtime.rememberCoroutineScope


val coroutineScope = rememberCoroutineScope()
- 捲動至
ItemDetailsBody()函式。 - 在
onDeletelambda 中使用coroutineScope啟動協同程式。 - 在
launch區塊中,對viewModel呼叫deleteItem()方法。
import kotlinx.coroutines.launch

ItemDetailsBody(
    itemUiState = uiState.value,
    onSellItem = { viewModel.reduceQuantityByOne() },
    onDelete = {
        coroutineScope.launch {
           viewModel.deleteItem()
    }
    modifier = modifier.padding(innerPadding)
)
- 刪除商品後,返回「Inventory」畫面。
- 在
deleteItem()函式呼叫後方,呼叫navigateBack()。
onDelete = {
    coroutineScope.launch {
        viewModel.deleteItem()
        navigateBack()
    }
- 在
ItemDetailsScreen.kt檔案中,捲動至ItemDetailsBody()函式。
此函式包含在範例程式碼中。這個可組合項會顯示快訊對話方塊,先要求使用者確認後再刪除商品,還會在您輕觸「Yes」時呼叫 deleteItem() 函式。
// No need to copy over

@Composable
private fun ItemDetailsBody(
    itemUiState: ItemUiState,
    onSellItem: () -> Unit,
    onDelete: () -> Unit,
    modifier: Modifier = Modifier
) {
    Column(
        /*...*/
    ) {
        //...

        if (deleteConfirmationRequired) {
            DeleteConfirmationDialog(
                onDeleteConfirm = {
                    deleteConfirmationRequired = false
                    onDelete()
                },
                //...
            )
        }
    }
}
如果您輕觸「No」,應用程式會關閉快訊對話方塊。showConfirmationDialog() 函式會顯示以下快訊:
- 執行應用程式。
- 在「Inventory」上選取清單元素。
- 在「Item Details」畫面上輕觸「Delete」。
- 輕觸快訊對話方塊中的「Yes」,應用程式就會切換回「Inventory」畫面。
- 確認您刪除的實體已不在應用程式資料庫中。
恭喜您實作了刪除功能!
|
|
編輯商品實體
與前一個部分類似,您在這個部分中要新增編輯商品實體的功能,繼續擴充應用程式。
以下簡單介紹在應用程式資料庫中編輯實體的步驟:
- 新增測試,檢測用於取得商品的 DAO 查詢。
- 在「Edit Item」畫面的文字欄位填入實體詳細資料。
- 使用 Room 更新資料庫中的實體。
新增 DAO 測試
- 在
ItemDaoTest.kt中,新增名為daoGetItem_returnsItemFromDB()的測試。
@Test
@Throws(Exception::class)
fun daoGetItem_returnsItemFromDB()
- 定義函式,並在協同程式中將一項商品加入資料庫。
@Test
@Throws(Exception::class)
fun daoGetItem_returnsItemFromDB() = runBlocking {
    addOneItemToDb()
}
- 使用
itemDao.getItem()函式從資料庫擷取實體,並設定成名為item的val。
val item = itemDao.getItem(1)
- 使用
assertEquals(),比較實際值與擷取到的值及斷言。完成的測試如下所示:
@Test
@Throws(Exception::class)
fun daoGetItem_returnsItemFromDB() = runBlocking {
    addOneItemToDb()
    val item = itemDao.getItem(1)
    assertEquals(item.first(), item1)
}
- 執行測試,並確認可通過測試。
在文字欄位填入資料
如果您在執行應用程式時輕觸「Item Details」畫面上的 FAB,會看到標題為「Edit Item」的畫面,不過所有文字欄位都沒有內容。在這個步驟中,您要在「Edit Item」畫面的文字欄位填入實體詳細資料。
|
|
- 在
ItemDetailsScreen.kt中,捲動至ItemDetailsScreen可組合函式。 - 在
FloatingActionButton()中,將onClick引數變更為包含uiState.value.itemDetails.id,也就是所選實體的id。這個id將用於擷取實體詳細資料。
FloatingActionButton(
    onClick = { navigateToEditItem(uiState.value.itemDetails.id) },
    modifier = /*...*/
)
- 在
ItemEditViewModel類別中,新增init區塊。
init {

}
- 在
init區塊中,使用viewModelScope.launch啟動協同程式。
import kotlinx.coroutines.launch

viewModelScope.launch { }
- 在
launch區塊中,使用itemsRepository.getItemStream(itemId)擷取實體詳細資料。
import androidx.lifecycle.viewModelScope
import kotlinx.coroutines.flow.filterNotNull
import kotlinx.coroutines.flow.first


init {
    viewModelScope.launch {
        itemUiState = itemsRepository.getItemStream(itemId)
            .filterNotNull()
            .first()
            .toItemUiState(true)
    }
}
在這個啟動區塊中,您新增了篩選器,傳回只含有非空值的資料流。接著使用 toItemUiState(),將 item 實體轉換為 ItemUiState。此外,也傳遞設為 true 的 actionEnabled 值,啟用「Save」按鈕。
為了解決 Unresolved reference: itemsRepository 錯誤,您需要傳入「ItemsRepository」做為檢視區塊模型的依附元件。
- 將建構函式參數加入
ItemEditViewModel類別。
class ItemEditViewModel(
    savedStateHandle: SavedStateHandle,
    private val itemsRepository: ItemsRepository
)
- 在
AppViewModelProvider.kt檔案的ItemEditViewModel初始化器中,新增ItemsRepository物件做為引數。
initializer {
    ItemEditViewModel(
        this.createSavedStateHandle(),
        inventoryApplication().container.itemsRepository
    )
}
- 執行應用程式。
- 前往「Item Details」頁面,然後輕觸 FAB
 。
。 - 您會發現文字欄位已填入商品詳細資料。
- 編輯庫存數量或任何其他欄位的內容,然後輕觸「Save」。
沒有回應!這是因為您並未更新應用程式資料庫中的實體。您將在下一節中修正此問題。
|
|
使用 Room 更新實體
在最後一項工作中,請新增最後的程式碼,實作更新功能。您要在 ViewModel 內定義必要的函式,並用於 ItemEditScreen 中。
接著就繼續編寫程式碼吧!
- 在
ItemEditViewModel類別中,新增名為updateUiState()的函式,這個函式會採用ItemUiState物件,但不會傳回任何內容。此函式會根據使用者輸入的新值,更新itemUiState。
fun updateUiState(itemDetails: ItemDetails) {
    itemUiState =
        ItemUiState(itemDetails = itemDetails, isEntryValid = validateInput(itemDetails))
}
在這個函式中,您將傳入的 itemDetails 指派給 itemUiState,並更新 isEntryValid 值。如果 itemDetails 是 true,應用程式會啟用「Save」按鈕。「只有」在使用者輸入的內容有效時,才將這個值設為 true。
- 前往
ItemEditScreen.kt檔案。 - 在
ItemEditScreen可組合項中,向下捲動至ItemEntryBody()函式呼叫。 - 將
onItemValueChange引數值設為新函式updateUiState。
ItemEntryBody(
    itemUiState = viewModel.itemUiState,
    onItemValueChange = viewModel::updateUiState,
    onSaveClick = { },
    modifier = modifier.padding(innerPadding)
)
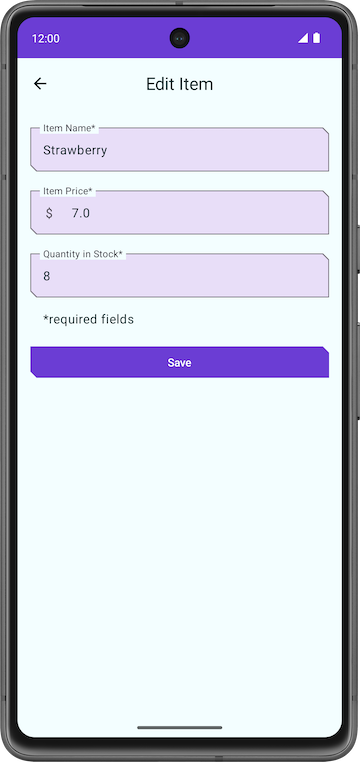
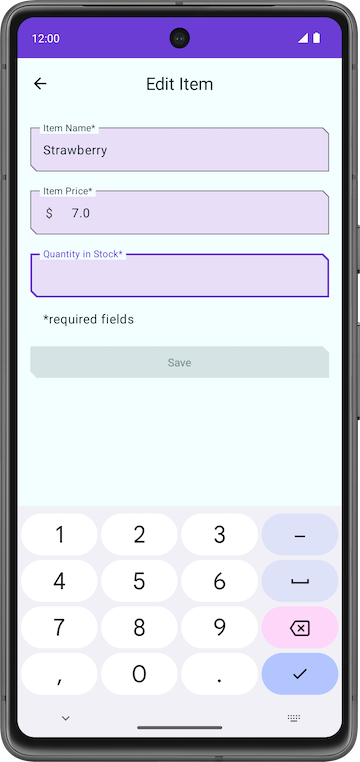
- 執行應用程式。
- 前往「Edit Item」畫面。
- 將其中一個實體值留空,讓這個值變成無效狀態。請留意應用程式如何自動停用「Save」按鈕。
|
|
|
- 返回
ItemEditViewModel類別,然後新增名為updateItem()的suspend函式,這個函式不會採用任何內容。您可以使用此函式,將更新後的實體儲存至 Room 資料庫。
suspend fun updateItem() {
}
- 在
getUpdatedItemEntry()函式中新增if條件,透過validateInput()函式驗證使用者輸入內容。 - 對
itemsRepository呼叫updateItem()函式,傳入itemUiState.itemDetails.toItem()。實體必須是Item類型才能加入 Room 資料庫。完成的函式如下所示:
suspend fun updateItem() {
    if (validateInput(itemUiState.itemDetails)) {
        itemsRepository.updateItem(itemUiState.itemDetails.toItem())
    }
}
- 返回
ItemEditScreen可組合項。您需要協同程式範圍才能呼叫updateItem()函式。請建立名為coroutineScope的 val,並設為rememberCoroutineScope()。
import androidx.compose.runtime.rememberCoroutineScope

val coroutineScope = rememberCoroutineScope()
- 在「
ItemEntryBody()」函式呼叫中,更新onSaveClick函式引數,啟動coroutineScope內的協同程式。 - 在
launch區塊中,對viewModel呼叫updateItem(),然後返回上一個畫面。
import kotlinx.coroutines.launch

onSaveClick = {
    coroutineScope.launch {
        viewModel.updateItem()
        navigateBack()
    }
},
完成的「ItemEntryBody()」函式呼叫如下所示:
ItemEntryBody(
    itemUiState = viewModel.itemUiState,
    onItemValueChange = viewModel::updateUiState,
    onSaveClick = {
        coroutineScope.launch {
            viewModel.updateItem()
            navigateBack()
        }
    },
    modifier = modifier.padding(innerPadding)
)
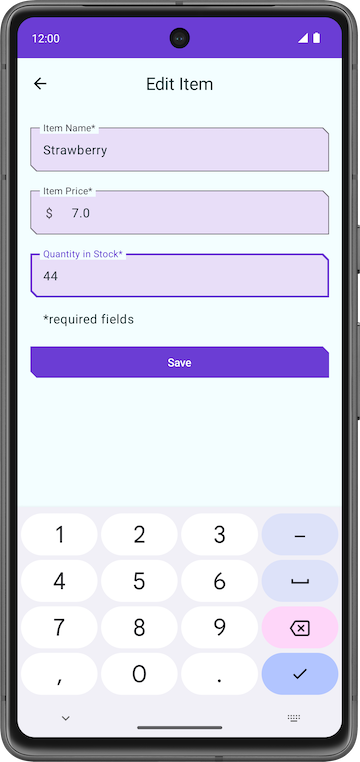
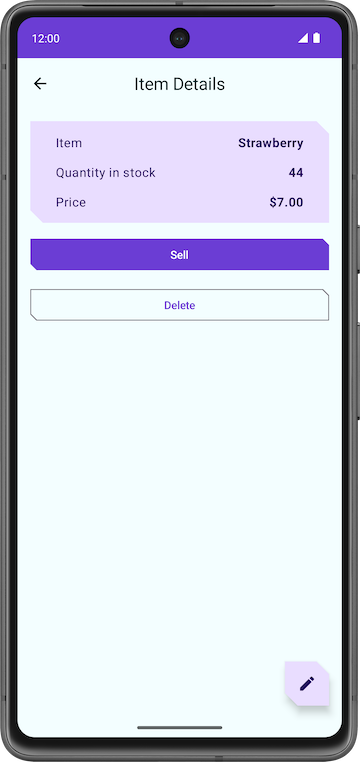
- 執行應用程式,然後嘗試編輯庫存商品。您現在可以編輯商品目錄應用程式資料庫中的任何商品。
|
|
恭喜您成功建立第一個使用 Room 管理資料庫的應用程式!
9. 解決方案程式碼
本程式碼研究室的解決方案程式碼位於下列 GitHub 存放區和分支中:
10. 瞭解詳情
Android 開發人員說明文件
Kotlin 參考資料