The *Gemini Developer API* gives you access to Google's Gemini models, letting
you build cutting-edge generative AI features into your Android apps---including
conversational chat, image generation (with Nano Banana), and text generation
based on text, image, audio, and video input.
To access the Gemini Pro and Flash models, you can use the Gemini Developer API
with Firebase AI Logic. It lets you get started without requiring a payment
method (like a credit card), and provides a generous free tier. Once you
validate your integration with a small user base, you can scale by upgrading to
the paid tier.
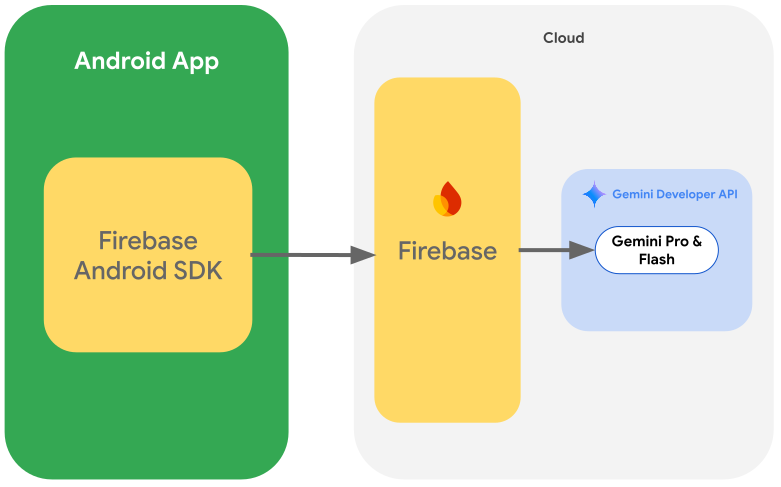 **Figure 1.** Firebase AI Logic integration architecture to access the Gemini Developer API.
> [!NOTE]
> **Note:** If you have strict [data location](https://firebase.google.com/docs/ai-logic/locations?api=vertex) requirements or you're already embedded in the Google Cloud ecosystem, you can consider using the [Agent Platform Gemini API](https://developer.android.com/ai/gemini/agent-platform-api.md.txt) (formerly Vertex AI) as your API provider for the Firebase AI Logic SDK.
### Getting started
Before you interact with the Gemini API directly from your app, you'll need to
do a few things first, including getting familiar with prompting as well as
setting up Firebase and your app to use the SDK.
### Experiment with prompts
Experimenting with prompts can help you find the best phrasing, content, and
format for your Android app. [Google AI Studio](https://aistudio.google.com/) is an Integrated
Development Environment (IDE) that you can use to prototype and design prompts
for your app's use cases.
Creating effective prompts for your use case involves extensive experimentation,
which is a critical part of the process. You can learn more about prompting in
the [Firebase documentation](https://firebase.google.com/docs/ai-logic/prompt-design).
Once you are happy with your prompt, click the **\<\>** button to get code
snippets that you can add to your code.
### Set up a Firebase project and connect your app to Firebase
Once you're ready to call the API from your app, follow the instructions in
"Step 1" of the [Firebase AI Logic getting started guide](https://firebase.google.com/docs/ai-logic/get-started?api=dev#set-up-firebase) to set up Firebase
and enable required APIs and services.
### Add the Gradle dependencies
Add the following Gradle dependencies to your app module:
### Kotlin
```groovy
dependencies {
// ... other androidx dependencies
// Import the BoM for the Firebase platform
implementation(platform("com.google.firebase:firebase-bom:35.1.0"))
// Add the dependencies for the Firebase AI Logic and App Check libraries
// When using the BoM, you don't specify versions in Firebase library dependencies
implementation("com.google.firebase:firebase-ai")
implementation("com.google.firebase:firebase-appcheck-debug")
}
```
### Java
```groovy
dependencies {
// Import the BoM for the Firebase platform
implementation(platform("com.google.firebase:firebase-bom:35.1.0"))
// Add the dependencies for the Firebase AI Logic and App Check libraries
// When using the BoM, you don't specify versions in Firebase library dependencies
implementation("com.google.firebase:firebase-ai")
implementation("com.google.firebase:firebase-appcheck-debug")
// Required for one-shot operations (to use `ListenableFuture` from Guava Android)
implementation("com.google.guava:guava:31.0.1-android")
// Required for streaming operations (to use `Publisher` from Reactive Streams)
implementation("org.reactivestreams:reactive-streams:1.0.4")
}
```
### Configure the App Check debug provider for local development
Starting early July 2026, as part of the guided setup workflow for AI Logic
in the Firebase console, Firebase App Check is automatically enforced to protect
the Gemini API. For local development, you need to configure the
App Check *debug provider* to bypass attestation while still maintaining the
enforcement of App Check.
1. In your debug build, configure App Check to use the debug provider
factory:
### Kotlin
```kotlin
Firebase.initialize(context = this)
Firebase.appCheck.installAppCheckProviderFactory(
DebugAppCheckProviderFactory.getInstance(),
)
```
### Java
```java
FirebaseApp.initializeApp(/*context=*/ this);
FirebaseAppCheck firebaseAppCheck = FirebaseAppCheck.getInstance();
firebaseAppCheck.installAppCheckProviderFactory(
DebugAppCheckProviderFactory.getInstance());
```
2. Obtain your debug token:
1. Run your app in the emulator or on your test device.
2. Look for the App Check debug token in your logs. For example:
D DebugAppCheckProvider: Enter this debug secret into the allow list
in the Firebase Console for your project: 123a4567-b89c-12d3-e456-789012345678
3. Copy the token (for example, `123a4567-b89c-12d3-e456-789012345678`).
3. Register your debug token with App Check:
1. In the Firebase console, go to the
**Security** \> **App Check** \> [**Apps** tab](https://console.firebase.google.com/project/_/appcheck/apps/?useAutoProject=true).
2. Find your app, click the overflow menu
(), and then select
**Manage debug tokens**.
3. Follow the on-screen instructions to register your debug token.
For details about the debug provider (including how to get a new debug token),
check out the [official App Check docs](https://firebase.google.com/docs/app-check/android/debug-provider).
> [!CAUTION]
> **Here are some critical points about the
> App Check debug provider:**
>
> - **Keep your debug token and debug build private.** Don't commit your debug token to a public repository, and don't ship your debug token or debug build in production builds of your app.
> - **Register your app with a production attestation provider before
> releasing to end users.** You'll need to [register your app with a production App Check attestation provider](https://firebase.google.com/docs/ai-logic/app-check) (for example, Play Integrity) so that your end-users can use your feature with App Check enforced.
### Initialize the generative model
> [!NOTE]
> **Note:** The latest Gemini 3.x Flash and Flash-Lite models are now available as stable versions. [Learn more about the models supported by Firebase AI Logic](https://firebase.google.com/docs/ai-logic/models).
Start by instantiating a `GenerativeModel` and specifying the model name:
### Kotlin
```kotlin
// Start by instantiating a GenerativeModel and specifying the model name:
val model = Firebase.ai(backend = GenerativeBackend.googleAI())
.generativeModel("gemini-3.5-flash")
```
### Java
```java
GenerativeModel firebaseAI = FirebaseAI.getInstance(GenerativeBackend.googleAI())
.generativeModel("gemini-3.5-flash");
GenerativeModelFutures model = GenerativeModelFutures.from(firebaseAI);
```
Learn more about the [available models](https://firebase.google.com/docs/ai-logic/models) for use with the Gemini
Developer API. You can also learn more about
[configuring model parameters](https://firebase.google.com/docs/ai-logic/model-parameters?api=dev).
## Interact with the Gemini Developer API from your app
Now that you've set up Firebase and your app to use the SDK, you're ready to
interact with the Gemini Developer API from your app.
### Generate text
To generate a text response, call `generateContent()` with your prompt.
### Kotlin
```kotlin
scope.launch {
val response = model.generateContent("Write a story about a magic backpack.")
}
```
### Java
```java
Content prompt = new Content.Builder()
.addText("Write a story about a magic backpack.")
.build();
ListenableFuture response = model.generateContent(prompt);
Futures.addCallback(response, new FutureCallback() {
@Override
public void onSuccess(GenerateContentResponse result) {
String resultText = result.getText();
}
@Override
public void onFailure(Throwable t) {
t.printStackTrace();
}
}, executor);
```
### Generate text from images and other media
You can also generate text from a prompt that includes text plus images or other
media. When you call `generateContent()`, you can pass the media as inline data.
For example, to use a bitmap, use the `image` content type:
### Kotlin
```kotlin
scope.launch {
val response = model.generateContent(
content {
image(bitmap)
text("what is the object in the picture?")
}
)
}
```
### Java
```java
Content content = new Content.Builder()
.addImage(bitmap)
.addText("what is the object in the picture?")
.build();
ListenableFuture response = model.generateContent(content);
Futures.addCallback(response, new FutureCallback() {
@Override
public void onSuccess(GenerateContentResponse result) {
String resultText = result.getText();
}
@Override
public void onFailure(Throwable t) {
t.printStackTrace();
}
}, executor);
```
To pass an audio file, use the `inlineData` content type:
### Kotlin
```kotlin
scope.launch {
val contentResolver = applicationContext.contentResolver
contentResolver.openInputStream(audioUri).use { stream ->
stream?.let {
val bytes = it.readBytes()
val prompt = content {
inlineData(bytes, "audio/mpeg") // Specify the appropriate audio MIME type
text("Transcribe this audio recording.")
}
val response = model.generateContent(prompt)
}
}
}
```
### Java
```java
ContentResolver resolver = applicationContext.getContentResolver();
try (InputStream stream = resolver.openInputStream(audioUri)) {
File audioFile = new File(new URI(audioUri.toString()));
int audioSize = (int) audioFile.length();
byte[] audioBytes = new byte[audioSize];
if (stream != null) {
stream.read(audioBytes, 0, audioBytes.length);
stream.close();
// Provide a prompt that includes audio specified earlier and text
Content prompt = new Content.Builder()
.addInlineData(audioBytes, "audio/mpeg") // Specify the appropriate audio MIME type
.addText("Transcribe what's said in this audio recording.")
.build();
// To generate text output, call `generateContent` with the prompt
ListenableFuture response = model.generateContent(prompt);
Futures.addCallback(response, new FutureCallback() {
@Override
public void onSuccess(GenerateContentResponse result) {
String text = result.getText();
Log.d(TAG, (text == null) ? "" : text);
}
@Override
public void onFailure(Throwable t) {
Log.e(TAG, "Failed to generate a response", t);
}
}, executor);
} else {
Log.e(TAG, "Error getting input stream for file.");
// Handle the error appropriately
}
} catch (IOException e) {
Log.e(TAG, "Failed to read the audio file", e);
} catch (URISyntaxException e) {
Log.e(TAG, "Invalid audio file", e);
}
```
And to provide a video file, continue using the `inlineData` content type:
### Kotlin
```kotlin
scope.launch {
val contentResolver = applicationContext.contentResolver
contentResolver.openInputStream(videoUri).use { stream ->
stream?.let {
val bytes = it.readBytes()
val prompt = content {
inlineData(bytes, "video/mp4") // Specify the appropriate video MIME type
text("Describe the content of this video")
}
val response = model.generateContent(prompt)
}
}
}
```
### Java
```java
ContentResolver resolver = applicationContext.getContentResolver();
try (InputStream stream = resolver.openInputStream(videoUri)) {
File videoFile = new File(new URI(videoUri.toString()));
int videoSize = (int) videoFile.length();
byte[] videoBytes = new byte[videoSize];
if (stream != null) {
stream.read(videoBytes, 0, videoBytes.length);
stream.close();
// Provide a prompt that includes video specified earlier and text
Content prompt = new Content.Builder()
.addInlineData(videoBytes, "video/mp4")
.addText("Describe the content of this video")
.build();
// To generate text output, call generateContent with the prompt
ListenableFuture response = model.generateContent(prompt);
Futures.addCallback(response, new FutureCallback() {
@Override
public void onSuccess(GenerateContentResponse result) {
String resultText = result.getText();
System.out.println(resultText);
}
@Override
public void onFailure(Throwable t) {
t.printStackTrace();
}
}, executor);
}
} catch (IOException e) {
e.printStackTrace();
} catch (URISyntaxException e) {
e.printStackTrace();
}
```
Similarly, you can also pass PDF (`application/pdf`) and plain text
(`text/plain`) documents by passing their respective MIME Type as a parameter.
### Multi-turn chat
You can also support multi-turn conversations. Initialize a chat with the
`startChat()` function. You can optionally provide the model with a message
history. Then call the `sendMessage()` function to send chat messages.
### Kotlin
```kotlin
val chat = model.startChat(
history = listOf(
content(role = "user") { text("Hello, I have 2 dogs in my house.") },
content(role = "model") { text("Great to meet you. What would you like to know?") }
)
)
scope.launch {
val response = chat.sendMessage("How many paws are in my house?")
}
```
### Java
```java
Content.Builder userContentBuilder = new Content.Builder();
userContentBuilder.setRole("user");
userContentBuilder.addText("Hello, I have 2 dogs in my house.");
Content userContent = userContentBuilder.build();
Content.Builder modelContentBuilder = new Content.Builder();
modelContentBuilder.setRole("model");
modelContentBuilder.addText("Great to meet you. What would you like to know?");
Content modelContent = modelContentBuilder.build();
List history = Arrays.asList(userContent, modelContent);
// Initialize the chat
ChatFutures chat = model.startChat(history);
// Create a new user message
Content.Builder messageBuilder = new Content.Builder();
messageBuilder.setRole("user");
messageBuilder.addText("How many paws are in my house?");
Content message = messageBuilder.build();
// Send the message
ListenableFuture response = chat.sendMessage(message);
Futures.addCallback(response, new FutureCallback() {
@Override
public void onSuccess(GenerateContentResponse result) {
String resultText = result.getText();
System.out.println(resultText);
}
@Override
public void onFailure(Throwable t) {
t.printStackTrace();
}
}, executor);
```
### Generate images on Android with Nano Banana
> [!NOTE]
> **Note:** Gemini 3.1 Flash Image (`gemini-3.1-flash-image`, Nano Banana 2), Gemini 3 Pro Image (`gemini-3-pro-image`, Nano Banana Pro), and Gemini 3.1 Flash-Lite Image (`gemini-3.1-flash-lite-image`, Nano Banana 2 Lite) are now available as stable versions. Learn more about the capabilities of [Gemini 3.1 Flash Image](https://deepmind.google/models/gemini-image/flash/), [Gemini 3 Pro Image](https://deepmind.google/models/gemini-image/pro/), and [Gemini 3.1 Flash-Lite Image](https://deepmind.google/models/gemini-image/flash-lite/)
The Gemini Image models (a.k.a., Nano Banana models) can generate and edit
images by leveraging world knowledge and reasoning. They generate contextually
relevant images, seamlessly blending or interleaving text and image outputs.
They can also generate accurate visuals with long text sequences, and they
support conversational image editing while maintaining context.
This guide describes how to use the Gemini Image models (the Nano Banana models)
using the Firebase AI Logic SDK for Android. Find more details about
[generating images with Gemini](https://firebase.google.com/docs/ai-logic/generate-images-gemini?api=dev) in the Firebase documentation.
> [!NOTE]
> **Note:** Using Gemini models for image generation using the Firebase AI Logic SDK is in Preview. This means the feature isn't subject to any SLA or deprecation policy and could change in backward-incompatible ways.
 **Figure 2.** Use Google AI Studio to refine your Nano Banana image generation prompts for your Android app
#### Initialize the generative model
Instantiate a `GenerativeModel` and specify a Gemini Image model name (like
`gemini-3.1-flash-image`). Then, configure `responseModalities` to include both
`TEXT` and `IMAGE` to generate interleaved text and images. If you exclude
`TEXT`, then the model will only return images.
### Kotlin
```kotlin
val model = Firebase.ai(backend = GenerativeBackend.googleAI()).generativeModel(
modelName = "gemini-3.1-flash-image",
// Configure the model to respond with images (required) and text (optional)
generationConfig = generationConfig {
responseModalities = listOf(
ResponseModality.TEXT,
ResponseModality.IMAGE
)
}
)
```
### Java
```java
GenerativeModel ai = FirebaseAI.getInstance(GenerativeBackend.googleAI()).generativeModel(
"gemini-3.1-flash-image",
// Configure the model to respond with text and images (required)
new GenerationConfig.Builder()
.setResponseModalities(Arrays.asList(ResponseModality.TEXT, ResponseModality.IMAGE))
.build()
);
GenerativeModelFutures model = GenerativeModelFutures.from(ai);
```
#### Generate images (text-only input)
You can instruct a Gemini model to generate images by providing a text-only
prompt:
### Kotlin
```kotlin
scope.launch {
// Provide a text prompt instructing the model to generate an image
val prompt =
"A hyper realistic picture of a t-rex with a blue bag pack roaming a pre-historic forest."
// To generate image output, call `generateContent` with the text input
val generatedImageAsBitmap: Bitmap? = model.generateContent(prompt)
.candidates.first().content.parts.filterIsInstance()
.firstOrNull()?.image
}
```
### Java
```java
// Provide a text prompt instructing the model to generate an image
Content prompt = new Content.Builder()
.addText("Generate an image of the Eiffel Tower with fireworks in the background.")
.build();
// To generate an image, call `generateContent` with the text input
ListenableFuture response = model.generateContent(prompt);
Futures.addCallback(response, new FutureCallback() {
@Override
public void onSuccess(GenerateContentResponse result) {
// iterate over all the parts in the first candidate in the result object
for (Part part : result.getCandidates().get(0).getContent().getParts()) {
if (part instanceof ImagePart) {
ImagePart imagePart = (ImagePart) part;
// The returned image as a bitmap
Bitmap generatedImageAsBitmap = imagePart.getImage();
break;
}
}
}
@Override
public void onFailure(Throwable t) {
t.printStackTrace();
}
}, executor);
```
#### Edit images (text and image input)
You can ask a Gemini model to edit existing images by providing both text and
one or more images in your prompt:
### Kotlin
```kotlin
scope.launch {
// Provide a text prompt instructing the model to edit the image
val prompt = content {
image(bitmap)
text("Edit this image to make it look like a cartoon")
}
// To edit the image, call `generateContent` with the prompt (image and text input)
val generatedImageAsBitmap: Bitmap? = model.generateContent(prompt)
.candidates.first().content.parts.filterIsInstance().firstOrNull()?.image
// Handle the generated text and image
}
```
### Java
```java
// Provide an image for the model to edit
Bitmap bitmap = BitmapFactory.decodeResource(resources, R.drawable.scones);
// Provide a text prompt instructing the model to edit the image
Content promptcontent = new Content.Builder()
.addImage(bitmap)
.addText("Edit this image to make it look like a cartoon")
.build();
// To edit the image, call `generateContent` with the prompt (image and text input)
ListenableFuture response = model.generateContent(promptcontent);
Futures.addCallback(response, new FutureCallback() {
@Override
public void onSuccess(GenerateContentResponse result) {
// iterate over all the parts in the first candidate in the result object
for (Part part : result.getCandidates().get(0).getContent().getParts()) {
if (part instanceof ImagePart) {
ImagePart imagePart = (ImagePart) part;
Bitmap generatedImageAsBitmap = imagePart.getImage();
break;
}
}
}
@Override
public void onFailure(Throwable t) {
t.printStackTrace();
}
}, executor);
```
#### Iterate and edit images through multi-turn chat
For a conversational approach to image editing, you can use multi-turn chat.
This allows for follow-up requests to refine edits without needing to re-send
the original image.
First, initialize a chat with `startChat()`, optionally providing a message
history. Then, use `sendMessage()` for subsequent messages:
### Kotlin
```kotlin
scope.launch {
// Create the initial prompt instructing the model to edit the image
val prompt = content {
image(bitmap)
text("Edit this image to make it look like a cartoon")
}
// Initialize the chat
val chat = model.startChat()
// To generate an initial response, send a user message with the image and text prompt
var response = chat.sendMessage(prompt)
// Inspect the returned image
var generatedImageAsBitmap: Bitmap? = response
.candidates.first().content.parts.filterIsInstance().firstOrNull()?.image
// Follow up requests do not need to specify the image again
response = chat.sendMessage("But make it old-school line drawing style")
generatedImageAsBitmap = response
.candidates.first().content.parts.filterIsInstance().firstOrNull()?.image
}
```
### Java
```java
// Provide an image for the model to edit
Bitmap bitmap = BitmapFactory.decodeResource(resources, R.drawable.scones);
// Initialize the chat
ChatFutures chat = model.startChat();
// Create the initial prompt instructing the model to edit the image
Content prompt = new Content.Builder()
.setRole("user")
.addImage(bitmap)
.addText("Edit this image to make it look like a cartoon")
.build();
// To generate an initial response, send a user message with the image and text prompt
ListenableFuture response = chat.sendMessage(prompt);
// Extract the image from the initial response
ListenableFuture initialRequest = Futures.transform(response,
result -> {
for (Part part : result.getCandidates().get(0).getContent().getParts()) {
if (part instanceof ImagePart) {
ImagePart imagePart = (ImagePart) part;
return imagePart.getImage();
}
}
return null;
}, executor);
// Follow up requests do not need to specify the image again
ListenableFuture modelResponseFuture = Futures.transformAsync(
initialRequest,
generatedImage -> {
Content followUpPrompt = new Content.Builder()
.addText("But make it old-school line drawing style")
.build();
return chat.sendMessage(followUpPrompt);
}, executor);
// Add a final callback to check the reworked image
Futures.addCallback(modelResponseFuture, new FutureCallback() {
@Override
public void onSuccess(GenerateContentResponse result) {
for (Part part : result.getCandidates().get(0).getContent().getParts()) {
if (part instanceof ImagePart) {
ImagePart imagePart = (ImagePart) part;
Bitmap generatedImageAsBitmap = imagePart.getImage();
break;
}
}
}
@Override
public void onFailure(Throwable t) {
t.printStackTrace();
}
}, executor);
```
#### Considerations and limitations
Note the following considerations and limitations:
- **Output Format**: Images are generated as PNGs with a maximum dimension of 1024 px.
- **Input Types**: The model doesn't support audio or video inputs for image generation.
- **Language Support** : For best performance, use the following languages: English (`en`), Mexican Spanish (`es-mx`), Japanese (`ja-jp`), Simplified Chinese (`zh-cn`), and Hindi (`hi-in`).
- **Generation Issues** :
- Image generation may not always trigger, sometimes resulting in text-only output. **Try asking for image outputs explicitly** (for example, "generate an image", "provide images as you go along", "update the image").
- The model may stop generating partway through. **Try again or try a
different prompt**.
- The model may generate text as an image. **Try asking for text outputs
explicitly** (for example, "generate narrative text along with illustrations").
For more details, see the [Firebase documentation](https://firebase.google.com/docs/ai-logic/generate-images-gemini?api=dev).
## Next steps
After setting up your app, consider the following next steps:
- Review the Android Quickstart Firebase [sample app](https://github.com/firebase/quickstart-android/tree/master/firebase-ai) and the [Android AI Sample Catalog](https://github.com/android/ai-samples) on GitHub.
- [Prepare your app for production](https://firebase.google.com/docs/ai-logic/production-checklist), including [setting up Firebase App Check](https://firebase.google.com/docs/ai-logic/app-check) to protect the Gemini API from abuse by unauthorized clients.
- Learn more about Firebase AI Logic in the [Firebase documentation](https://firebase.google.com/docs/ai-logic/get-started?api=dev).