Android アプリの重要な特長の一つとして、実行する「アクション」に基づいて、別のアプリにユーザーを送信する機能があります。たとえば、アプリが保存しているお店やサービスの住所データを地図上に表示する場合、そのアプリ内に地図を表示するアクティビティをビルドする必要はありません。代わりに Intent 使用して、住所を表示するリクエストを作成できます。これに基づいて、Android システムが、地図上に住所を表示できるアプリを起動します。
最初のクラスの初めてのアプリを作成するで説明したように、自分のアプリ内のアクティビティ間を移動する際に、インテントを使用する必要があります。この場合は通常、起動するコンポーネントの正確なクラス名を定義する「明示的インテント」を使用します。しかし、「地図を表示する」など、別のアプリにアクションを実行させる場合は、「暗黙的インテント」を使用する必要があります。
このレッスンでは、特定のアクションを対象とする暗黙的インテントを作成する方法や、暗黙的インテントを使用して、別のアプリ内でアクションを実行するアクティビティを開始する方法について説明します。また、暗黙的インテント用のランタイム チェックを組み込む理由については、以下の動画をご覧ください。
暗黙的インテントをビルドする
暗黙的インテントは、開始するコンポーネントのクラス名を宣言せず、代わりに実行するアクションを宣言します。アクションは、表示、編集、送信、取得など、実行する処理を指定します。
インテント アクションとデータを関連付ける
インテントには、表示する住所や送信するメール メッセージなど、アクションに関連付けられたデータが格納されることもよくあります。作成するインテントに応じて、Uri など、各種のデータタイプが格納されます。インテントによっては、データをまったく必要としない場合もあります。
データが Uri である場合は、シンプルな Intent() コンストラクタを使用して、アクションとデータを定義できます。
たとえば、電話番号を指定する Uri データを使用して、通話を開始するインテントを作成する方法を以下に示します。
Kotlin
val callIntent: Intent = Uri.parse("tel:5551234").let { number ->
    Intent(Intent.ACTION_DIAL, number)
}
Java
Uri number = Uri.parse("tel:5551234");
Intent callIntent = new Intent(Intent.ACTION_DIAL, number);
自分のアプリが startActivity() を呼び出すことでインテントを呼び出すと、別の電話アプリが、指定された電話番号への通話を開始します。
ほかに 2 つのインテント(およびそのアクションと Uri データのペア)の例を以下に示します。
地図を表示する
Kotlin
// Map point based on address
val mapIntent: Intent = Uri.parse(
        "geo:0,0?q=1600+Amphitheatre+Parkway,+Mountain+View,+California"
).let { location ->
    // Or map point based on latitude/longitude
    // val location: Uri = Uri.parse("geo:37.422219,-122.08364?z=14") // z param is zoom level
    Intent(Intent.ACTION_VIEW, location)
}
Java
// Map point based on address
Uri location = Uri.parse("geo:0,0?q=1600+Amphitheatre+Parkway,+Mountain+View,+California");
// Or map point based on latitude/longitude
// Uri location = Uri.parse("geo:37.422219,-122.08364?z=14"); // z param is zoom level
Intent mapIntent = new Intent(Intent.ACTION_VIEW, location);
ウェブページを表示する
Kotlin
val webIntent: Intent = Uri.parse("https://www.android.com").let { webpage ->
    Intent(Intent.ACTION_VIEW, webpage)
}
Java
Uri webpage = Uri.parse("https://www.android.com");
Intent webIntent = new Intent(Intent.ACTION_VIEW, webpage);
インテントにエクストラを追加する
他の種類の暗黙的インテントは、文字列など、さまざまなデータタイプを提供する「エクストラ」データを必要とします。さまざまな putExtra() メソッドを使用することで、エクストラ データを 1 つまたは複数追加できます。
デフォルトでは、インテント内に格納されている Uri データに基づいて、インテントに必要とされる適切な MIME タイプが自動的に決定されます。インテント内に Uri を格納していない場合、通常は setType() を使用して、インテントに関連付けられるデータタイプを指定することをおすすめします。MIME タイプを詳細に設定することで、インテントが受け取るアクティビティの種類を指定できます。
ここでは、目的のアクションを指定するためのエクストラ データを追加しているインテントの例を示します。
添付ファイル付きのメールを送信する
Kotlin
Intent(Intent.ACTION_SEND).apply {
    // The intent does not have a URI, so declare the "text/plain" MIME type
    type = "text/plain"
    putExtra(Intent.EXTRA_EMAIL, arrayOf("jan@example.com")) // recipients
    putExtra(Intent.EXTRA_SUBJECT, "Email subject")
    putExtra(Intent.EXTRA_TEXT, "Email message text")
    putExtra(Intent.EXTRA_STREAM, Uri.parse("content://path/to/email/attachment"))
    // You can also attach multiple items by passing an ArrayList of Uris
}
Java
Intent emailIntent = new Intent(Intent.ACTION_SEND);
// The intent does not have a URI, so declare the "text/plain" MIME type
emailIntent.setType(HTTP.PLAIN_TEXT_TYPE);
emailIntent.putExtra(Intent.EXTRA_EMAIL, new String[] {"jan@example.com"}); // recipients
emailIntent.putExtra(Intent.EXTRA_SUBJECT, "Email subject");
emailIntent.putExtra(Intent.EXTRA_TEXT, "Email message text");
emailIntent.putExtra(Intent.EXTRA_STREAM, Uri.parse("content://path/to/email/attachment"));
// You can also attach multiple items by passing an ArrayList of Uris
カレンダーの予定を作成する
注: このカレンダーの予定用のインテントは、API レベル 14 以降に限りサポートされます。
Kotlin
// Event is on January 23, 2021 -- from 7:30 AM to 10:30 AM.
Intent(Intent.ACTION_INSERT, Events.CONTENT_URI).apply {
    val beginTime: Calendar = Calendar.getInstance().apply {
        set(2021, 0, 23, 7, 30)
    }
    val endTime = Calendar.getInstance().apply {
        set(2021, 0, 23, 10, 30)
    }
    putExtra(CalendarContract.EXTRA_EVENT_BEGIN_TIME, beginTime.timeInMillis)
    putExtra(CalendarContract.EXTRA_EVENT_END_TIME, endTime.timeInMillis)
    putExtra(Events.TITLE, "Ninja class")
    putExtra(Events.EVENT_LOCATION, "Secret dojo")
}
Java
// Event is on January 23, 2021 -- from 7:30 AM to 10:30 AM.
Intent calendarIntent = new Intent(Intent.ACTION_INSERT, Events.CONTENT_URI);
Calendar beginTime = Calendar.getInstance();
beginTime.set(2021, 0, 23, 7, 30);
Calendar endTime = Calendar.getInstance();
endTime.set(2021, 0, 23, 10, 30);
calendarIntent.putExtra(CalendarContract.EXTRA_EVENT_BEGIN_TIME, beginTime.getTimeInMillis());
calendarIntent.putExtra(CalendarContract.EXTRA_EVENT_END_TIME, endTime.getTimeInMillis());
calendarIntent.putExtra(Events.TITLE, "Ninja class");
calendarIntent.putExtra(Events.EVENT_LOCATION, "Secret dojo");
注: できる限り具体的に Intent を定義するようにしてください。たとえば、ACTION_VIEW インテントを使用して画像を表示する場合、image/* の MIME タイプを指定することをおすすめします。これにより、他のタイプのデータを「表示」できるアプリ(地図アプリなど)がインテントによってトリガーされないようにします。
インテントを使用してアクティビティを開始する
Intent を作成し、エクストラ情報を設定したら、startActivity() を呼び出してシステムに送信します。
Kotlin
startActivity(intent)
Java
startActivity(intent);
インテントを受け取るアプリがない状況に対処する
多くのインテントは、デバイスにインストールされている別のアプリ(電話、メール、カレンダー アプリなど)によって正常に処理されますが、アプリは、インテントを処理できるアクティビティがない状況に備えておく必要があります。インテントを呼び出すときは常に、ActivityNotFoundException をキャッチできるようにしておきます。これは、アプリのインテントを処理できるアクティビティが他にない場合に発生します。
Kotlin
try {
    startActivity(intent)
} catch (e: ActivityNotFoundException) {
    // Define what your app should do if no activity can handle the intent.
}
Java
try {
    startActivity(intent);
} catch (ActivityNotFoundException e) {
    // Define what your app should do if no activity can handle the intent.
}
この例外をキャッチしたら、アプリで次に行う動作を決定します。この次のステップは、呼び出すインテントの特性によって異なります。たとえば、インテントを処理できるアプリが具体的にわかっている場合は、そのアプリをダウンロードするためのリンクをユーザーに提供します(Google Play 上の自分のプロダクトにリンクする方法を参照)。
確認ダイアログ
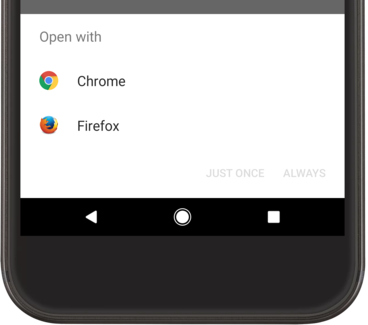
インテントを処理できるアクティビティが複数あると判明した場合、図 1 に示すように、使用するアプリを選択できるダイアログ(別名「確認ダイアログ」)が表示されます。インテントを処理できるアクティビティが 1 つのみの場合、システムはすぐにそのアクティビティを開始します。

図 1. インテントを処理できるアプリが複数あるときに表示される選択ダイアログの例
完全な例
次に、マップを表示するためのインテントを作成し、そのインテントを処理するアプリが存在することを確認してから起動する、一連の方法について例を示します。
Kotlin
// Build the intent.
val location = Uri.parse("geo:0,0?q=1600+Amphitheatre+Parkway,+Mountain+View,+California")
val mapIntent = Intent(Intent.ACTION_VIEW, location)

// Try to invoke the intent.
try {
    startActivity(mapIntent)
} catch (e: ActivityNotFoundException) {
    // Define what your app should do if no activity can handle the intent.
}
Java
// Build the intent.
Uri location = Uri.parse("geo:0,0?q=1600+Amphitheatre+Parkway,+Mountain+View,+California");
Intent mapIntent = new Intent(Intent.ACTION_VIEW, location);

// Try to invoke the intent.
try {
    startActivity(mapIntent);
} catch (ActivityNotFoundException e) {
    // Define what your app should do if no activity can handle the intent.
}
アプリチューザを表示する

図 2. チューザ ダイアログ
Intent を startActivity() に渡してアクティビティを開始したとき、インテントに応答できるアプリが複数あった場合、ユーザーは、デフォルトで使用するアプリを選択できます(ダイアログの下部にあるチェックボックスをオンにします。図 1 を参照)。この機能は、対象のアクションを実行するときにユーザーが毎回同じアプリを使用することを希望している場合に便利です。たとえば、多くのユーザーは、ウェブページを開くときは 1 つのウェブブラウザだけを使用し、また、写真を撮影するときは 1 つのカメラアプリだけを使用します。
一方、実行対象のアクションが複数のアプリによって処理できる場合、ユーザーは毎回異なるアプリを選ぶかもしれません。たとえば「共有」アクションでは、アイテムの共有に使用するアプリが複数ある可能性があります。この場合、図 2 に示すように、チューザ ダイアログを明示的に表示する必要があります。チューザ ダイアログによって、ユーザーは、使用するアプリをアクションごとに毎回選択します(アクションのデフォルト アプリを選択することはできません)。
チューザを表示するには、createChooser() を使用して Intent を作成し、startActivity() に渡します。たとえば、次のようになります。
Kotlin
val intent = Intent(Intent.ACTION_SEND)

// Create intent to show chooser
val chooser = Intent.createChooser(intent, /* title */ null)

// Try to invoke the intent.
try {
    startActivity(chooser)
} catch (e: ActivityNotFoundException) {
    // Define what your app should do if no activity can handle the intent.
}
Java
Intent intent = new Intent(Intent.ACTION_SEND);

// Create intent to show chooser
Intent chooser = Intent.createChooser(intent, /* title */ null);

// Try to invoke the intent.
try {
    startActivity(chooser);
} catch (ActivityNotFoundException e) {
    // Define what your app should do if no activity can handle the intent.
}
これにより、
createChooser() メソッドに渡されたインテントに応答するアプリのリストがダイアログに表示されます。アクションが
ACTION_SEND でも
ACTION_SEND_MULTIPLE でない場合は、title パラメータを指定できます。

